Showing posts with label Mechanics. Show all posts

Wednesday, 18 November 2015

SWIMPLATFORM EXTENTIONS


http://boatnutmagazine.com/


           SWIMPLATFORM EXTENTIONS


It is popular now a days to modify our boats and add the accessories that we see on new boats, to change the issues that older boats were plaiged with in the 80s and 90s. Boat owners are doing things as simple as changing to LED lights right through to adding oversize swim platform extensions and everything in between. Trying to create a more up to date and usable boat, is this a good idea? Will these type of modification affect the performance of the boat (both mechanical and ride performance). I have operated a few boats where the addition of accessories had completely destroyed the performance of the boat. Unfortunately it always seems to be the first time boat buyer who ends up owning these boats, the seller knows the boat is no longer performing but the new boater has nothing to compare the boat to and assumes the ride is natural.

What are the problems associated with installing accessories like swim plat forms, radar arches, generators, extra batteries and other weight and load changing items to our boats. All boats that come to market are designed with several important standards and measurements in mind, these include floatation, center of gravity and load weight balance. The boats are engineered and weighed with full loads this includes fuel, fresh water, batteries all of the systems that the boat was designed to have and use from the factory. Changes to any of these measurements will change the way the boat handles and performs.

 By adding weight you affect the way the boat sits in the water when at the dock. This can include a list to one side, a drop in the water line (aft, forward or over all). These change can and will affect exhaust flow, safe height for thru hull locations from the water line, proper operation of bilge pumps, and of course the ability for floatation that the manufacturer installs to work correctly or at all. In the case of a list many boaters try to counter act it by adding more dead weight to the high side making the situation worse. The moment that you have changed the load enough to create a change at the water line you have changed the way the boat will perform. Keeping in mind I have not allowed for all your personal items you keep on the boat and for some boaters this can be the equivilent of a pick up truck load of items of all shapes, weight and description.

  Lets go over the main items we add to our boats now a days to make them more up to date:


Swim platform extension: The first question you need to ask is did my boat come with this option what was the size and how was it mounted. Am I running the correct engine package combination to accept this accessory. Quite often the boat you have did not have the platform added at the factory due to the fact that the boat has V6 power rather than V8 power or you may have a single engine rather than a twin engine combination. Possibly the boat came optioned with a bundle of accessories that you don't have and this could include counter weight items that are moved forward such as a generator in front of the motors to offset a heavier transom load. If you are planning to add a platform to a boat that did not come with this option here are the things you need to consider.
  • What is a reasonable size. You may want a patio back there but can you see it from the helm, how much extra in slip fees will this cost you as you are changing the length over all. What are you really using the swim platform for, is it just to make boarding the boat easier and are you looking to mount a BBQ. How will this change the way I tie my boat up during bad weather
    .
  • How much does it weigh. Load weight right on the transom is one of the evasive changes to a boat you can make. The reason for this is you are directly affecting the center of gravity. This will change the way the boat planes, the affect of the trim tabs and drive trim. The depth of water the drives are in at the dock, and the exhaust flow. If you have thru hull exhaust you can sink the ports under the water completely or only part way either is not a good thing. this can increase the back pressure on the motor, and possibly leave the mufflers full of water at all times. In the case of and inboard out board it will change the height of the exhaust water in the bull horn ( the exhaust outlet at the back of the motor) outing stress on the flapper valves and increasing the opportunity to hydrolic the motor on shut down or while backing up. Both of these situations are expensive to repair and can blow a motor.  

  • How will the hull run after. A swim platform can create several bad situations if it is not designed to match the boat correctly. If the platform is mounted down low two important effects can happen. the first is suction this is when the bow of the boat starts to lift and the platform is right down in or at the surface of the water, this creates a vacuum effect were the boat has to power past and pull the platform out of the water. When this happens the boat lays bow up for way to long and with out enough power will not plane at all. The second is the following sea scenario were the platform act like a trim tab and lifts the back of the boat out of the water. As the waves roll up behind they get under the platform and have no were to break so it just lifts the boat up and can create a situation were you can no longer control the boats direction. This same situation will show itself while trying to back down or if you are floating or at anchor. The boat can actually come right around on you and you will be facing the direction you were coming from in a second!

  • What will it be mounted to. There are three ways to mount an extension, over the platform, under the platform or directly to the transom. Most over platforms mount this way to prevent the trim tab effect, the silly part of this is the platform is useless as the platform sits a foot or more out of the water. they look more like a back deck than a swim platform. The second is under mount this is generally how the factory installs platform extensions. it is clean neat and functional, But you need to restrict the size try to stay close to the factories sizes any more and you will probably find it floating past you one day. You must be sure that all the interior support structure is in the boat to do this as the bolts go up through the bottom of the platform hull area. Just because the boat was designed for this does not mean that the support structure is in the boat. The third is way is to mount right to the boat transom, picking the right height and being sure that the structure of the transom is solid is important. You do not want to half ass this mounting set up. Quite often there are issues with this set up as a larger platform will require different bolt patterns and support bars. Check the engine compartment first you may have steering bars, pumps, or your motors may be so close that placing support bars were they need to be maybe impossible. Try to remember that in some cases the reason for the factory installing small platforms is an engineering issue not just due to the fact that they were not wanting to do more.

  • What do you want the extension for. If you want a functioning platform than you probably will not like the over mount platform at all, the platform can be unusable for swimming and re boarding. This falls into a safety issue as well if you have high decks or deck sides you need to be able to get down to the water in the case of an accident. It would be ridiculous to attempt to get a hurt person up more than a foot out of the water on this type of platform. In some cases that the re boarding issue, if you feel over board was the only reason the factory put any platform at all on the boat. Not all accessories were created for there good looks they just had to function. If you are just trying to add length seriously sell the boat and buy a bigger one.
Just do not assume that the extension you buy or have built will work you need to consider a lot of things before you slap three feet of floor on the back of your boat!   It can turn out fantastic or be the biggest failure and destroy the performance characteristics of a great boat.
    Davit Systems fall under the same rules as adding a platform they are both transom load weight additions. You must make the same considerations to the boat in either case, The difference with a davit system is that you can calculate the weight load and have a marine engineer or the manufacturer inform you of its feasibility and the effects of the weight. If you buy a boat with a davit system be sure you find out the recommended load before you just load your sea doo or tender.

      To guarantee access to all of  Boat Nut Magazine articles, pictures and featured services visit the official Boat Nut Magazine ©™ website. Be sure to reply to the Boat Nut Association registration on our site for the latest Boat Nut weekly and monthly news letters and opportunities.


      Copyright 2015 © Boat Nut Media, Toronto, Ontario. All rights reserved. No part of this information/publications may be stored in a retrieval system, transmitted, or reproduced in any way, including but not limited to photocopy, magnetic, or other record, without prior agreement and written permission of the publisher, Boat Nuts Media ©™ No liability is assumed with respect to the information provided. 
       

    Thursday, 26 March 2015

    Boat Service and Service Plans


    http://boatnutmagazine.com/


    Develop a Service Plan


    Do you really want to have boat ownership that can be budgeted? It can be done. Do not wait for something to break down, set up a service plan. This is done on much larger yachts however this idea has not trickled down to smaller pleasure boats, and I am not sure why. It makes so much sense rather than face big winterizing bills and spring start up bills every year, you should design an annual service program. We suggest you set out an annual arraignment with your service provider. This program will allow you pay an equal amount each month, based on the service provider scheduling regular visits to service your boat. You would provide a list of services based on the hours of operation put on the boat and the trips you may have planned. These service visits are scheduled for each month, quarterly and annually. This not only benefit's the boater as you can create a budget for planned ownership, but the technician will have a year round income so he/she can plan tools, parts purchases, and staff.

    The boat owner has the advantage in this negotiation:

    1-The boater can negotiate the requested service to cover items you may normally do to save cash.
    2-Get the best rate as you are committing to a full year of service at a time.
    3-Purchase annual parts when you can buy them for the best prices.
    4- Not face large bills at the end or beginning of the season, and reduce the risk of break down.
    5- Hold the value of the boat as you can provide a service history, knowing that someone is keeping an eye on the boat at all times is a big selling point for buyers and security for yourself.
    6- Preventative maintenance goes a long way to keep up value and reliability.
    7- Boat owners can create a package which provides you with a cruise kit, every boater should have a cruise kit. This is a supply of parts that represents the standard list of components that are used regularly for service and breakdown. You can store this kit on the boat or bring it with you if you cruise long distance. A decent cruise kit will add value to your boat at the time of sale.

    As a boat owner you need to think about it this way for example if it costs you $3500.00 over a year this will convert to $292.00 per month, instead of seasonal hits and worrying about arraignment of service when you need it. You will also build a relationship with your service provider and your service provider with your boat. If your service provider is in your marina you can create a service plan which includes having the boat checked on in the case of weather or just a general check on a routine basis. Watching for loose lines, unauthorized entry or loose canvas for example. I am not sure why more boaters have not got together and set this up for groups of boats, if you and several of your neighboring boats use the same service provider then this program will be even easier to establish.
                                     
    You will need to create or have a service plan put together for your boat based on the propulsion configuration, the accessories on your boat, where your boat is moored, and the hours of use. Once you have all of this information then you must determine the recommended maintenance that all of these items require each year. This can be determined in most cases from access to published flat rate manuals, or from the manuals that you should have received when you purchased the boat. Establishing a service plan may take a little work but it will pay dividends for you the boat owner, you will be able to determine over all cost of owner ship (if you plug in the numbers of marina fees). If you are planning to buy a boat, and you take the time to complete a service plan you will be able to accurately determine the annual cost of ownership. I have seen a lot of boats sold when new boaters buy a boat and are shocked by the cost of ownership, this is why so many boats fall into disrepair or are not used. If you have put a service plan together be sure your insurance company is aware, this way if you have a claim the question of lack of maintenance by the boat owner is not questioned. This program will not stop major break downs however regular service should catch these types of failures before they happen, there are usually always signs of impending break downs.

    Boat Nut is designing a down load of a service plan outline, you will only need to enter the details to calculate ownership costs and provide recommended details to develop the best service plan for your boat.  You will be able to use this completed information to calculate the annual costs of a boat before you buy it or create a plan with your service provider. The download will also outline the information you should be asking for from your service provider to be sure that you have selected the correct provider for your needs. Do not assume that the marina or facility that you are using is screening service providers to be sure you sure protected. Also do not assume that if you are in a closed marina where you are having to deal with specific service providers that they are the service providers that they are the right for you or your boat. I personally disagree with closed yards, I believe that forcing relationships never works out well, you as the boat owner should be able to contact any service provider who can meet the criteria standard in the industry.

    When you purchase a new used boat it is very important to consider that the service you are receiving is within the parameters of your warranty requirements. quite often you will need to have the technician to sign off that he/she has completed the required service to the standard required and used the correct materials. The technician who signs off should be able to demonstrate that they are trained with a manufacturers certificate related to your service requirements. This will eliminate any questions should you need to process a claim for a failed component. These are the certificates that you see on the walls when you are in your service providers office. If the incorrect products or fluids are not used or you fail to keep up your service requirements than you run the risk of a rejected claim. When you consider the value of many of these components and the fact that you are probably paying for extended warranties, correct service is a necessity,  Establishing a sound service plan will save you head ache and dollars, and in the process you should have a boat with the highest reliability and a side line, you will be maintaining the highest resale value of the boat you own.

    Ask us about our new 2015 Services

    To guarantee access to all of  Boat Nut Magazine articles, pictures and featured services visit the official Boat Nut Magazine ©™ website. Be sure to reply to the Boat Nut Association registration on our site for the latest Boat Nut weekly and monthly news letters and opportunities.


    Copyright 2015 © Boat Nut Media, Toronto, Ontario. All rights reserved. No part of this information/publications may be stored in a retrieval system, transmitted, or reproduced in any way, including but not limited to photocopy, magnetic, or other record, without prior agreement and written permission of the publisher, Boat Nuts Media ©™ No liability is assumed with respect to the information provided.

    Wednesday, 18 March 2015

    Gas or Diesel, whats the better fit for you?


    http://boatnutmagazine.com/


    Gas or Diesel the age old question when buying a yacht?

    Identical 410's
    Gas- Tan Canvas (Top) Diesel- Black Canvas (Bottom)


    Boat Nut Media had a chance last fall to run identical 410 Silverton Sport Bridge Yachts one with twin big block gas motors and the other with a pair of cat diesels, so what were the differences? Does it make a difference when you are puttering along or cruising long distances, the answer is it does.

     The gas boat is powered with two big block 454 ci low hour motors, and is set up virtually identical to the diesel boat. The only difference is a washer dryer in the gas boat, which is countered in the diesel boat with an automatic shore power cord system, So the weight difference is mainly in the motors themselves. However we will say the gas boat sits approximately two inches higher than the diesel boat at the water line.

    Both boats were ran side by side down the lake for four hours on plain. The gas boat burnt $400.00 worth of fuel and the diesel burned approximately half of that $220.00. The boats were evenly matched for speed as a matter of fact the diesel boat could out run the gas boat if you pushed the throttle down and let the boats go. Why is this ? Well the gas boats props are at least 3 inches smaller in diameter, and the shafts on the diesel are a half an inch larger. This makes for a much smoother ride in the diesel as the running gear is larger you just do not feel like you are pushing the diesel hard at all. The diesel motors run at least 1700 RPM less at high speed than the gas motors.

    I must say the extra weight of the diesel motors make the ride very stable overall, boat movement is reduced. The gas boat has more transom lift this would be due to weight and the extended RPM range this 1700 RPM is translated into more water at higher speed passing the props thus creating more transom lift. Transom lift creates more roll from front to back in the gas boat than the diesel boat. The diesel boat just punches a big hole through the water it provides the same bow rise it just squats in the water at the aft. Thus creating a much larger wake out the back

    When departing the dock the diesel has substantially more push and more positive low speed control by the shifter's, this is directly related to the size of the props. Idle speed is also much faster with the diesel for the same reason, there is a larger volume of water passing the diesel boats props. The gas boat is also very manageable as well, but the reaction time from shift to movement is much tamer and slower. The gas boat will require more corrections for side wind or current. The first time you shift the diesel you may feel a little intimidated as it moves right away and quick. Neither one of these boats are equipped with thrusters so all docking moves must be made with the motors. When docking the gas boats gives you more reaction time to prepare for movement which can be a real plus for first time boaters, however this can bite you if you have an off the dock wind or current. At an idle at the dock the diesel can be dirty and smelly, as a matter of fact other boaters were not happy with long term idling . This though was partly due to the diesel motors requiring a general service. Although even with optimum fuel burn a diesel is a smelly proposition backed into the dock. This becomes worse in a diesel if you have the generator running also. On this model boat running the generator would probably all but eliminate the ability of sitting in the back cockpit or keeping the large sliding door open. A real draw back while at anchor. The gas does not seem to have this same effect on the usage of the aft deck or cabin door.

    When it comes to service these two boats are likely very close in maintenance costs, however if you had a starter or alternator go out the diesel, it would punch a hole in your wallet. Serious breakdowns will cost more with a diesel. Do not let this sway your decision making if a diesel receives regular run hours and correct maintenance then they will out last the gas motors two to one. The other upside to a diesel is there are less mechanical items to fail you there are no spark plugs no wires and no ignition system.

    I believe that the choice between gas and diesel comes down to running hours and and what performance you are looking for in a larger boat. A gas boat is ideal if you are not putting on a lot of hours and not going far, in other words a floating cottage. If you had a diesel in these conditions it would cost you more to keep it running, diesels need to run they do not do well sitting around they are more difficult to get running if they do not see time then gas engines. If you are an avid traveler and cruise your boat all the time and like to go distances than buy a diesel the fuel burn rate will give you extended range and they love to run under load for days at a time. You have to take a look at how you are going to use the boat, access to fuel, the cost of fuel, can you get service on a reliable basis and how fast you want to get there, I must say a good diesel turbo set up will blow the doors of a gas boat the same size all day. The last benefit to a diesel is they do not seem to care what you load on your boat they seem to perform pretty much the same way with or without the tender and all your gear on board, where you will surely notice the difference with gas motors they just do not develop he same torque, and torque is push!

    To guarantee access to all of  Boat Nut Magazine articles, pictures and featured services visit the official Boat Nut Magazine ©™ website. Be sure to reply to the Boat Nut Association registration on our site for the latest Boat Nut weekly and monthly news letters and opportunities.


    Copyright 2015 © Boat Nut Media, Toronto, Ontario. All rights reserved. No part of this information/publications may be stored in a retrieval system, transmitted, or reproduced in any way, including but not limited to photocopy, magnetic, or other record, without prior agreement and written permission of the publisher, Boat Nuts Media ©™ No liability is assumed with respect to the information provided.



    Basic Bravo Three and Volvo Duo Prop Service


     http://boatnutmagazine.com/

    Basic Bravo Drive Service / Volvo Duo Prop Service


    Be sure to also read the Alpha Basic service blog as there are details that will cross over and apply.
    Bravo  drives are easily identified  by their size, Bravo drives are much larger in size and are most identified with duo prop configuration. There are three common generations of Bravo drives. The first is the single prop bravo drive most common on boats from the 1980's, single prop drives are similar in service to the alpha drive only larger in size. It is the two Duo prop generations that we want to focus on in this service information. The reason why I have included the Volvo Duo Prop drive with the Bravo Three duo Prop are they are very similar to complete a basic service on.

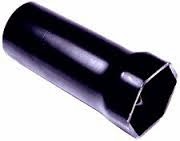
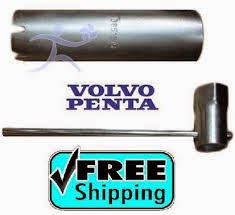
    There are some specialty tools you will need to purchase from your mercury or Volvo dealer to complete service. this is because the gear oil drain is located behind the props.

    1-  Prop Nut socket kit from Mercury Marine (Mercury will not fit Volvo)
    2-  Prop Nut Socket kit from Volvo Marine (Volvo will not fit Mercury)
    3-  Large straight screw driver for vent screw (Mercury)
    4-  Large set of metric Alan wrench's for drain screw (Volvo Marine)
    5-  5 one liter bottles of High Performance gear lube (Mercury Marine)
    6-  Volvo synthetic Gear lube from Volvo, you must use the synthetic gear lube in your Volvo drive        do not use Mercury High Performance
    7- Mercury Zinc Chromate primer (Mercury Marine)
    8- Mercury Phantom Black Spray paint (Mercury Marine)
    9- Volvo zinc Chromate primer (Volvo Marine)
    10- Volvo silver color match drive paint( Volvo Marine)
    11- Anode replacement kit for either Mercury Bravo Three Drive or Volvo Duo prop drive( you may require the drive serial number to be sure you get the correct parts. For Bravo Three you will locate the drive serial number on the top motor cover. On a Volvo you will locate the serial number for the drive on the motor cover.
    12- Mercury 2-4-c grease this can be used on either drive.
    13- Grease gun with underwater grease by either Mercury or Volvo.

    In either drive service case you will need a oil recovery container (oil drain pan). You will also need a one foot cut length of 2x4 to use as a prop wedge. The first step is to remove the props. Trim the drive down to a comfortable position to access the prop nuts and remove the props. Place the 2x4 wedge in between the edge of the large prop and the anti cavitation plate above the prop so the props cannot turn when you apply pressure with the correct prop nut socket on the small prop. These nuts may be very, very tight, they loosen by turning to the left. Once the small nut is removed you may find the prop tight to pull off, place a wooden block against the back of the prop on of the back of the blades and give the block a hit with a mallet, do not smash the block simply work your way around the blades until the prop pops off. Do not let the prop fall on the ground they are finally tuned stainless and can be bent with a fall onto concrete or hard surface. This will expose nut number two the large prop nut . Place the 2x4 in the same location between the end of the blade and the anti cavitation plate and loosen the same way. Once nut is removed take off the prop.

    You will now be able to see the drain screw in the very bottom of the bullet or gear case facing you. You will now need to trim the drive all the way down with the oil change tray under the drive, with the skeg set over the middle of the pan. You will then remove the drain screw which will have a small ring gasket on it. Then you will remove the vent screw which will be on the side of the gear case up high on the right hand side of the case. If you have a Volvo Duo Prop drive you can also remove the dip stick which is in the top middle of the gear case it looks like a large bolt with a slot for a screw drive in it. Now you will need to leave the drive for a couple of hours to completely drain down, this will also drain the reservoir bottle on the engine at the same time. Do not rush this.

    While this is going on its time to inspect the condition of the drive and the anodes. If the anodes show any bad break down or are missing install new ones, the kit will provide you with details of were to look for all the anodes that can be serviced. If you have areas were the paint is damaged then you will need to re spray and paint in these areas . Do not unless absolutely necessary sand and paint the whole drive. If you do this you are starting a process that will never end you will be painting the drive every year., the products that the drive was coated with from the factory are the best and are almost impossible to reproduce. Once you sand the drive you are immediately promoting corrosion. Do not paint any anodes they will not work if they are coated with paint. If you paint the anodes the props will become your anodes!

    When you are sure that all the gear lube is drained it is time to refill. Hook the gear oil pump up to the drain screw hole and begin to slowly pump gear oil into the drive with the large duo prop drives stop every five minutes and let the air get on top of the lube, a two min break is good enough and then continue to pump slowly until the gear lube is showing at the vent. Now leave every thing hooked up and take a ten minute break, come back and pump a little more until the slow flow out of the vent screw hole is steady with no air sputtering. Now you are full. Grab the drain screw and install a new seal ring and do the same to the vent screw. Install the vent screw (and in the case of a Volvo put the dip sick back in finger tight). Now remove the gear lube pump and replace the drain screw.
    and the vent screw. In the case of the Volvo Duo Prop you can confirm the gear oil level with the dip sick and then replace and tighten the dip stick.

    With the drive full of gear oil you must now go into the boat and fill up the reservoir on the engine . On the first trip you must recheck the level in this reservoir and if it drops some top it up. This is important and like the alpha reservoir there is a sensor and alarm on this bottle, if the gear oil level goes down to a low level it will send you a signal by providing a constant beeping at the dash when the ignition is on. I noted in the alpha service blog that the reservoir must be connected through the wire harness, if the sensor is not plugged in or the wires are modified get them fixed. Without this warning you will not know that the drive is consuming gear oil and the worst case the drive will blow up. If through the year you need to keep filling the reservoir then contact your authorized service provider and have them do a pressure test on the drive, and have the drive fixed if gear oil can escape then water can get in. This is a recipe for disaster.

                                                       
    On a Bravo Three Drive or the Volvo Duo Prop it is important that the trim up and down is smooth and even , If the drive trim is slow to react or the drive jolts on the way up or down you will need to grease the trim ram pins there are two one at thee front of the rams and one at the back, the way to do this is to remove the plastic end fitting on the ram pin, under this you will find either a nut or a clip remove one side and slide the pin out of one ram side only place some grease in the hole and slide the ram back in and reverse the procedure for the other side. try to do one side at a time if you remove the whole pin then you need to man handle the drive back into place to slide the pin through all the holes. In the case of a Mercury Bravo Three there is a yellow plastic spacer in the drive itself that must be re installed the correct way or your drive will not trim all the way down. In most cases this job can be a little intimidating and you may want to let your service provider handle this.

    There is no sea water pump in a Bravo Three or Volvo duo prop. So gear oil change, placing some grease on the prop shafts, a little paint, anodes and your basic service is done. If you see any zirk fittings for a grease gun to hook on give them a couple of pumps of grease and away you go.

    Things you must be aware of with Bravo Drives:

    1- Do not operate the shift unless the motor is running, all you are doing is stretching the shift cable
        this will cause shift problems.
    2- If you have Bravo Three drives and are a fishing nut then you are likely stressing the universal           joints and should have the drive pulled every year to keep an eye on the universal joints.
    3- Gear oil changes are key to the drives ability to sift because of the cone clutch.
    4- If you run fast a lot with the Bravo Drive the bearing at the very top of the drive gets hot and will       burn up, there is a kit you can buy that pick up water and dumps it on the top of the drive to cool         the housing and bearing, if you are running long distance it is a good idea to slow down and let the     top of the case wet down and cool occasionally.


    Example of a Bravo Shower

    5- Keep your props in good shape if you run with banged up props it is hard on the prop seals.
    6- Set out a service schedule were you have the drive pulled at regular hourly operation times or             annually for drive shaft, bearing and bellows inspection and service.
    7- If you have damage to the skeg or cavitation plate get this fixed, the aerate water around the props       will be disturbed and you will loose performance (this is true for any drive)
    8- If when you drain the gear lube the gear lube looks like a milk shake or has any water in it call            your service provider and have them pressure check the drive.
    9- Always replace the ring seals at the drain and vent screws after any service.

                                             
    Mercury Duo Prop Tool


    Things to be aware of with Volvo Duo Props:

    1- You actually loose less horse power through a Volvo drive.
    2- You have a dip stick in the top of the drive to check fluid level after you change the gear oil.
    3- Under the front cap of the drive There is the shift shaft this are should be lubed up to prevent corrosion, as there is a seal here that can allow water into the drive and if it is not lubed can create stiff shifts.
    4- You must use Volvo synthetic fluids appropriate for your application.
    5- If you are buying parts for your Volvo Duo Prop be sure of the serial number, and only by genuine    Volvo parts as after market parts quite often will fit but are not exactly right and you will be                 repairing again in a season,
    6- Do not try to remove the props without the right tool if you knock off any of the raised bumps on       the nut you will end up having to cut the nut off.
    7- Arrange with your service provider regular dive pull service to inspect the drive shaft, bearing and     the bellows this should be based on hours of operation or annually.

                                           
    Volvo Duo Prop Tool


    When we discuss service based on hours the standard is usually every 100 hours of operation or every year. A key fact is that most Inboard /Outboard boats that sink ,the cause is the bellows. The bellows are the rubber boots which surround the drive shaft and the shift shaft, some drives have exhaust bellows also. With age these bellows begin to crack and water starts to trickle in, a dead give away for bellows that are going bad is when the drive is pulled and there is water in the bellows and or the drive shaft is all rusty. Because of the proximity of the bellows to the water (under water) this is a repair you should have an insured and certified service provider complete the installation can be tricky and requires experience . Done wrong and your boat is on the bottom. This is why it is recommended not to store the boat with the drive trimmed up for long periods of time, if you have muskrats in your area they love to chew on the exposed bellows. So keep your drive in the all the way down position as much as you can.

                                               
    Example of Bellows Kit


    Never attempt a repair that you feel is over your head if you require detailed service information Email: boatnutmedia@gmail.com  and we will help you with any questions you may have.


    To guarantee access to all of  Boat Nut Magazine articles, pictures and featured services visit the official Boat Nut Magazine ©™ website. Be sure to reply to the Boat Nut Association registration on our site for the latest Boat Nut weekly and monthly news letters and opportunities.


    Copyright 2015 © Boat Nut Media, Toronto, Ontario. All rights reserved. No part of this information/publications may be stored in a retrieval system, transmitted, or reproduced in any way, including but not limited to photocopy, magnetic, or other record, without prior agreement and written permission of the publisher, Boat Nuts Media ©™ No liability is assumed with respect to the information provided.


    Monday, 16 March 2015

    Spring Boating : How to know if the boat is running the way it should


    http://boatnutmagazine.com/

    How do you know if your boat is operating right?


    There are a set of simple test tricks to know if your boat is performing the way it is expected to.
    Your boat has a basic set of parameters dictating performance expectations that the builder released when the boat was originally sold new, these numbers are an idea in most cases. These parameters would have or could have included information such as top speed, RPM at full throttle, weight of the vessel with full fuel and water, fuel burn expectations, etc. However after some engine operation hours your horsepower numbers will begin to drop off, the weight numbers will vary from boat to boat simply because some boaters will keep a lot of gear and items on their boat , other owners will have next to nothing. If you start to add accessories like a tender, radar arch, swim platform extension, a replacement swim platform or adding a big generator. Then you have definitely changed the weight of the vessel and could possibly have changed the center of gravity and created a load shift backward/forward or side to side of the vessels center line.

    Changing the load from the center line or changing the center of gravity will totally change the expected performance of the hull and the way the boat rides on the water. Large loads can create changes that the hull cannot recover from, an example of this is when the load shift from center line will no longer allow the hull to get on a natural plain position. The bow will simply not drop. The only way to fix this type of problem is to start changing props, modifying or installing a hook in the hull, this is a type of permanent trim tab. You can also add more weight to the fore ward hull. All of these modifications can bring the bow down, however all these modifications will mean that your fuel bill will climb substantially. A really good accessory designer will keep this information in mind and recommend installation location instructions specific to your make and model of boat. Adding accessories like extended swim platforms can really affect the performance of the hull when backing up or travelling in following sea conditions.

    This means that the new swim platform can act like a trim tab and keep the hull from rolling from bow to stern. This can create lift at the transom and make the boat very "transom loose". Which creates a situation were you loose the ability to steer the boat. In the worst case of operation in a following sea the back of the boat can be lifted up and come around to try and pass you. This is when the weight of the boat is being placed on the mounting point of your new swim platform and the water can rip it off.

    Other situation that can be created is a "list" when the load weight is not even from side to side, this situation is enhanced at high speed. The boat starts to lean over and becomes unstable. You can try to correct this with trim tabs but if this is a must all the time you must address the list. If you continue to run a boat with a list you will eventually stress the trim tab and the trim tab ram or trim tab will eventually give up. Balance from side to side is far more easily addressed than any other balance problems . The load on the boat can be moved around, the best place to start is with the batteries etc. If you find the boat is listing and slowly getting worse you may have a leak, and a floatation locker maybe slowly filling up. This type of leak can go on for a long time and never show any water in the bilge. To figure this problem out you will probably need to bring in a surveyor to tell you were this maybe taking place.

    When it comes to the engine there are some simple tell tail signs that you need to have some mechanical work done. What you need to do is start by reading the water, this means on a nice calm morning start the motor or motor(s) one at a time. Immediately go to the back of the boat and look at the exhaust water and the water around the back of the boat. If you see a slick of gas on the water then the motor is not cleanly burning all the gas it is consuming. This is the sign of requiring at least a tune up. If you have twins with thru hull exhaust check the water flow against each other, if one motor flows more than the other then you probably need to change a sea water pump impeller in the motor with less flow. This same trick can be used for inboard out board units. With the engines off trim the drives up and down and look for any oil slicks if there is a leak in a seal the small leak will create a slick on the surface of the water. For trim tabs use the same test. Any kind of slick is a sign that something is wrong! The water around the back of a boat that is running right will be clean.

    The exhaust smoke color can also tell you a lot about what is going on with the motors. White smoke is usually just steam. A little bit of white smoke is not a horrible thing on start up or after a long run coming off plain but it should clear up quickly. However white smoke that has a sweet smell means that you are burning antifreeze from your closed cooling system. Black smoke is carbon, which may just mean the boat needs a good high rpm run to clean up and heat up the motor, or it could be a sign of bad spark plugs. Blue smoke is oil, this is a sign that you have a motor that is getting tired, if it is just blue at the start then you have a valve train or ring problem and again will need to get this fixed. This means some type of engine tear down. Any off the above problems will affect the performance of the motor(s) and this will affect the boats performance.

    Take the boat for a ride and bring another driver with you. This is so you can read the water again. The information you can get from this is interesting. Look out the back off the boat while you power up through the rpm range, watch the wash coming off the back of the boat it should be even on both sides, when you do this "do not" use the trim tabs at all. Look at the prop wash and you should see a nice even flow of water, if you have twins the wash should be the same on both sides. When you get to 2500 plus rpm with twins if you match the rpm's on port and starboard motors the boat should start to sing. The sound will be even and matching (the sound should be like one motor). When this happens, run the boat like this for 15 min or so the sound should remain even and solid you will hear it if a motor starts to lag or miss immediately. With some experience doing this you will easily be able to pick out the motor that is acting up. Now take a peak up the sides of the hull and see were the water is breaking out from under the hull and how far the spray travels this will let you know if you are running with any list on plain.

    When you are out for your ride you can test the rpm ranges of your motor(s), you should have push all the way from idle speed right through the range. Check the following. When you push the throttle and the rpm increases quickly but the boat is slow to react or it sounds like the motor is not loading up (Slipping), or at the top end of the rpm range the maximum speed of the boat is obtained way before full throttle is obtained, and the last of the throttle range just increases the rpm only, These are signs that you have to re prop. The best way to do this is to call the engine manufacturers and they will ask you a series of questions to determine the best prop for the performance you are trying to achieve, improving the prop can make a huge difference in performance and fuel burn.

    These are simple tips but they really do work try them out on your boat or your friends boat. Reading this is may explain why quite often a mechanic will start the boat and step off the back and stare at the water he/she is reading the signs the boat are giving. A lot of times problems will show up here first before a break down. A boat is much like a car, it will tell you what is wrong, most cases long before a larger problem arises, the trick is to know what your boat is telling you.

    To guarantee access to all of  Boat Nut Magazine articles, pictures and featured services visit the official Boat Nut Magazine ©™ website. Be sure to reply to the Boat Nut Association registration on our site for the latest Boat Nut weekly and monthly news letters and opportunities.


    Copyright 2015 © Boat Nut Media, Toronto, Ontario. All rights reserved. No part of this information/publications may be stored in a retrieval system, transmitted, or reproduced in any way, including but not limited to photocopy, magnetic, or other record, without prior agreement and written permission of the publisher, Boat Nuts Media ©™ No liability is assumed with respect to the information provided.


    Saturday, 14 March 2015

    ALPHA DRIVE BASIC SERVICE


    http://boatnutmagazine.com/

    ALPHA DRIVE

    Detailed  Basic Spring Alpha Drive service list


    This basic service list will apply to Mercury Alpha Drive Generation 1 or Generation 2 .This is a basic list that the boat owner should be able to complete in the spring before launch. First you must be able to identify your drive type. First of all Alpha drives are single prop only, there is no alpha duo prop. Alpha drives are a smaller in size and weight. You can not identify your drive by the engine alone, Alpha drives came in combinations covering combinations from 4 cylinder (3 litre) to big block V8 motor (454 cyld).

    The alpha drive is the easiest to manage they are the lightest drive, in weight, one person can lift it and move it around with out help. The spring service list for the Alpha drive is as follows:
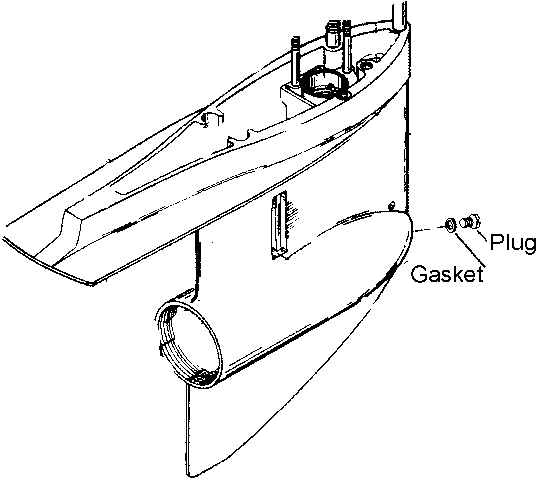
    1- On the sides of the bullet directly behind the prop near the front of the case you will locate a large drain screw (photo below c/w gasket) it can be removed with a large flat screw driver, Directly above this drain screw above all of the anti cavitation plates you will locate another identical screw this is the vent screw.

     First step after you locate the vent and drain screws is to remove the prop. when you remove the prop you should have  the prop nut, stainless steel nut lock which has small flanges that are bent back over the brass spacer(these small tabs will have to be bent away from the spacer), the brass spacer, the prop ,and behind the prop the thrust washer a large brass tapered washer. Inside the prop you may find a hub will slid out, Note: that the hub will only fit back in one way. (Photo of prop and hardware above). Get a large container (an oil change pan will work the best), be sure to trim your drive all the way down, this will orientate the drive skeg in the oil catch pan.With collection pan under the drive remove the drain screw and the vent screw. (Pictured in the diagrams below)

    2- Allow the gear oil to drain from the drive this will take at least an hour to complete. The longer you give the drive to drain the better the service will be, do not rush.
    3- While the gear oil is draining, it is time to take a look at the anodes these are clearly marked in the drive picture at the top of this post. If they are gone or are badly corrode you will need to change them. Anodes are your front line protection against corrosion.
    4-  If the drive has some area were the paint is damaged you can prime and paint just these areas, DO NOT unless it is really really necessary sand down the drive and respray  the whole thing. Once you do this you will be doing this every year! The products that the drive comes from the factory coated with are the very best and cannot be reproduced. Once these factory coatings are sanded the drive  does not have the same corrosion resistance any more. Just touch the drives up even this will start to become an annual thing to do.
    5-  Now  you can prepare to refill the drive with gear oil you will need to pick up a gear oil pump kit that attaches to the gear oil bottles these parts are available from your local mercury parts dealer (photo of pump and gear oil below)

    You will need 4 or 5 one litre containers of gear oil for the job. You will attach the pump to the filler screw hole at the bottom or on the bullet of the drive. Very slowly pump your gear oil back in the drive please go slow, the reason for this is, the gear oil must push the air out of all the passages on its way up to the vent screw hole. When you see new gear oil at the vent screw hole coming out stop. Waite five minutes and try to pump a little more you may get spits of oil and air at this time, if you do stop and try again after a couple of minutes. The gear oil at the vent should flow out evenly. Once you have determined that the drive is full you will re install the vent screw with a new ring gasket and then the drain screw with a new ring gasket (seal). Photo of vent screw and gasket above.
    The reason for new seals at the drain screw and vent screw  every time you service them is simple these are points were water can access the gear oil. After all the drain screw and vent screws are under  the water level.
    6- Clean the prop shaft and all of the prop parts with a clean dry rag. Place a thin layer of 2-4-C grease on the prop shaft and re install the prop. Be sure not to over tighten the prop nut. tighten until snug and then grab the prop and try to move back and forth on the shaft you will feel a slight bit of movement from the shaft a couple of millimeters, and then bend back the nut locks, you should only be bending the tabs that line up with the slots in the spacer.
    7-  On newer boats there is a gear oil reservoir on the top of the motor, you will now need to go in the boat and top this bottle to the operating rang mark.It drains down when the drive is draining.


     On your first run of the year check the gear oil level in the reservoir on the engine if the drive was filled to fast the drive will consume some of this gear oil and you will need to top the reservoir up again. A note about the gear oil reservoir, There is a sensor in this bottle and when the gear oil is low it will send a signal and you will receive a beeping alarm at the helm. Never ignore these alarms they are critical! I have seen many boats were the wires to the reservoir have been cut if this is the case fix the problem do not leave the drive reservoir unhooked or modified in any way, this is how a drive manages to blow up with out any notice. If you do not have a reservoir and alarm system than this service is even more critical, as it is the only way of verifying you have full, good clean gear oil in the drive.

    List of tools for this service:
    1-Mercury floating prop wrench, which every Alpha owner should have on the boat
    2-Pair of needle nose pliers
    3- Small mallet
    4- Set off screw drivers
    5- Extra large straight blade screw driver
    6- Metric socket set

    Parts required:
    1- 4 to 5 one litre mercury high performance gear oil
    2-Two replacement drain screw seals
    3- Anode kit if required fro Mercury Marine
    4- Mercury phantom black spray paint
    5- Mercury zinc chromate primer
    6- 2/4/C Mercury Grease

    Problems that you may have:
    A- Contaminated gear oil, this is gear oil that has been mixed with water. If when you drain the gear oil you have fluid that comes out looking like a green milk shake or if when you drain the gear oil there is water which has separated and poured out separately. If this is the case you will need to contact your Mercury Authorized service provider for repair. Quite often the problem is fishing line around the prop shaft behind the prop and against the prop shaft seal.
    B- Over heat problems or poor water flow to the engine, this is probably a water pump kit it is located inside the drive between the upper and lower gear case . The water pump should be serviced at least every two years.
    C- A clunking sound when you put the boat in gear Call your Mercury Service provider and get this checked there is a universal joint on the drive shaft between the motor and the drive.
    D- A vibration or constant odd sound from the back of the boat, there is a bearing in the transom housing that is held in a large rubber mounting this bearing is designed to carry the drive shaft through it and it can seize or start to fail
    E- Trim and Tilt wont work this is not an exterior problem, it is a trim pump issue
    F- The drive trim limit does not work, this is probably a trim limit sender issue you will need to call a Mercury Service technician to verify
                                             

    If you complete this basic service every year you will extend the life of your drive.


    To guarantee access to all of  Boat Nut Magazine articles, pictures and featured services visit the official Boat Nut Magazine ©™ website. Be sure to reply to the Boat Nut Association registration on our site for the latest Boat Nut weekly and monthly news letters and opportunities.


    Copyright 2015 © Boat Nut Media, Toronto, Ontario. All rights reserved. No part of this information/publications may be stored in a retrieval system, transmitted, or reproduced in any way, including but not limited to photocopy, magnetic, or other record, without prior agreement and written permission of the publisher, Boat Nuts Media ©™ No liability is assumed with respect to the information provided.

    Friday, 6 February 2015

    Helping Boaters

    http://boatnutmagazine.com/


    IS THE PLEASURE BOAT INDUSTRY REALLY HELPING THE BOATER?

    I have been a trouble shooter and certified technician in the pleasure boat industry for more than thirty years. Earning multiple industry and government certifications both international and here at home (Manufacturers and US Coast Guard). My trade has taken me to every state and province in the US and Canada. Completing projects for companies such as Sea Ray, Bayliner, Boston Whaler, Rinker, Tiara, Four Winns and Ranger to name a few. I have had repair shops in Ontario, Vancouver, Nanaimo and Florida. Working with dealers such as Olympic Boat Center and Marine Max. All these places and companies have given me a unique perspective on the pleasure boat industry and its consumers. There seems to be a disconnect with what information, education and services boaters really require ( as a group boaters are fractured into many groups, usually determined by the boat builder name such as Sea Ray owners Club , which marina or yacht club you belong to), every one has an opinion or free advice. Quite often this advice comes from industry outsiders and people who believe they have the answer. This not only makes things confusing but is often incorrect leaving the most important, accurate information not presented to the boater. In this industry there should be as much information as possible, based on fact. Which should be available to you when making decisions about boat purchases or  boating related services.

    Boat Nut Media wants to be your go to location for unbiased boating information, however we NEED your input to be sure we are providing boat owners and potential boaters with the information and training that makes sense to you. Without YOUR input we are just another boat media outlet that no one relies on to become informed, with no trust. It is important that any information or training is put in terms that the boater can easily understand. Our goal is to connect with boaters through social media relationships unlike other boat media outlets. For example, " Power Boat TV" with its 25 years on network television, and only 858 likes on their Facebook page. I was not shocked by this number,  but when you consider that they are unchallenged you would assume they are doing something right, are they that far off the mark of the boaters interest?

    Reviews for example,  I have not seen or read one yet that is a true representation of what a review is meant to be. Wouldn't it be great to have a "Top Gear" type of presentation. No fear of telling how it is, good, bad or just crap. When you consider what you the consumer spend on your boat purchase, not to mention what is spent to maintain and enjoy your boat. I would think there would be a market for an honest, fact based format. The question " is there enough interest by boaters"? the industry generally says no.

    Topics for this new web based media outlet could be boating safety, regional laws, destinations in your boating region (an example would be on lake Ontario where you can take in a play by boat), international border crossing (how the laws affect you). Real Reviews! We will even come out to your boat if you would like to have us on board (drive and review every boat possible). Hot Topics such as surveys, and service. How To advice that can actually be followed even if its just for you to understand what your paying for. (Which will be available on line for download specific to your boat). The ability to ask a question of your choice (there are no stupid questions) and get  quality answers. Information about planned development( such as what's going to happen at Ontario Place and what will happen to the marina), and much more.

    The only way Boat Nut Media will gain traction is if you the boat owner or new boater get involved. We have to prove to the industry that they are not listening or providing the content you need, so please respond with your thoughts to Boat Nut Media at our Email boatnutmedia@gmail.com , Twitter or on Facebook. Just drop us a comment good or bad or ask us a question. Boat Nut Media thanks you for your time.

    Director of Education Programs 2015


    To guarantee access to all of  Boat Nut Magazine articles, pictures and featured services visit the official Boat Nut Magazine ©™ website. Be sure to reply to the Boat Nut Association registration on our site for the latest Boat Nut weekly and monthly news letters and opportunities.


    Copyright 2015 © Boat Nut Media, Toronto, Ontario. All rights reserved. No part of this information/publications may be stored in a retrieval system, transmitted, or reproduced in any way, including but not limited to photocopy, magnetic, or other record, without prior agreement and written permission of the publisher, Boat Nuts Media ©™. No liability is assumed with respect to the information provided.