Showing posts with label pwc owners clubs. Show all posts

Friday, 15 January 2016

Some sobbering numbers for you Canadian PWC Owners


 http://boatnutmagazine.com/

 
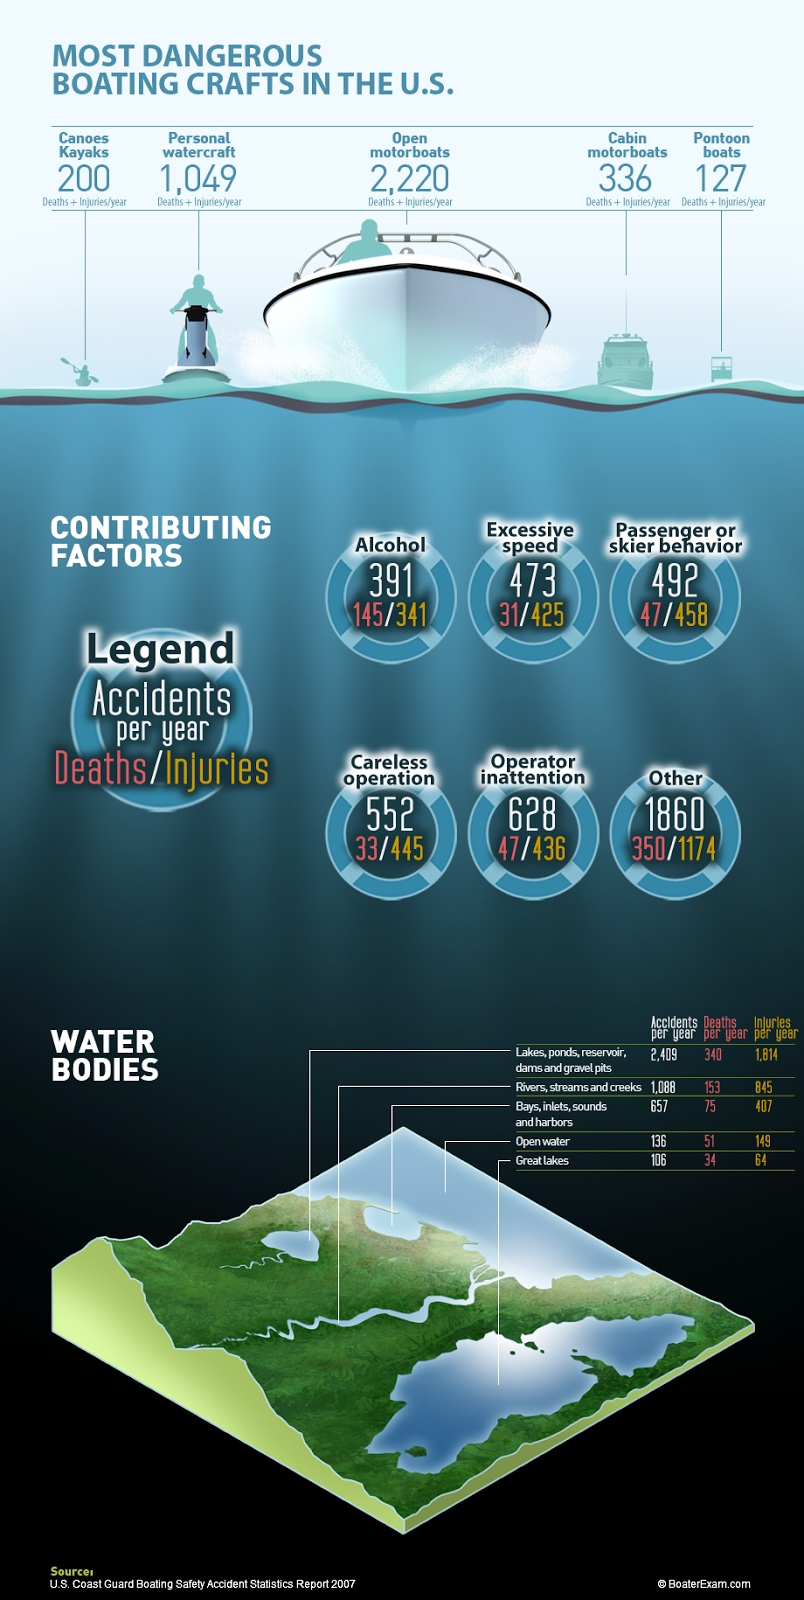
PWC Stats in Canada, will the numbers of injuries be reflected by the number of PWC's in the market? There are now an estimated 60,000 PWC in Ontario alone and these numbers are growing every month. Is it time to consider something other than a boaters card, I am not a fan of over regulation however these machines are faster and more dangerous than ever.


Figures from RED CROSS


There were 68 fatalities involving personal watercraft (PWC) during 1991-2008, including

33 immersions and 35 trauma deaths (Tables 3a). Traumatic incidents frequently resulted

in head injury, which contributed to at least 32% of PWC trauma deaths. Other injuries

included spinal injury in 18%, fractures in 12%, and major lacerations in 26%. Victims often
sustained multiple injuries

Overall, 19% (13/68) had head injuries, 10% (7/68) spinal injuries, and 16% (11/68)
major lacerations. This compares with 4% (67/1,788) head injuries for other powerboats

and 2% (17/979) for unpowered boats; 1% (11/1,788) spinal injuries for other
powerboats and 0% for unpowered boats; and 2% (28/1,788) major lacerations for

other powerboats and 1% (5/979) for unpowered boats.

PURPOSE

 96% of PWC victims died during recreational activities, 1% during occupational

activities and 3% during other/unknown activities . Only recreational

fatalities will be discussed here.


RECREATIONAL FATALITIES


There were 65 recreational fatalities involving PWC, including 31 immersion deaths and

34 trauma deaths (including 3 cases where the person was being towed by a PWC). PWCs

accounted for 1% of all immersion deaths, 2% of powerboat immersion deaths, 25% of all

trauma deaths and 28% of powerboat trauma deaths

Given the small number of immersion fatalities and the large proportion of trauma victims,

this section will combine discussion of immersion and trauma deaths.


TYPE OF INCIDENT

 
 Overall, 34 victims died following a collision (52%), 21 fell overboard

(32%), 4 capsized (6%), 1 was swamped (2%), 1 had other causes (2%); circumstances were

unknown for the remaining 4 victims (6%). Immersion deaths most often resulted from

falling overboard, while nearly all trauma deaths resulted from collision. 65% of PWC

collisions involved another boat, whereas for other powerboats, only 29% of collisions

involved another boat.

28

PERSONAL FACTORS


AGE & SEX


 Males accounted for 85% of PWC fatalities during 1991-2008, with those

15 to 24 years at highest risk for both immersion and trauma. Females and children were

overrepresented in PWC trauma deaths. While females accounted for only 3% of PWC

immersion deaths, they represented 26% of trauma deaths; similarly, children under 15

accounted for only 6% of immersion deaths but for 18% of trauma deaths.

ALCOHOL


 Alcohol was present or suspected for 51% of PWC victims 15 years of age and

older, possibly more since alcohol was unknown in 7% of cases. Alcohol was present or

suspected in a higher proportion of immersion deaths than of trauma deaths.

SWIMMING ABILITY


 Swimming ability was unknown for 74% of PWC victims. For the


remainder,


 35% were weak or non swimmers, 29% were average or strong swimmers and

35% were swimmers of unspecified ability.


BOATING EXPERIENCE


 Boating experience was unknown for 60% of PWC victims. For the

remainder, 38% were experienced boaters, 58% inexperienced and 4% occasional boaters.

In comparison, only 7% of powerboat victims for whom boating experience was known

were inexperienced boaters.

ETHNICITY


 Although aboriginal peoples were over-represented in most categories of

water-related fatality, they accounted for only 3% of PWC fatalities, roughly equivalent to

the proportion they represent of the Canadian population.


EQUIPMENT FACTORS


FLOTATION


 26% of immersion victims were properly wearing a flotation device

, while 50% of trauma victims were doing so.


ENVIRONMENTAL FACTORS


BODY OF WATER


 68% of fatalities occurred in lakes, 20% in rivers, 9% in the ocean, 2% in

other locations, and 2% in an unknown location .

WIND AND WAVES


 Wind conditions were unknown for 80% of fatalities. For the remainder,

wind was described as strong for 8%, breezy for 54% and calm for 38%. Wave conditions

were unknown or other for 71% of victims. For the remainder, it was rough for 16%,

choppy for 37%, calm for 42% and other for 5%; no stormy weather was reported
.


LIGHT CONDITIONS


8% of PWC fatalities occurred in darkness, 12% in twilight, and 72%

in daylight. Light conditions were unknown for 8% of deaths..


MONTH AND DAY


 All fatalities occurred between April and October, 97% between

May and September. July and August accounted for 65% of deaths, compared with 33%

for other powerboats and 30% for unpowered boats. 71% of deaths took place between

Friday and Sunday.

REGION


 The highest proportion of PWC fatalities were seen in Quebec and Ontario,

followed by the Prairie provinces and British Columbia. There were no PWC deaths

identified in the northern territories during 1991-2008, but there were 6 immersion deaths

in NWT where the type of boat was unknown .

ACCOMPANIMENT


14% of PWC victims were alone, while 60% were accompanied by at least

one adult, 9% only by minor(s) and 11% by someone of unknown age; an adult bystander

was present in 6% of cases.


TEMPERATURE*


WATER TEMPERATURE


Water temperature was unknown for 71% of PWC immersion fatalities.

For the remainder, it was reported to be extremely cold (<10°C) for 44%, cold or cool

(10-20°C) for 33%, and warm or hot (>20°C) for 22% .


 AIR TEMPERATURE


 Air temperature was unknown for 77% of PWC immersion deaths.

For the remainder, it was ≤15°C for 29%, and >15°C for 71% .

ICE AND COLD WATER

 Based on the criteria used in Module 2 of the 1991-2000 series (Ice &

Cold Water), it is probable that cold water was a factor in 16% of PWC immersion deaths.
 

SALES NUMBERS FROM NMMA 2015


The NMMA reports that retail sales of new boats and engines reached $2.1 billion in 2015, a 3.8 percent increase over 2014 while pre-owned boat sales totaled $1.06 billion, maintaining the industry’s healthy contribution to the Canadian economy. In addition, personal watercraft, including brands such as Jet Ski, SeaDoo and WaveRunner, experienced a sales surge in 2015 with unit sales of new personal watercraft jumping ten percent from 2014. The pre-owned category also experienced a strong increase in 2015, rising seven percent. What’s more, Canadians’ participation in recreational boating has remained stable at 43 percent of the adult population, up from 35 percent in 2011-2012, the last time it was recorded.


The bottom line is that the numbers from Red Cross will be a direct reflection of the volume of PWC's in the market. So Please be carful on the water!

 
Copyright 2015 © Boat Nut Media, Toronto, Ontario. All rights reserved. No part of this information/publications may be stored in a retrieval system, transmitted, or reproduced in any way, including but not limited to photocopy, magnetic, or other record, without prior agreement and written permission of the publisher, Boat Nuts Media ©™ No liability is assumed with respect to the information provided

Monday, 9 March 2015

THE ART OF FIBERGLASS REPAIR PART 1


http://boatnutmagazine.com/


THE ART OF FIBERGLASS REPAIR

 all the mysteries that surround this topic.

The first question  you need to ask yourself is what is a fiberglass repair? There are three different interpretations of fiberglass repairs. First there is cosmetic gel coat repair, second is a gel coat repair that require fiberglass material repairs behind to fill a hole of some kind, Third type is structural repair were there is damage to a stringer or bulkhead, this is usually more than do it yourself.

Before you consider gel coat repairs you need to understand how the boat is manufactured. The boat is made in reverse of what you see, out side in. The gel coat is sprayed in the mold first and is backed by different layers of fiberglass mat and roving, cored in the center before more fiberglass materials are added, this is what you see inside the boat.

The gel coat layer is the colored resin layer you see, under the gel coat in the next layer is dark pink in color. The core or the next layer is generally either a light pink color, or a wood core made of balsa which is solidly saturated with resin. This information is important when you are assessing the type of cosmetic repair you have.

When you are looking at the damaged area, you are looking to see if the damage continues through the gel coat layer and into the pink layer below. If you see the pink layer then you know that you must fill this repair first. If the damage does not have pink at the bottom then you will complete the repair as a scratch. There is are exceptions to this rule and that is if the gel is exceptionally thick and if you do not fill it there will be a large sanding dip in the surface. There are occasions were this dip will be better than trying to match the color. This is particularly true in the case of an older vessel were matching the faded color will be difficult.

The other visual cues are cracks leaving the repair area or perhaps the damage is a group of stress cracks, this type of repair requires filling and finishing to complete. The last type of repair would be a hole were you must replace the structure first with fiberglass materials.These  types of repairs will be covered in two other posts . One specific to stress cracks and the other will be holes and punctures.

So lets go over how to repair a gel coat scratch and chip. In the case of scratches that do not require filling simply follow the sanding and finishing procedures.
The first thing you will need to assemble are your tools for the job. You will need a small trowel (do not go and buy one from the hardware store if you can go to an art supply store and pick up a oil painting trowel).The next tool will be a rotor such as a dremel, with a bit a small file design works the best. A must have is a quality sanding block. The dremel, bit, and sanding block can be purchased at Canadian Tire. while you are there pick up some 120, 400, 600, 1200 wet and dry sand paper along with some white cloth rags. You will need to source a Pre Val sprayer, dust mask,  fitted rubber gloves, small 2 inch disposable paint brush, and a multiple speed polisher with a quality wool polishing pad.

Sourcing materials is the tricky issue, for the gel coat I recommend you order from Spectrum Color, they supply color match to match almost every make and model, they have a list on their web site. For brand new boats go back to your dealer and order a quart of match gel coat for your boat, you will need the hull ID number. Do not go to your local supplier for  any old white base gel and try to tint the gel coat to match unless you really have to. The quality of this gel coat and cost for custom tinting is not worth it and usually wont be a really nice match. If you are completing repairs below the water line were you have anti foul then you can use base white gel coat. You will also need a small can of styrene, a small amount of cabosil, a small container of Patch Aid (speed patch), 3 or 4 mixing cups, catalyst, aqua buff 1000 white compound, masking tape and masking paper.

Once you have all your tools and supplies its time to go to work, First mix your gel coat like a can of paint. Open the can and test the match gel coat to the boat, the way to do this is to clean an area with compound take a small sample of the gel coat out of the can place an uncatalyzed dot it in the area you have cleaned, get a piece of cigarette saran wrap the package wrap material, Get some spit on a clean finger and place a dot next to your gel coat sample spot do not mix the two materials, Place the saran wrap over the whole area and gently rub so the wet area and the sample blend this will show you what the edges of the repair will look like. You should not see a difference between the wet area and the gel coat sample. If you are satisfied with the match we will move on to the actual repair.

You will need to prepare the area for your fill. Set up your Dremel and open up the void area that you need to fill up (remove just enough material to remove any contamination or loose material). Do not go any deeper than the existing damage. In an area 6/2/1 in other words for every inch of damage you will need to prepare an area 6 inches long. Take the 120 sand paper and remove the shine inside of the expanded 6 inch area. Wipe the area with acetone damp rag occasionally, all shine must be gone from this area. When your finished with this step clean the area with acetone thoroughly, then apply masking tape around your area you need to fill, leave a 2 mm space around the void you are going to fill. Now you will need to mix some gel coat paste to fill the void, take a mix bucket and pour in a measured amount of gel coat that you think will be enough to fill the void. If you have more than one repair you can make a larger amount and store it (for a day with a cover), Remove enough fill mix only what you will need for each repair area at a time. On a mix board (such as a piece of card board)place the determined amount of gel coat you will need, mix in 50 percent per volume of Patch Aid (speed patch), mix evenly, then you will start to add cabosil powder mix until you get the consistency of peanut butter. The gel coat paste will need to be catalyzed to cure add 2 per cent per volume and mix well. You now have approximately ten minutes of working time to make you fill.

The next step is to slightly over fill the void, use the masking tape you placed around the void as your guide. Once the fill is evenly pulled slightly thicker across the masking tape immediately remove the masking tape gently, this should leave a nice clean looking fill slightly larger than your void. You will have to allow this area to cure. This is easy to visually assess due to the fact that the Patch Aid(speed patch) you have added will allow the gel coat to cure with a flat hard surface. This is were you get out your buffer for the first time, with a dry pad (no compound) give the fill a short buff. The reason for this is that gel coat shrinks when it  heats up while curing. The heat from the buffer will preshrink the repair area, if you don't do this the gel fill will shrink later when you are buffing to get the shiny finish you are trying to achieve. Once this is done install some 120 sand paper on the sanding block. Now on 45 degree crossing angles start to sand down the fill (all sanding should be done this way) this should not take long. For fills on a radius or in odd area you may need to create a custom sand block out of doweling, be inventive.

When you have everything sanded nice and it feels right when you run your hand or straight edge on the fill you are ready to spray. It is not unusual to have to complete two fill procedures to get the surface correct. If you have sanded outside of your preparation area this do not panic , Take a rag with acetone and clean your whole repair area. If you fail to do this you will end up with a dark halo around the repair. In another new mix cup pour in some gel coat enough to cover the area that has been sanded down. Too the gel coat you placed in the cup add 50 percent Patch Aid (speed patch)and mix evenly. Quite often this provides a sprayable gel coat, however some gel coats are thicker than others so you may need to add a very small amount of styrene to your mix to reduce the mix. The gel coat should be just runny enough that if you use a tongue depressor as a stir stick when you remove the tongue depressor the gel coat should leave a nice even film that you can barely see through. Put this mix aside and finish preping the spray area. Mask off 2 inches inside the sanding area not right along the edge and cover around the area with masking paper. Clean the area again and again, If it is a little cool out below 55 degrees then take a heat gun or blow dryer and preheat the repair area on the boat. Pour the gel coat in the mix bucket into the Pre Vail jar and add 2 percent catalyste to the gel coat and mix evenly. Now install the sprayer top and get ready to spray on an area of your masking paper (do not turn the Pre Vail sprayer on its side or upside down). If the gel coat is too thin it will run away fast, add a little of your color match gel coat out off the can mix in and try again .If the gel coat is to thick it will spray in globs, you need to add more styrene and try again. When the gel coat is right then begin with a light coat over the fill area first, focus here then make the spray area larger and larger with every coat covering the previous coat, but do not spray all the way to the masking tape you do not want a hard edge to sand out. Try to get 6 to 8 coats on the boat don't be afraid to put on more if you feel it is necessary to do so. If you are spraying colored gel be sure to feather the edges really well (no thick edges of the spray area). It is fine after the spray sits for 5 minutes to give the area a little warmth not "heat" from a blow dryer or heat gun.

This spray area will take a half an hour or so to cure, again the area will get dull and hard when cured. Remove the tape and paper after the gel coat has cured. Take a dull pencil and pencil the whole area down and  then give the area a rub down with your finger, this will give you a guide so you can see your sanding progress. If the area is really bumpy you can start with a 120 grit sandpaper on your sanding block but only until the bumps are gone. Apply pencil again and change the sand paper to 400 wet  and dry paper. With a water bottle handy spray the whole sanded area down( if you add a little bit of dish soap to the water in the bottle the sand paper will last longer) and begin with sanding with the 400 grit sand paper on your block, Once all the pencil is gone you will re peat the process again with 600 grit and 1200 grit sandpapers on your sanding block. Not everyone gets this the first time in one go, if you really do not like what you see sand the area and spray again.

Once the area is completely sanded with 1200 sand paper its time to polish the area. With your paint brush lay a thin coat of compound on the area turn the buffer to the lowest speed and with the pad flat begin to polish, let the machine do the work do not try pushing hard on the machine( you will find that the pad needs to pick up some compound to work well, this is called seasoning the pad). You are trying to generate heat but not to much! just a nice warm surface. Re peat as required until you achieve the finish you desire. This is a job of patience if you are not a patient personality,  hire someone who is because if you rush you will waste the materials and the time. Do not try to complete gel coat repairs if it is raining or has rained and it is still wet all over the boat. Pick a nice dry sunny day the results will speak for themselves

One tip polish the boat first if this the plan you get the best repairs on a clean boat, always wash the boat first and let it dry before doing any repairs. Be patient and start with a small area in an less visible area first to get a feel for the materials.


READ ART OF FIBERGLASS REPAIR PART 2  STRESS CRACKS


READ ART OF FIBERGLASS REPAIR PART 3 HOLES

To guarantee access to all of  Boat Nut Magazine articles, pictures and featured services visit the official Boat Nut Magazine ©™ website. Be sure to reply to the Boat Nut Association registration on our site for the latest Boat Nut weekly and monthly news letters and opportunities.


Copyright 2015 © Boat Nut Media, Toronto, Ontario. All rights reserved. No part of this information/publications may be stored in a retrieval system, transmitted, or reproduced in any way, including but not limited to photocopy, magnetic, or other record, without prior agreement and written permission of the publisher, Boat Nuts Media ©™ No liability is assumed with respect to the information provided.