"NOMAD" is a brand we are developing with NEW PRODUCT vendors from around the world!
Nomad products must be non damaging to the environment and be guaranteed to work in any application. The first product that we will be introducing is "BOTTOM PAINT BOOSTER".
FOR SALT SHAKERS AND FRESH WATER
So what is Bottom Paint Booster? Well that is easy, for years commercial boaters in the Gulf of Mexico have kept a secret to virtually prevent growth on the bottoms of their boats. You may have seen these power boat owners using the same bottom paint brands as you are however they mix in an all natural blend of material to the bottom paint to double the effectiveness of the coating being applied. I am sure if you have read my articles you will know that I do not back any power boating product that is smoke and mirrors. It took me quite q while to get a salty dog to share his secret nd when he did you could have knocked me over with a feather, so simple but so effective. Year after year I continued to watch this additive in use, it is so effective that I thought there was no way! Yet it really does work, we painted half the hull without the additive and half with and the difference was obvious. The side with the Bottom Paint Booster was virtually clear of any barnacles and worm corral. I was sold on the material. The problem was would it work in fresh water as well as salt water, I am happy to say it does.
Bottom Paint Booster is cheap and will multiply the effectiveness of regular anti foul twice over. Because it is plant based it creates no chance of corrosion in either copper based bottom paint or tin based bottom paint. Any anti foul can use a BOOST!
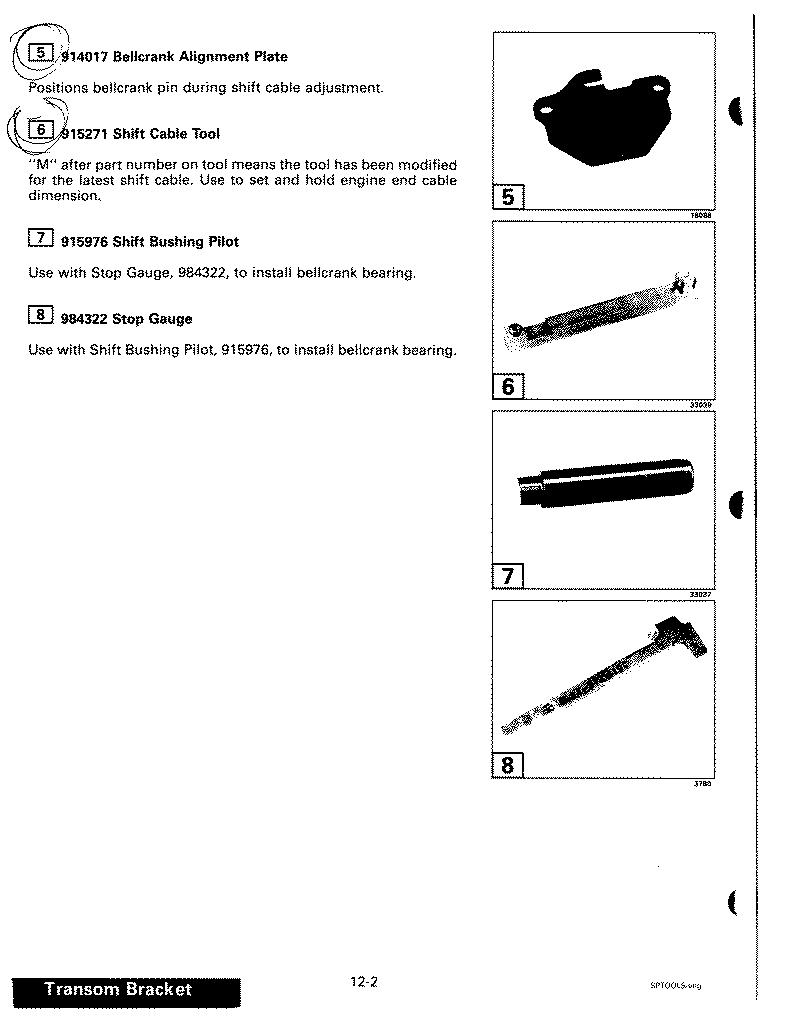
HOW IT WORKS?
Bottom Paint Booster is a plant based product that is all natural, " you could if you wanted to sprinkle it on your fries". This mix of all natural plant product which discourages bottom growth both in salt water and fresh water. It is a dry mix that you add to the anti foul while still in the can, Boaters will mix booster completely into the bottom paint, then continue to apply the bottom paint in the recommended way. Booster is simply suspended in the bottom paint in the same way as the copper or tin component of the anti foul. If you are a boater who tries to stretch the life time of your anti foul coatings than Booster is for you. This product will continue to deter growth even after the paint has hardened.
If you a salt water boater in the Gulf of Mexico you will experience less dive time for monthly bottom cleaning services. Your dive service provider will notice a difference.
"Bottom Paint Booster" will not cause any color differences in the anti foul coatings. It will not pollute the water, or environment, This product will not affect the life of or designed process of wear. Booster will not make any difference to the application of or clean up of bottom paint.
This is not cayenne pepper if that is what you are thinking!
Another needless death on the water this year, boaters have to start to obey the rules when it comes to lifejackets. To many boaters panic when there is a crisis on board, I am not saying that this is the case. Knowledge of boat operation and how to complete a Williams Turn may have helped here. To many boaters stash the safety gear away in places were in an emergency they are difficult to access. Boaters also fail to prepare tenders and throw rings in a way that makes sense for emergency use (learn to tie a proper quick release knot). This equipment is not a pain in the ass pile of boat crap or jewelry, when you need it you need it. This is a wake up call do not be that boater that says there by the grace of god that's not me. BE PREPARED, PRACTICE RESCUE, BE PROCTIVE and this kind of accident can end with tears of joy rather than tears of pain.
Colorado mom dies saving 2-year-old son from drowning in Lake Powell
SALT LAKE CITY - A mother was enjoying a family boat trip across Lake Powell when she heard a scream and splash. Her 2-year-old son had slipped off their houseboat and into the water.
Chelsey Russell, a 35-year-old mother of two from Lakewood, Colorado, jumped in to rescue her son. She managed to keep the toddler above water for five agonizing minutes until a relative pulled him safely back onto the boat.
But by that point, Russell was unconscious. She was pulled from the water and rushed to shore at the nearby marina, where bystanders and officials performed CPR Tuesday afternoon.
After about 30 minutes, they determined they couldn’t save the woman who just rescued her son.
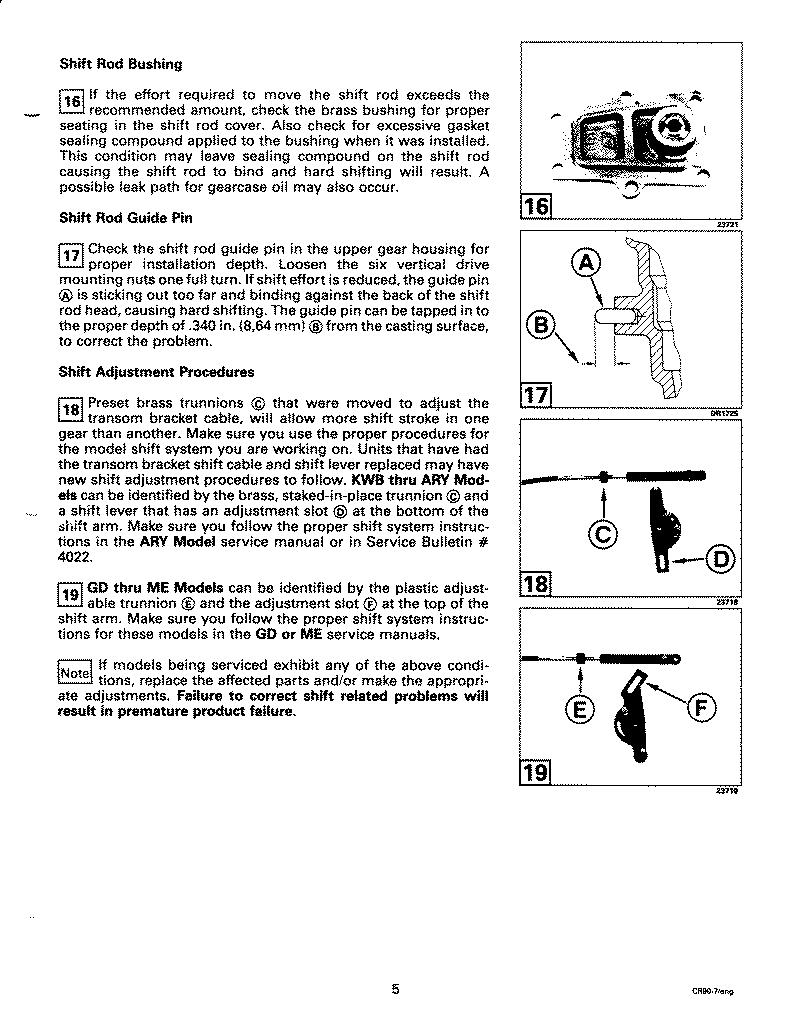
Officials with Glen Canyon National Recreation Area, which encompasses the 186-mile-long lake along the Utah-Arizona border, said the boy was in stable condition and flown to a hospital about 200 miles away in Flagstaff, Arizona, as a precaution.
The houseboat had been traveling about 8 mph toward shore when the boy, playing with another child, somehow fell off, San Juan County Sheriff Rick Eldredge said Friday.
After Russell jumped in, her brother stopped the boat and hopped in after his sister, leaving Russell’s mother and at least one other child aboard.
The boat had kept moving after Russell went in and the man realized he was too far away from her and the child, Eldredge said. So he returned to the vessel to retrieve a motorboat they had been towing. The knots tethering it were so tight that he had to cut them with a knife.
Russell was in the water for at least five minutes before her brother could reach them and take the conscious toddler from her chest. Throughout that time, she kept her son above water, her family told authorities.
“She was holding the baby out of the water the best that she could,” Eldredge said.
The sheriff said neither Russell nor her son wore life jackets. They are required for boaters under 12, according to Glen Canyon National Recreation Area.
The sheriff’s office was waiting for the Utah medical examiner to determine Russell’s cause of death, but Eldredge said it was suspected to be drowning. He did not know when the medical examiner would make a ruling.
“There are no words to convey the tragedy of losing a loved one like this,” Teri Tucker, acting superintendent for the recreation area, said in a statement. “Our hearts are with the family and friends of the victims during this time of unexpected pain and loss.”
It’s the sixth death at the recreation area this year.
Russell’s co-workers at a Denver law firm remembered her as a “superstar” attorney, mother and marathon runner who competed in a 100-mile race last year.
“She was a better mom than any other mom I’ve ever known, including myself, and she would have done anything for her kids,” colleague Amy Seneshen told CBS Denver.
“She was a talented lawyer, loved by everyone in this firm,” attorney Keith Tooley said Friday. “She was just a rock star here. Her passing has just crushed us all.”
Russell leaves behind a 5-year-old daughter in addition to her 2-year-old son, according to CBS Denver.
In the thirty seven years of repairing, restoring, fabricating and maintaining gel coat surfaces I have read and viewed a mountain of how to information related to gel coat maintenance. This information came by way of manufacturer service schools (attending and instructing), operating the largest fiberglass repair shop in Canada ( Nautica Marine Repair, Port Moody BC), completing prototype work for power boat manufacturers (Maxum Boats, Chris Craft Boats), supplier technical literature/ video and practical experimentation (around the world). A portfolio filled with more than one thousand completed gel coat projects. The fact remains that maintaining a gel coat finish comes down to three basic rules.
1- A willingness of the boat owner to put in the time and/or the money to maintain his/her boat.
2- Using the right products to complete the tasks at hand
3- A clear understanding of how gelcoat as a material reacts to different procedures
Gelcoat is the finish that production boat builders use because it a predictable product that is a bonded layer of tinted polyester material, making up the finished surface we see when the hull or deck are removed from the mold.. Gelcoat is a material that can be released from a mold with a repetitive, reliable result. A gelcoat surface is repairable and forgiving. There are well defined procedures to maintain, and repair, these procedures are all well documented. There are other reasons but for sake of argument these are the reasons that are easy to understand. Virtually every new boat has some type of cosmetic work done to the hull and or the deck while in production. These repairs should not or do not effect the life time finish of your boat. So the thought that gel coat maintenance or repair is doomed to fail is just not true. As a matter of fact a well maintained gelcoat finish can last the lifetime of a boat.
FROM BOATS .COM
If you’re a boat nut ( I love the Boat Nut Reference) perusing the internet for boat maintenance tips—and since you're here on boats.com, we’re guessing that you are—you’ve probably come across our videos on getting tough stains out of gel coat, and how to restore faded gel coat. Even if you've already absorbed that information, there are a number of small yet important things you can add to your list of regular boat maintenance chores to help you attain the ultimate gleam in your hull—which will also make your gel coat last longer. Here are 10 tips to keep your pride and joy in prime condition.
You will read or view information that will inform boat owners that gel coat finishes are unsustainable or require a PHD in polymers to maintain. Entire articles dedicated to painting over the gelcoat finish, touting the idea that a painted hull will somehow reduce the maintenance aspect of boat ownership. With no discussion in regard to how much it will change a repair bill if you slide down the dock and damage the top coat finish. I get the paint proposal, however the cost involved in a great top coat finish will buy you a hell of a lot of gelcoat maintenance. There are ways to determine when a boats gelcoat finish is just to far gone to restore or repair and top coat is only option. That being said there are definitely some boats were the quality of the material and or the products used as mold release definitely affect the life and look of the finish. In these cases the amount of time and material you will spend to try to maintain the factory finish is a waste. The initial gel coat restoration that you do to determine if the factory finish is obtainable or sustainable is not a waste of time. Should the gelcoat be beyond saving the surface is now clean and a top coat estimate will be more accurate. This is due to the fact that the company you hire to top coat over the gelcoat will se any areas that will require repair before primer.
FROM POWER AND MOTORYACHT .COM
Fiberglass is a pretty good boatbuilding material, but gelcoat is its weakness. Although gelcoat feels slick as polished stainless, its surface actually has more nooks and crannies than a Thomas’ Original English Muffin—and it attracts dirt and stains as well as those tasty breakfast treats absorb butter, too. Ask anyone who has transited the Intracoastal Waterway: Tannin in the water from rotting vegetation leaves a tea-brown mustache, pretty much in the shape of the bow wave at 6 or 7 knots. A rite of ICW passage is cleaning off the stain once you arrive at your destination, an awkward chore with the boat in the water.
Even if your boat’s clean-shaven, you still have to deal with stains from bird droppings, water streaks, exhaust, general airborne pollution, spilled wine, and, my personal favorite, ink from a half-eaten squid left on deck by a seagull. (I assume it was a seagull, anyway.) How do you handle all of these, without developing rubbing-compound shoulder? Choose the right products, and in many cases you’ll need less elbow (or shoulder) grease than you think. Gelcoat care involves three stages: Cleaning, protecting, and polishing. Keep up with cleaning and protecting, and you shouldn’t need to do much polishing. A fourth stage, restoration, is necessary only as a last resort, and best left to experts. Let’s hope it doesn’t come to that. Cleaning is easiest, and there are plenty of modern concoctions to help you out
GELCOAT QUIRKS YOU NEED TO KNOW
POST CURE
Fiberglass boats with a gelcoat finish have a few quirky characteristics that anyone who has owned the same boat for years will recognize. There is the post cure curve which is were the materials will continue to cure over years in the hot sun long after the boat was built. This is why you get a hot side of the boat with more print through pattern, if you have the boat facing the same way year in/ year out. This print pattern is far more apparent with colored gel coat hulls. Even a great name in production power boats like Sea Ray will experience this issue. Print thru is when you look at the gelcoat finish and you see the laminated pattern that is under the gelcoat surface. Post cure is also responsible for surface issue such as lines in the gelcoat finish when you remove pin strips. You may also notice that the first name that is applied to the transom is usually visible after a name change even years later. Post cure plays a role in the reason why hull blisters do not suddenly appear in a boat over ten years old, (The materials that the boat are constructed with have stabilized and hardened up to a point were chemical breakdown of the resin becomes almost impossible). there are always exceptions to this rule. The blister topic is another bone of contention with me, we will save that for another article. Believe me it is not just a hull problem.
FOGGING / WATER SPOTS
Fogging or water spotting, is only visible in gelcoat that has color. This is were high moisture content has crept into the gelcoat material. Gelcoat is not a solid surface, it is full of pores and any areas were sanding and polishing or just heavy polishing has gone on without the experience of heat closing the surface flaws, there will appear foggy or cloudy areas. If this foggy or cloudy look appears in a new hull after a short time, this surface area was probably sanded and polished or simply polished during production, well before the boat even got to the dealer. Water spots are most noticeable under air conditioning through hulls, exhaust ports and drains. Theses are areas were water is present in one way or another most of the time. A great representation of how water effects a color is Bayliner models that were built with the dark grey hull (Cierra and Trophy). This color was in the area from the lower hull side to the keel. The grey colored gelcoat at the water line on one of these boats that is moored with out bottom paint. The surface will get a white color change in the grey gelcoat at and below the water line. When the boat is hauled out and the surface gets a chance to dry the white shade in the grey will start to darken back up.
TRANSLUCENCE
The last quirk is translucence this is were either the color of the gel coat is not a solid (there is not enough pigment in the color of the gelcoat to create a solid color) or when one color overlaps another when the two colors are sprayed in the mold. In this case you can see ghosting when the color behind is not uniform in thickness or evenness over the area. You will notice this mainly in gelcoat that is red, blue or green. Translucent gel is the most susceptible to buff through. This is when the wrong type of compound is used to prepare the surface for wax and large areas of the color either get darker or lighter in areas on the boat.
SPECIAL NOTATION FOR METAL FLAKE GELCOAT
Metal flake gelcoat finishes are created in three levels the photo clear gelcoat top we touch, the flake under that and the base color under the flake. The mistake that is made with flake gelcoat is that aggressive compounds are used and burn through is common. If burn through occurs there is no way to restore the factory finish. Once the flake is exposed the compound removes the color from the flake and it becomes a silver area on the boat. Flake requires a delicate touch nothing more aggressive than a 2000 compound and at least two coats of heat set wax, do not mess around with any one step products. You have no room for gelcoat surface damage on a flake boat. I have done a lot of flake gelcoat repairs over the years and they are not easy to match or finish . Flake is an art and most boats that get any damage are painted. Be sure if you buy a used flake boat that you know whether the finish you are seeing and maintaining is gelcoat or paint. it is hard to tell a great paint repair job from a great gelcoat finish. Many boats that have been repaired may have both.
There have been huge advances in gelcoat over the years its harder and more UV resistant now than ever before, however the principals to maintaining a great finish remain the same. Some boat builders are better than others at making allowances for gel finish aging. An example of this is with Sea Ray their blue color gel coat is actually more purple in color, so as the UV breaks the color down the color becomes more blue. This same affects take place with white colors, off white will become whiter and a bright white will become more yellow or grey in color depending on the tint mixture.
Understanding this information is key to a successful maintenance program, and boaters consideration when it comes to swapping out strip packages and graphics. You will even notice that first name on the back of the boat is usually visible after it has been changed out, even years later. This is UV damage and post cure working together in tandem.
So how do you keep your boat looking its best?
I think we can break boats into three levels of condition ROUGH, HALF WAY and NEW
Rough Condition
Rough this boat has received no maintenance and when you wash the boat a white wash comes of the hull and deck. No matter what the color of the gelcoat.There is no shine left at all! When a boat is in this condition you use all the weapons you can to clean and prepare the gelcoat surface for restoration. Do not worry about harming the gelcoat finish there is no finish left ! The gelcoat may not completely recover depending on the make of the boat or the gelcoat color. Yes the brand does make a difference in the gelcoat finish, not all boats are created equally. However this is not to deter you, you will not know what you have until you try.
FROM POWER AD MOTORYACHT.COM
When attacking any stain, remember the doctor’s credo: First, do no harm. The shelves of every chandlery hold a slew of gelcoat cleaners, but try boat soap and water first. Starting with mild cleaner and working your way up to the heavy artillery keeps you from damaging the gelcoat unnecessarily. “Soap, water, and elbow grease is the best way to take out most stains,” explains Sandy Derthick of Ashland Inc. (www.ashland.com), manufacturer of Maxguard and Enguard gelcoats. “Avoid using harsh chemicals like acetone, acid, or bleach-based cleaners to wash gelcoats, as these types of chemicals can weaken the gelcoat matrix.”
My boat-cleaning friend Margarita Xistris (www.nauticaldetails.com) agrees, up to a point. “Wash your boat weekly with boat soap, and remove stains right away,” she says. If soap won’t remove a stain, try lemon juice; it often works, and is very safe environmentally. Less environmental, but effective, is oxalic acid. “Apply it in the sun, and keep it warm,” she says. For rust stains, make a paste and let it sit. Mean Green Degreaser (www.meangreendegreaser.com) is good for removing black soot and pollutants, especially from non-skid. “Marinate the area. Don’t dilute the cleaner much; let it sit for 10 minutes, then hit it again if necessary,” adds Xistris. “It’s better to use less abrasion, and rely on chemical action to clean the stain.”
Before selecting any cleaning product, read the label to find out what’s in it, what kinds of stains it’s designed to remove, and how to use it. Pay attention to any warnings on the label, too. Acidic cleaners and stain removers are effective, but many require protective measures. MaryKate On & Off Hull & Bottom Cleaner (www.crcindustries.com), for example, contains phosphoric, hydrochloric, and oxalic acids. The safety data sheet says, “wear protective gloves/protective clothing/eye protection/face protection. Avoid release to the environment.” I’d try something milder first.
1ST STEP: Pressure wash the hull and deck, use a small fan tip and keep the wand moving, try to wash toward the stern always in the same direction. Open all the deck hatches and lockers at this time, get the inside of the lids, drain channels and locker walls. Get ride of all the heavy crap and clear all the drains spend time focusing on the anchor locker.You are doing this to knock off all the chalking and years of crud. In most cases the white dust is mold release that has given up the UV fight. All boats are born with some mold release on the gelcoat surface. This mold release is removed were sanding and polishing or just aggressive polishing has been completed by a detailer, repair technician or factory. So when I reference fogging in color when the surface is repaired at the factory or after the factory the removal of the mold release surface plays a key role in the failure of the gelcoat finish. This mold release is a wax and when the hull is curing in the mold there is a lot of heat generated so this wax surface is very hard and should be considered part of the gel coat surface your trying to reproduce and maintain.. Keep this in mind as heat setting is the key to maintaining and reproducing a new boat gelcoat finish
2ND STEP: Remove the stains that are on the gelcoat surface. These stains are usually from spiders and birds. There may also be rust stains and grease and oil marks. Under hatches and in deck access lockers you will want to remove mold and mildew.
It is a great idea to spray the whole deck area down with bleach yes bleach. The deck must be wet and you must remove any gear such as lines, ropes, and canvas from the boat. Use a spray bottle and spray the gelcoat surface down. The bleach will remove environmental surface debris, this is a must if you are anywhere under a flight path of airplanes. Use bleach to remove bird and spider stains, this may take repeating the process several times until the stains are gone. This same process will clean the mold and mildew out of lockers, hatch lids and drain channels. Even good detailers will miss this step.
The next chemical you will need is muriatic acid available from swimming pool supply stores or paint supply stores. Muriatic Acid will not damage vinyl or plastic. This is the product required to remove rust stains from the gelcoat finish. Rust can appear at the base of any stainless hardware on the boat. Stainless is no longer stainless when you cut the air off from the surface and allow water to creep in. Rust may also come from engine work tools or other metal items left in damp locations. You apply the muriatic acid by brush from a jar, be sure you read the instructions on the product it is an acid and can be harm full to breath or ingest. The stain areas with rust must be dry before you start , apply the acid on the rust stain area with a small paint brush and watch for the area to turn yellow when this happens rinse with water right away. repeat until the stain is gone.
For grease and oil marks try WD40 even on the seats, if this dos not work get out a Mr Clean scrub pad.
3RD STEP: Wash the boat completely with a mild soap and rinse the hell out of the boat. Spend time at the rub rail and hatches you can get a pile of sand and foreign debris out of these areas. Make sure you have cleaned the whole boat top to bottom. The next steps depend on a clean surface the cleaner the better the gelcoat finish will be. Allow your gelcoat to completely dry, you will need to inspect all of the gelcoat surfaces next!
FROM BOATS.COM
1. Start the spring by hitting the hull with an oxidation remover and a buffer (after an initial wash-down, of course). We agree it's a pain in the keister, but if you wax without cleaning first you’ll only seal in the imperfections and dullness that took root over the winter.
FROM POWER AND MOTOR YACHT.COM
No matter how conscientious you are at cleaning and sealing your gelcoat, eventually the day will come when it looks dull and chalky, which means it’s time to get out the buffer and compound. Polishing with rubbing compound, or, in dire cases, wet-sanding, will usually restore the gelcoat’s color and shine—but every compounding removes gelcoat (wet-sanding strips even more), so it’s better to protect than to restore. Eventually, your gelcoat can get so thin that you’ll be able to see the glass fabric underneath it. (To predict how your gelcoat will look after restoration, wipe it with a wet sponge. The water briefly fills the chalky areas and brings back the color. If it looks good wet, your gelcoat will probably respond to polishing; if not, skip this section and go straight to the sidebar on this page: “Paint? Get Out Your Checkbook”)
There’s a right way and a wrong way to compound, by the way, and it starts with the compound itself. Don’t use auto compound on a boat; it’s designed for softer paint, so it’s less abrasive and it will take a lot of rubbing to do the job. Compound formulated for gelcoat is more abrasive and cuts faster—never use it on your car, or you’ll be heading for the spray booth. And most rubbing compound contains petroleum distillates. (Wear a mask, so you don’t inhale any particles.) The oil is what restores the color, though.
If you’re not comfortable using a buffer, hire the yard to compound your hull, if not the whole boat. (The deck is easier, and you can do it in smaller bites.) Honestly, I’d rather work more and earn the money to pay for someone else to compound my boat than do it myself. It’s not particularly satisfying work, and it takes more skill than you think to do a good job. Wet-sanding? Call the experts.
4RTH STEP: Its time to get that finish back. What supplies and equipment will you need?
The materials or products that you use are more than half the battle in your gelcoat maintenance program. I have a simple list of products that will give you the best results every time no matter where you are geographically, salt water/ fresh water your boat is kept in, or the brand of boat you own. The list I am providing you are the best products that I have ever used or seen to restore or maintain gelcoat surfaces in the industry. You will not be disappointed with the products as long as you understand how to make them work for you.
PRODUCT LIST TO COMPLETE A GELCOAT MAINTENANCE PROGRAM ( MATERIALS)
Why Aqua Buff? Aqua Buff is the best compound for gelcoat maintenance and restoration that I have ever used, it is predictable and easy to manage. Aqua Buff supplies 1000 and 2000 compounds. Use the 1000 compound for the first buff (to restore the color and remove any fogging) it is effective at removing any old applied waxes and what is left of the existing mold release wax on gelcoat surfaces. Used in combination with the 2000 compound (this is a necessary step) the gel coat surface will be reflective and visually look finished. This compound is the most forgiving material you will ever use on a gelcoat surface. Aqua Buff allows you the necessary work time to heat the gelcoat surface to the temperatures required to close the surface flaws. Aqua Buff compounds give you immediate visual feed back. All necessary when you are working to restore a gelcoat surface to a factory new boat finish. This product will work on any plastic surface. You can use the 2000 compound right over graphics, the chances of burning or polishing through the surface is reduced to a point where the chances of buff through is virtually eliminated.
Why Finesse It? Finesse It is a sealer that will bring the color to an absolute factory finish. With the right technique and heat from the buffer pad this product gives the extra finish step that a compound cannot provide. Finesse It is available in black and white, only use the black on dark colors. Aqua Buff leaves virtually no swirl marks when worked into the gelcoat surface, however if there are any swirls Finesse It will eliminate them.
Why Boat & Aircraft Wax? This is simply an inexpensive product that can be heat set and provide a wax finish as close to a mold release new boat finish as I have ever been able to produced. You will fall over when you find out the retail price point! Boat and Aircraft Wax is considered a cleaner wax which allows you to get any Aqua Buff compound or Finesse It sealant that the polisher will no reach. Yes it looks that good even by hand. It is a wax that allows you to carry on using it as a great gel coat surface maintenance product.
I can not explain the science of why the combination of these products work but be assured it sure does in any environment any where in the world, every time. It has taken years to get the right combination of products together to produce a new boat finish that can be reproduced over and over.
FROM BOATS.COM
2. Now set that buffer aside, and make your base coat of wax a thick paste wax. Yes, this stuff is tougher to apply than liquid wax, and no, it doesn’t provide as much shine as a spray-on carnauba. Your elbows will ache and unless your boat's a dinghy this job will take hours. But that thick, pasty stuff is more protective and lasts far longer. The truly dedicated among us will rub, rub, rub from stem to stern—and then start all over again, giving the boat a full-length double-coating of love.
3. With the base coat applied it's time to get the gleam going, by giving the boat a third coat of wax with a liquid carnauba-based product. But remember, though this stuff looks great it doesn’t last for long. After a couple of weeks in the sun and rain, that gleam will be gone. So every other Saturday plan to re-apply it. That way the shine will keep shining and the base coat of wax will stay protected.
4. After every trip in saltwater, douse every inch of fiberglass with freshwater regardless of how dirty it may or may not be. Then, douse it again. Otherwise, when the saltwater dries it leaves crystals behind. These crystals can magnify the sun's rays, and UV light is the number-one enemy of wax—so leaving salt behind will rapidly speed up the wax’s break-down.
FROM POWER AND MOTOR YACHT.COM
Once the stain’s gone and the gelcoat’s clean, you have to rewax. Some folks still swear by carnauba wax, while others have switched to longer-lasting polymer sealers. Which is better? Depends on who you ask. Derthick at Ashland says, “If the gelcoat is in good condition, it’s best to just use a conventional wax to protect the surface.” Xistris, on the other hand, says polymer sealant takes more time to apply, but lasts longer and is better for the gelcoat. “Polymer sealants are like suntan lotion for your boat,” she says.
Everyone knows how to wax gelcoat, but most of us don’t do it often enough. More is better, within reason. Polymer sealants aren’t so straightforward, says Garry Dean, a professional detailer from Tampa, Florida, who has developed Detail Juice, a line of eco-friendly products for maintaining the finishes of cars, motorcycles, and boats (www.detailjuice.com). His Bionic Banana Shield is a “synthetic polymer hybrid wax” that prevents dirt and oxidation from getting into the gelcoat pores. Even under the Florida sun, one application should last at least six months, says Dean. Won’t two layers be better? Maybe not.
Dean says that if you protect a surface with a solvent-based polymer, then apply a second layer over the first to get more protection, the second layer dissolves and removes most of the first one. Thus, you’ve done two applications, used twice as much product, spent twice the time, but you end up with just one layer of polymer. The trick, he says, is to recoat a solvent-based sealant with a water-based one. Using his own products as examples, Dean recommends sealing gelcoat with solvent-based Bionic Banana Shield. Then, every month or so, apply a layer of water-based Juice Boost polymer; it won’t dissolve the Bionic Banana Shield, but will add another layer of protection on top of it. In six months, start over. (This process should work with any combination of solvent- and water-based sealants—but I’d test on a small area first, just to make sure they’re compatible.)
BOAT NUT MAGAZINE NOTE: You will notice the varying opinions on the use of polymers. The truth is a lot of boaters buy these products or one step solutions to restore and maintain gelcoat (color) issues. Unknowingly they screw up the gelcoat surface, the damaged gel coat surface is immediately apparent while prepping the boat for a buff and wax. After removing all the stains and washing the gelcoat surface, swirl marks from a rag become visually apparent on the surface. This gelcoat damage requires more than a little work to repair. A buff and polish now carries with it a gelcoat surface repair bill. Boaters are sold on the idea that all they have to do is apply the secret sauce and the gelcoat will look new, NOT FOR LONG!
FROM BOATS.COM
10. Never apply a polymer or acrylic coating (like Rejex or Poli Glow) over of a waxed hull. This stuff can make old gel coat look new again, for sure. But if any wax gets trapped under the barrier these coatings create it will turn yellow over time, so be sure they’re initially applied to clean, bare glass. What about after application? You can wax over most of these coatings (read the manufacturer's recommendations to be sure this is true of the one you're using, since a few require polishing with a specific product,) and it will help their beauty shine through.
EQUIPMENT TO COMPLETE A GELCOAT MAINTENANCE PROGRAM
YOU WILL NEED: A variable speed sander/polisher complete with and arbor extension. The arbor extension will allow you to use a two side polishing pad (use a 3m white two sided polishing pad). You will also need a pad spur to clean the compound from and prep the polishing pad for use. You require a variable speed polisher, as 90% of the time you will be using the tool at the absolute lowest speed possible. You will also need the recommended polishing pad for the Finesse It (this is a foam pad) to reduce and eliminate swirls from a rotating surface. The other tools you will need will be plenty of clean white cotton rags and a soft hand held scrub brush for the non skid areas.
A half way gelcoat finish has been some what neglected yet retains a nice shine. You will notice more on the gelcoat finish of boats that for sale or that the owner has recently started to loose interest in his/her gelcoat maintenance. This gelcoat will not require a complete restoration, but may have areas that are starting to show signs of gelcoat finish break down. This boat will require an assessment of condition some areas may need to be restored. Half way gelcoat finishes will require you to cherry pick from the above list of steps to restore that factory new gelcoat shine.
The gelcoat finish on this type of boat will probably require a variety of maintenance levels of work from rough to new. If the boat is only a year or so old always check to see if there is a transferable warranty if there is be sure you know what it covers. If there is a transferable warranty be careful to try and follow as close to New Boat Condition rules as possible
When it comes to a new boat I recommend the first thing you do is contact the customer service department of the boat builder that you have purchased and get the complete recommended gelcoat maintenance details from them. Get a written document that outlines what materials and procedures they advise are accepted and will not void a warranty limitation. Stick to these perimeters and do not let any detailer sell you on any other services or products. It is tough enough to get a claim on a gelcoat finish issue through the system, by using products that are not recommended by the manufacturer you can find yourself having a warranty claim kicked.
Document the fact that you are following all the recommended maintenance procedures and products for all your new boat service and maintenance. You have paid a premium for that new boat and the warranties that are associated with that purchase. If you do have an issue with the gelcoat finish on your new boat report and document the area(s) right away never wait until the end of a season or the next time of service. Most claims are accepted based on the report date, not on the date the work to repair starts.
I have seen more and more new boats trying to gain an edge in the marketing by offering exotic colors and finishes on hulls in the last few years, some are clearly using these colors and materials on the hull to hide the amount of factory repair work on the gelcoat that would be necessary when chopping all those popular (huge) hull side windows in a new boat hull. After all boat builders rarely spend money they don't have to on facilities and new materials like top coat. These finishes are not gelcoat they are top coat finishes never assume that you know what your new boat is made of. Top coat products may require unique products and procedures to maintain the finish.
8. Throughout the season, if you spot some staining and need to use a dedicated hull cleaner or soap with strong de-greasers, immediately re-wax the gel coat. Many of those strong cleaners or strippers contain acid, to erase rust streaks and other tough stains. But that acid will also melt your protective coating of wax right off of the fiberglass. If you don’t replace it, oxidation will quickly set in.
GELCOAT MAINTENANCE
Number 8 from Boats.com is very true, maintaining a gelcoat finish requires not just a regular front to back boat going over but spot maintenance. This brings us full circle to the Determining Gelcoat Condition section of this article if you recall I mentioned that gelcoat will deteriorate and show flaws when the mold release wax had been tampered with. You must maintain that wax surface over your shiny gelcoat surface. If the color gelcoat starts to fog up or show water spots again get out the gelcoat maintenance products and maintain those specific areas. Gelcoat finish has environmental enemies all the time, however a constant buff and wax and wax program can keep your boat looking like new for years and years. Get a maintenance schedule going right away it will pay dividends, particularly when you are ready to your boat. A boat with shiny like new gelcoat will always be the first to sell.
Never assess the over all condition of your gelcoat finish by the components that make up the boat. Components are the pieces of separately finished pieces that make up your boat. An example of components are the radar arch, hardtop, dash, vents etc. Some of these components are made out of materials other than gelcoat, some are manufactured by vendors and not by the boat builder. Parts manufactured separate from the hull or the deck can and will age differently than those large gelcoat areas that make up the hull and deck. Components often require their own maintenance assessment and maintenance program
I can not think of a better example than a dash component. If the dash is not molded in one piece with the deck then the gelcoat surface will quite often die in the sun behind the windshield faster than the rest of the surfaces in the cockpit area. Dashes are tricky they have limited access and all that stuff in and on them. It is not uncommon to have to lift a windshield if the forward section of the dash has no gelcoat finish left at all. You must take a look at the accessibility and the gelcoat color to make a determination of how you restore this area. There are a few tricks to make this area better without having to tear the boat apart, however if you do aggressively go after this area of gelcoat finish, and plan to keep the boat for a while. Consider this is an area for top coat finishes, this makes all the sense in the world. No one wants to go at that size of job more than once in the lifetime of ownership.
On a New Boat always cover those hard to maintain areas up do not leave the sun to damage the gelcoat finish.
When your gelcoat fades beyond recovery, paint—actually linear polyurethane—is your best friend. Yes, you can re-gelcoat, but why? LP is harder, smoother, more fade- and stain-resistant, and easier to maintain than gelcoat, explains Matt Anzardo, North American marketing manager at AkzoNobel, the parent company of Awlgrip and Interlux. The two materials are completely different, he says: Gelcoat cures via a chain-reaction initiated by a catalyst (usually MEKP, the clear liquid that comes with polyester resin you buy at the chandlery). “There’s not a set mix ratio for catalyst,” Anzardo says, “so there’s usually some unreacted material.” And what’s more, aggressive cleaners and compounds open the natural pores in gelcoat and make it more susceptible to staining. Awlgrip, like other linear polyurethanes, is cured, not catalyzed, from components carefully mixed in a precise ratio that cross-link to form the linear polyurethane coating. Anzardo says that this results in a tough, abrasion- and UV-resistant material with a smooth, non-porous surface that’s color-stable and relatively stain resistant. When applied over an equally tough epoxy primer (the primer seals the pores in the existing gelcoat, and provides a tenacious bonding surface for the topcoat), the result is a finish that’s hard to beat, and one that demands minimal maintenance: just regular cleaning and occasional polymer sealing. (The Awlgrip system includes a proprietary cleaner, Awlwash, and polymer sealant, Awlcare.)
So the gelcoat finish on the boat has died or requires so much work to restore that top coating the hull or deck is the only real sensible option on the table. Okay shop the higher end yards close to you and remember you get what you pay for (there is always taking a risk spraying top coat outside a controlled environment). As a matter of fact in more and more places you cannot spray top coat in the open environment at all. It has been at least ten years since I have been involved in top coat materials and procedures (in the paint game that's a lifetime!) New water based products and procedures exist today so I will leave the top coat conversation for a paint expert to advise you on. But I do know this paint on a boat should be a last resort unless you are dealing with a boat that has been painted from day one, or has been so screwed up that paint is the solution. A boat can be have a new gelcoat finish applied to it do not let anyone tell you it cannot, however the labor to complete this work and the skill level to finish the surface are getting very difficult to source today.
We have other options today to create a new look and colors on a boat and they include wraps, I know its not top coat or gel coat but anything we put over that old gelcoat surface is susceptible to damage. Never mind it will get damaged and a wrap is just that it can be replaced and changed over time. If you want have heard to be current and hip, get a wrap!
1- A willingness of the boat owner to put in the time or the money to maintain his/her boat.
2- Using the right products to complete the tasks at hand
3- A clear understanding of how gelcoat as a material reacts to different procedures
Buy the right products take the time to learn how to use them, do not be sold snake oil that will fix all your gelcoat finish issues and show your boat some love and it will love you back! Gelcoat is still the best finish for a boat and it can last the life time if you just educate yourself on what it is how it reacts, do not be intimidated by articles that tell you to go straight to the paint shop. Lastly do not start putting products onto your gelcoat surface until you understand how they work and why they work.
Order a free video from BOAT NUT MAGAZINE! You will get step by step detailed information on technique and how to use the products we listed, Gelcoat maintenance is a hands on job and to understand all the steps you have to see it and try it. Boat Nut Magazine explains how to determine the condition of the gelcoat finish carrying right through to the finished boat. This video also includes non skid protection and restoration as well as after restoration maintenance.
This website and its author are not affiliated in any way with OMC. See complete disclaimer below.
Introduction and History
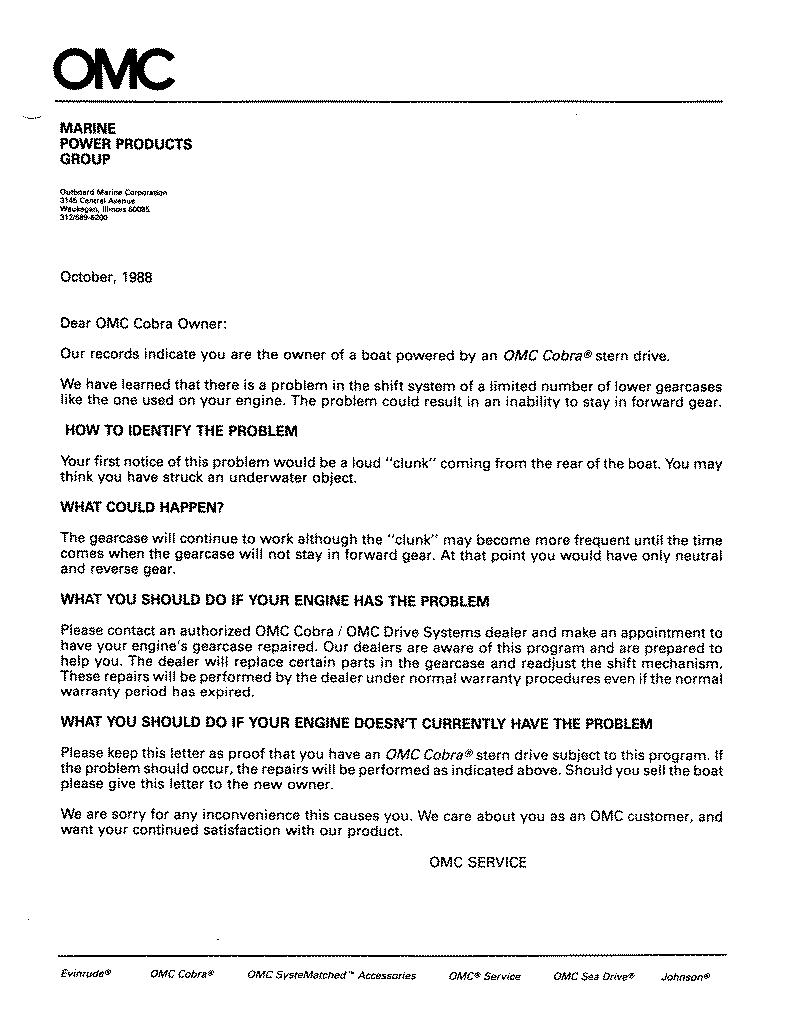
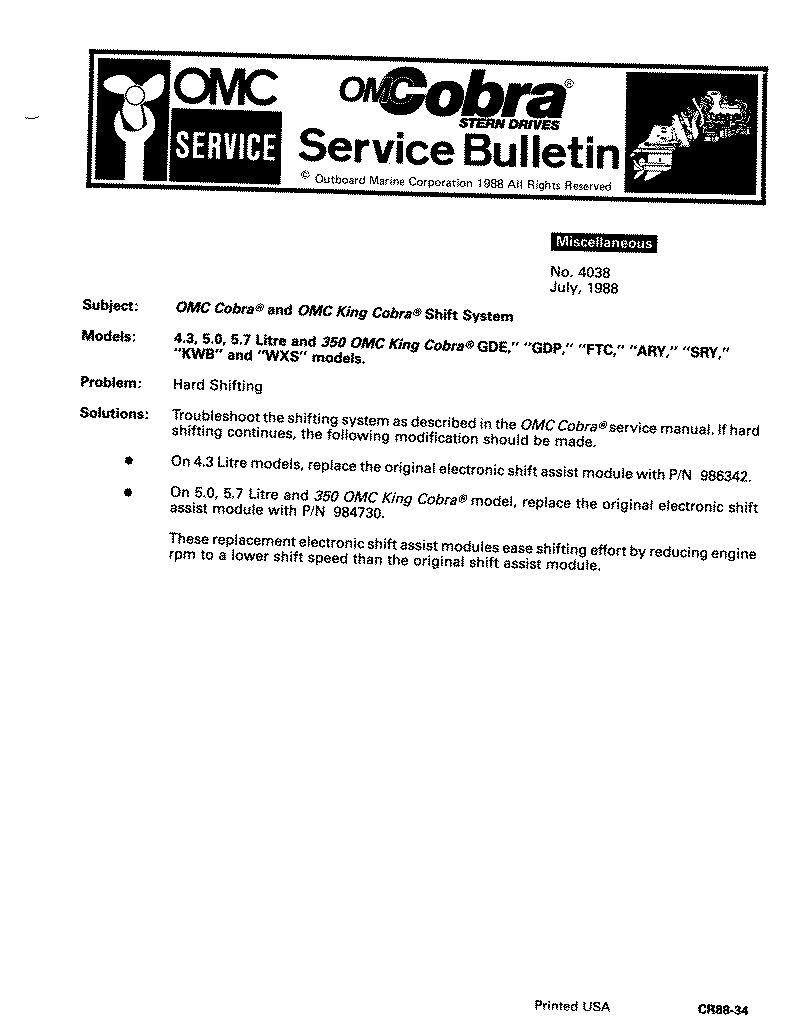
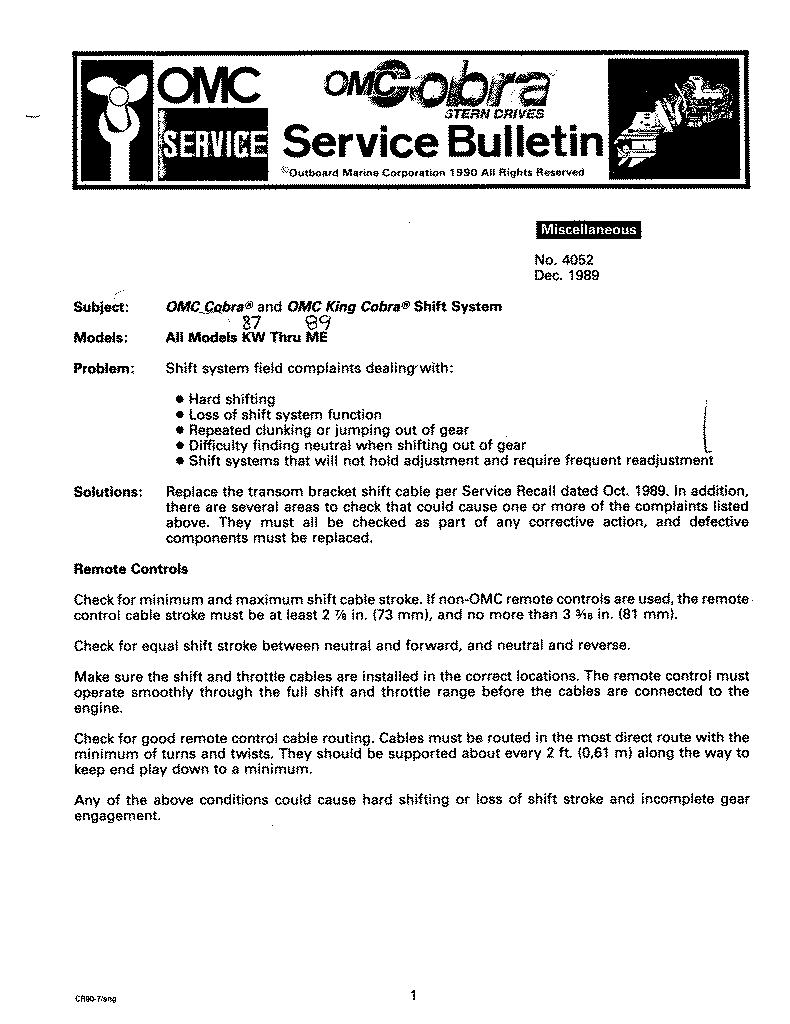
When some critical Volvo patents expired, Outboard Marine Corp. redesigned their sterndrive product and named it the "Cobra." This sterndrive was mated to many different engines, and was routinely installed on a wide variety of boats. The first Cobra shipped in 1985. Everyone agreed the new Cobra drive was an improvement over the predecessor "stringer mount" drive, including many existing boat manufacturers that owned large inventories of the now-obsolete drives. Since these manufacturers didn't want to get stuck with un-salable sterndrives, they pressured OMC into limiting Cobra shipments until they could clear out their existing inventories. Thus, the Cobra didn't ship in volume until the 1986 model year. Thanks to Carl G. Craver for this tidbit. Some early Cobras ate their gearsets. OMC initially thought the clutch dogs were disengaging due to insufficient "bite" (interference cut) on the clutch dog teeth. OMC increased the bite angle from two to five degrees, and all subsequent Cobra clutch dogs have five-degree teeth. All known Cobra owners got a letter (133k) promising warranty coverage if any gearsets failed. Unfortunately, the five-degree clutch dogs did not solve the problem, and in the following year, OMC re-diagnosed the trouble as sticky shift cables. Cobra owners got another letter, inviting them to deliver their boats to an OMC dealer for a free redesigned cable. OMC would replace any cable that failed for free, and if a cable failure destoryed a gearset, OMC would replace the gearset too. The last time I checked (1997), a Cobra gearset was almost US$1000 (labor extra). OMC finally ended this extended warranty in early 1994. I belive the redesigned cable has truly fixed the problem. Alas, many people in the marine business clearly rememberd the gearset troubles, and forgot (or never heard of) the subsequent cable recall and resolution. Many of these folks are "still around," and they have contributed to the Cobra's (undeserved) troubled reputation today. The Cobra was produced until 1993, when OMC redesigned it to use a cone-clutch shifting mechanism originated by Volvo-Penta. I don't know if OMC purchased gears and etc. made by Volvo, or just copied Volvo's design. OMC was having financial difficulties at that time, and sold a 50% stake in their sterndrive business to Volvo-Penta. This new sterndrive is available with one prop ("SX") or dual props ("DP"). The new SX/DP drive retains many of the original Cobra castings. OMC has since been taken private by another company, and sold their remaining interest in the sterndrive business to Volvo. OMC and Volvo have agreed to supply parts to each other, but OMC has left the sterndrive business. OMC continues to purchase SX and DP drives for boats produced by OMC subsidiary companies. OMC went bankrupt in December 2000. Bombardier has purchased the outboard business and the Evinrude and Johnson brandnames. Bombardier is supplying Cobra sterndrive parts, with some price increases. My understanding is that OMC still exists as a legal entity, but they've closed their business, and sold off the rights to their products. I gather they still own their Waukegan headquarters, mainly because they polluted it badly and it's now a Superfund site.
Problems with the Cobra
Cobras have a reputation for eating their gears. This is usually due to a failed shift cable, and is easily prevented. Cobras are routinely maladjusted, compounding the problem. When the distraught owner of a failed Cobra wrote to Trailer Boats magazine, they brushed him off. I wrote a followup letter to Trailer Boats to explain what happened. My letter suggested the dealer was responsible, but it was never published; I suppose it was too long. You may read it here.
Current Status of the Cobra
Original and aftermarket parts seem to be readily available. Comments on rec.boats suggest that many dealers and technicians are still misunderstanding Cobras, and I expect that Cobra expertise will diminish over time. If you're buying a used boat, you're stuck with the drive already installed. If it's a Cobra, you can use the information here to get it shifting perfectly; properly maintained, it is just as good or better than the comparable MerCruiser products. The terrible reputation of the Cobra may depress the price of Cobra-equipped boats slightly. If you know how to adjust a Cobra, this is not an entirely bad thing.
Identifying Your Cobra
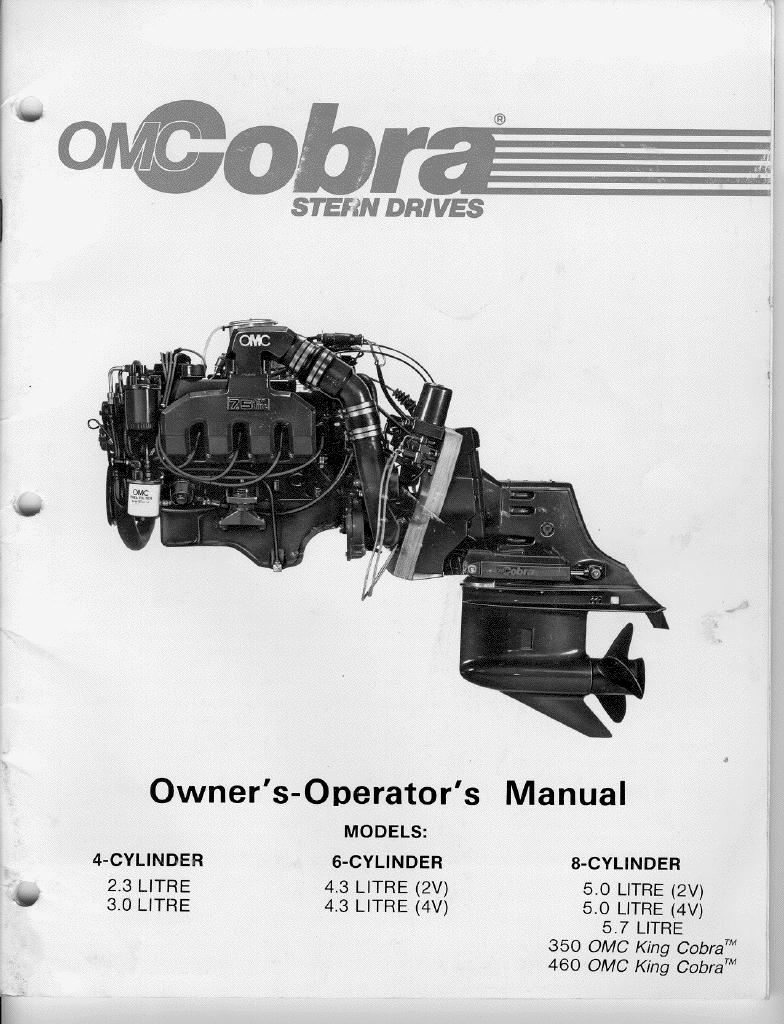
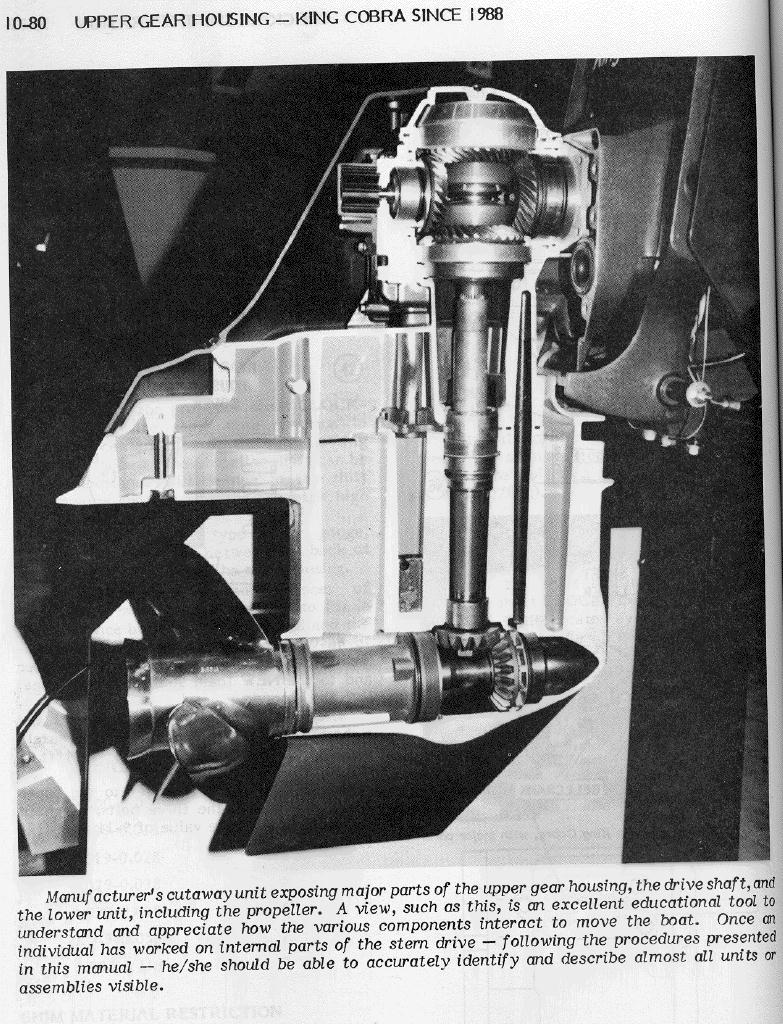
I'm aware of three varieties of Cobra: 1. Dog-clutch (128k), prop exhaust (labelled "OMC Cobra") The most common Cobra, and the subject of this website. The F-N-R gears are located in the bottom, in-line with the propeller. Note the top of the outdrive (portion exposed to water outside the boat) is relatively flat. 2. Dog-clutch, through-hull exhaust (labelled "King Cobra") Mechanically the same as #1, but louder. 3. Cone-clutch (cut-away view, 198k) (also labelled "King Cobra") This Cobra is very rare; I have never personally seen one. The F-N-R gears are located in the top of the outdrive, directly behind the engine. Note the hump on top of the outdrive case that accomodates these bulkier gears. The Volvo-style "cone clutch" in the 1993-on "King Cobra" is extremely durable, and it is not subject to the "bad gears" failure the others are famous for. The 1993-on "King Cobra" is also not otherwise addressed on this webpage; if you have one, buy the manuals, and take it to a qualified Volvo technician. Rejoice! Volvo-style gears are renouned for near-indestructibility. Note the water-pump located on the back of the F-N-R gearcase on the 1993-on OMC "King Cobra." I've been told that the Volvo SX and DP drives use a similar waterpump attached to the engine crank pulley (inside the boat). The rest of you with "dog-clutch" Cobras can continue reading :-) . You will need your serial numbers when querying OMC about your drive. OMC hid several different serial numbers in various places. See them all here (141k). This page was scanned from my 1998 Owners' Manual, and does not show where OMC hid the serial number for smallblock Ford V8s (302, 351), or for GM big-block V8s (454, 502).
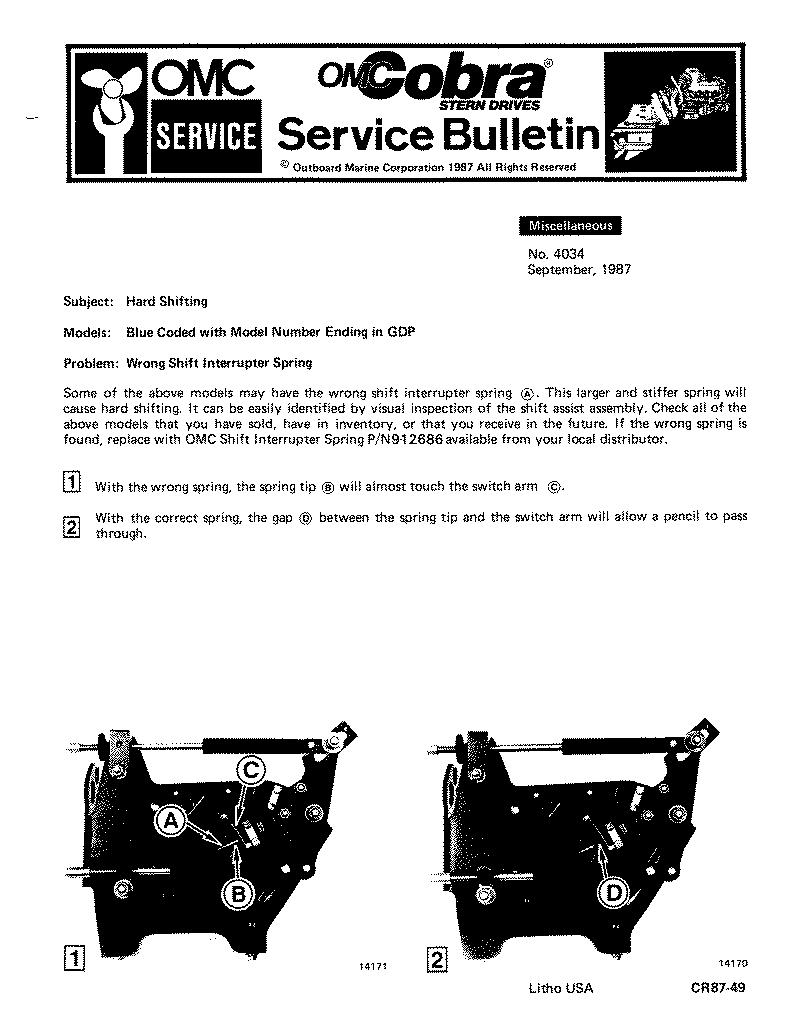
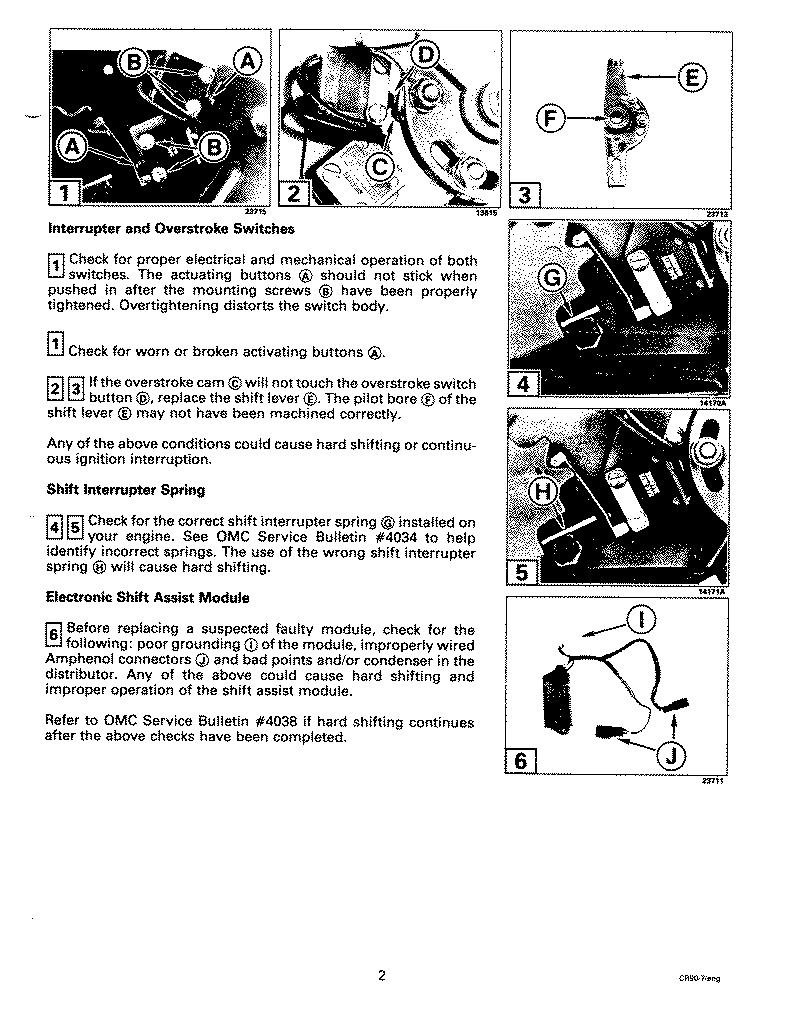
My Cobra has a 2bbl 4.3L V6, and is fitted to a 1988 Four Winns Horizon 180, a typical 18-foot bowrider. This is my first boat, so it took me a while to realize what a serious problem I was facing. My Cobra gearshift was very stiff, requiring about three times as much force as it should to engage/disengage gears. I made many phone calls to OMC, accumulated documentation, talked to many people, and replaced parts until it improved. The main problem turned out to be the Transom Bracket Shift Cable; it seems that the cable OMC installed in 1989 during the recall was still on my boat, and it was failing. In retrospect, this should not have been a suprise; the cable was approximately nine years old! Today, my Cobra "shifts with a finger," as should any properly adjusted Cobra. My Cobra also had a stalling problem when cold; if you engaged a gear before the engine was fully warmed up (a ten-minute process), it would stall. This was an annoyance, as well as an embarrassment when there is a line of folks waiting to launch their boats. The stalling problem turned out to be a vacuum leak, coumpounded by a complete carburetor maladjustment. Of course, I didn't figure this out until I removed the carburetor for a rebuild (one of the hold-down nuts was loose). It appeared that a previous owner/mechanic deliberatly maladjusted everything on the carburetor in a vain attempt to compensate for the vacuum leak. Today, I can engage reverse and back off the trailer as soon as the engine is running. When reviving my boat from winter storage in 1999, I carefully re-visited the adjustment procedure, and I actually measured the cable drag of my transom bracket shift cable. It was too high; another hour of exploration led to a defective "retainer" (see part "R" in picture 11 here). I thought this was very subtle problem, but it's known and documented in the OMC service bulletins. I have some hints for Cobra owners that defy classification. If you have any of your own to share, please send me an e-mail.
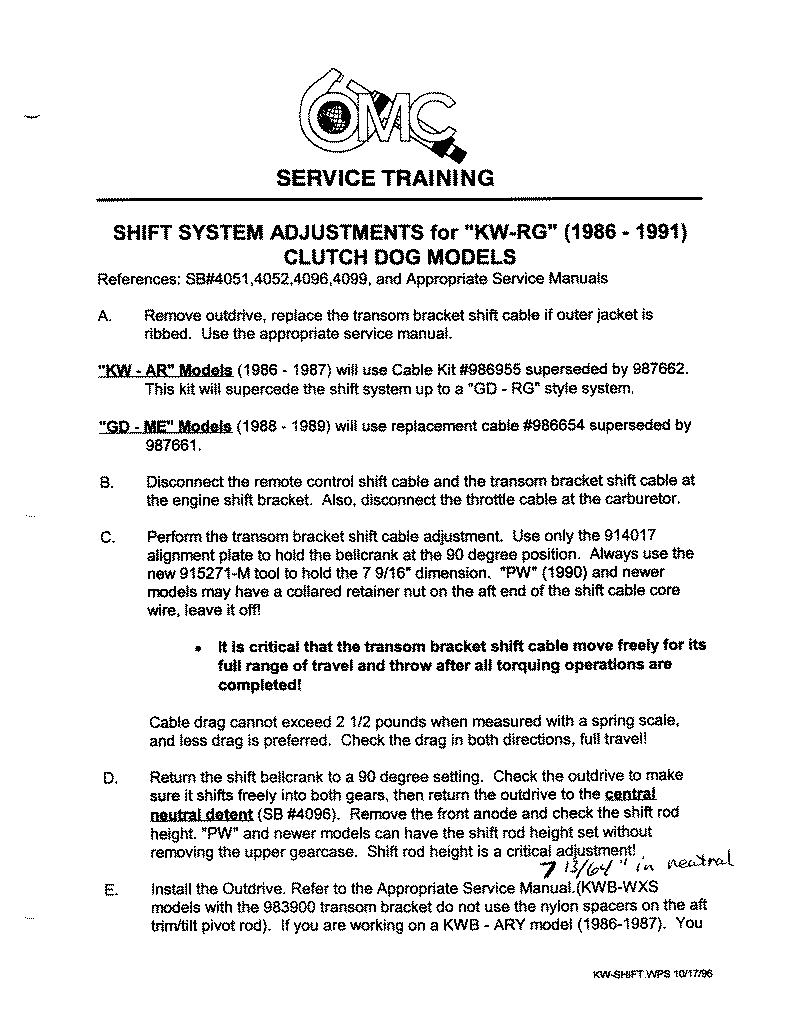
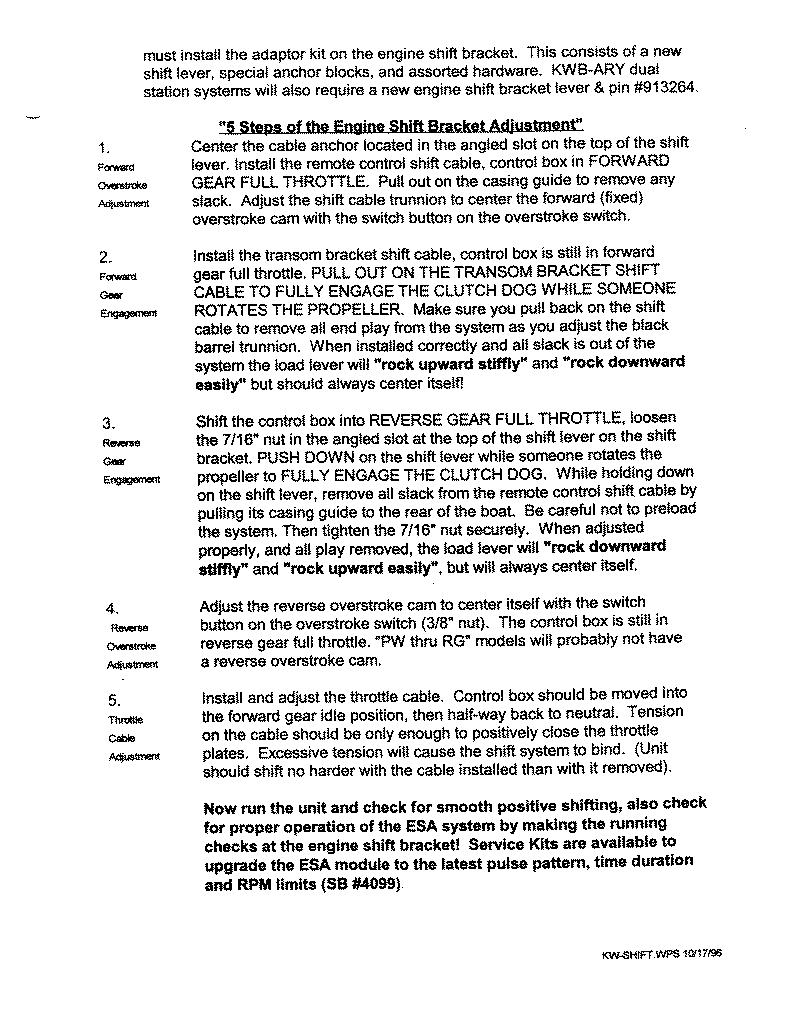
Adjusting your Cobra Shift Linkage
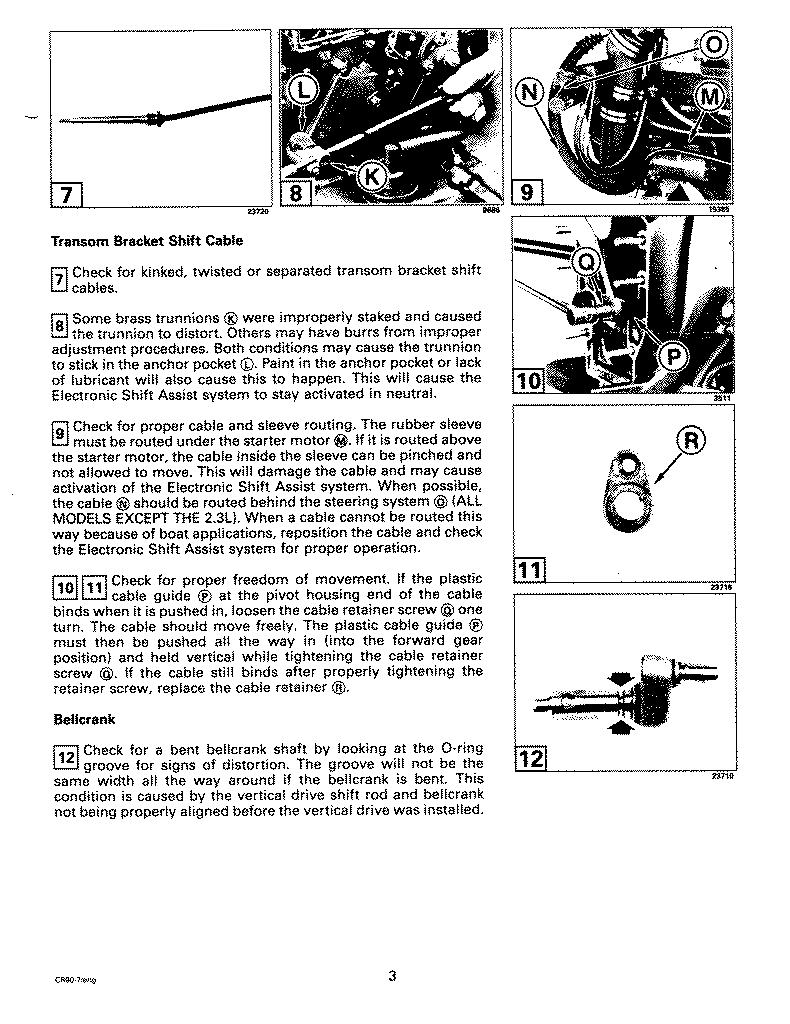
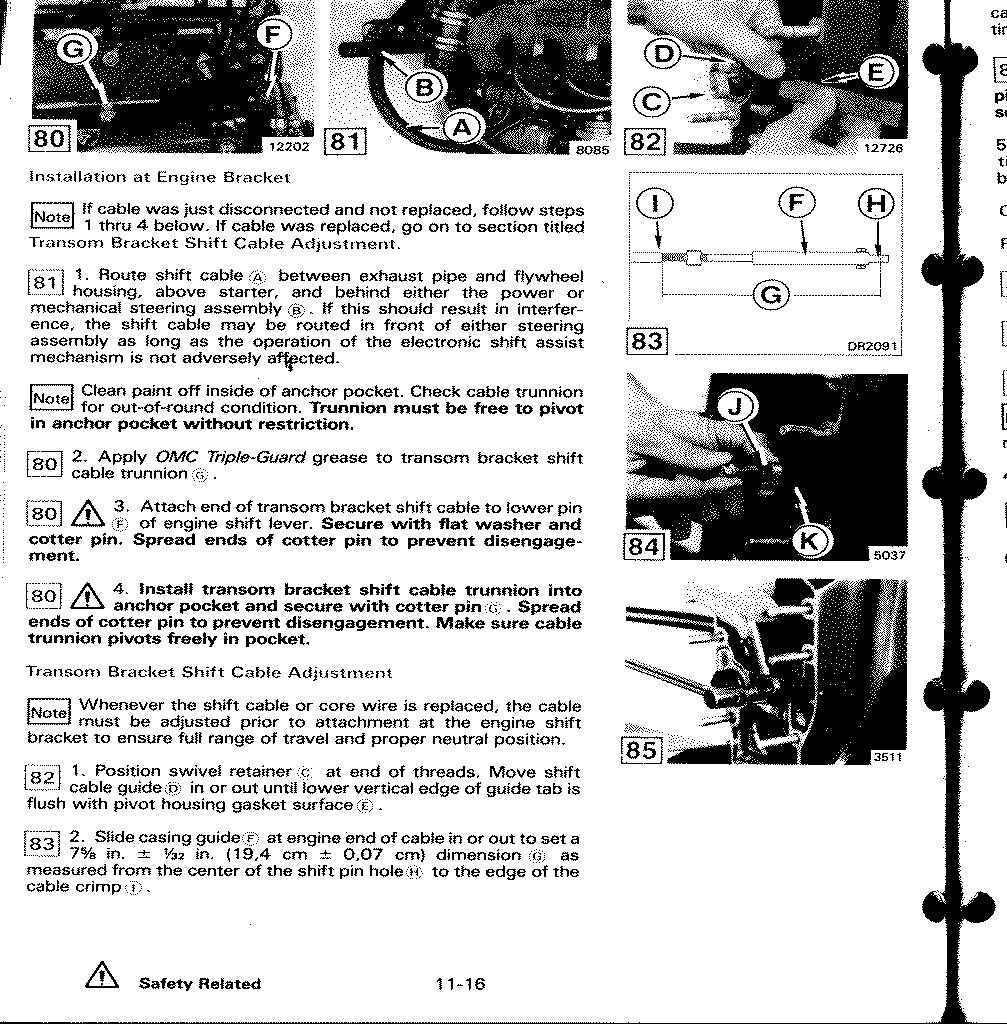
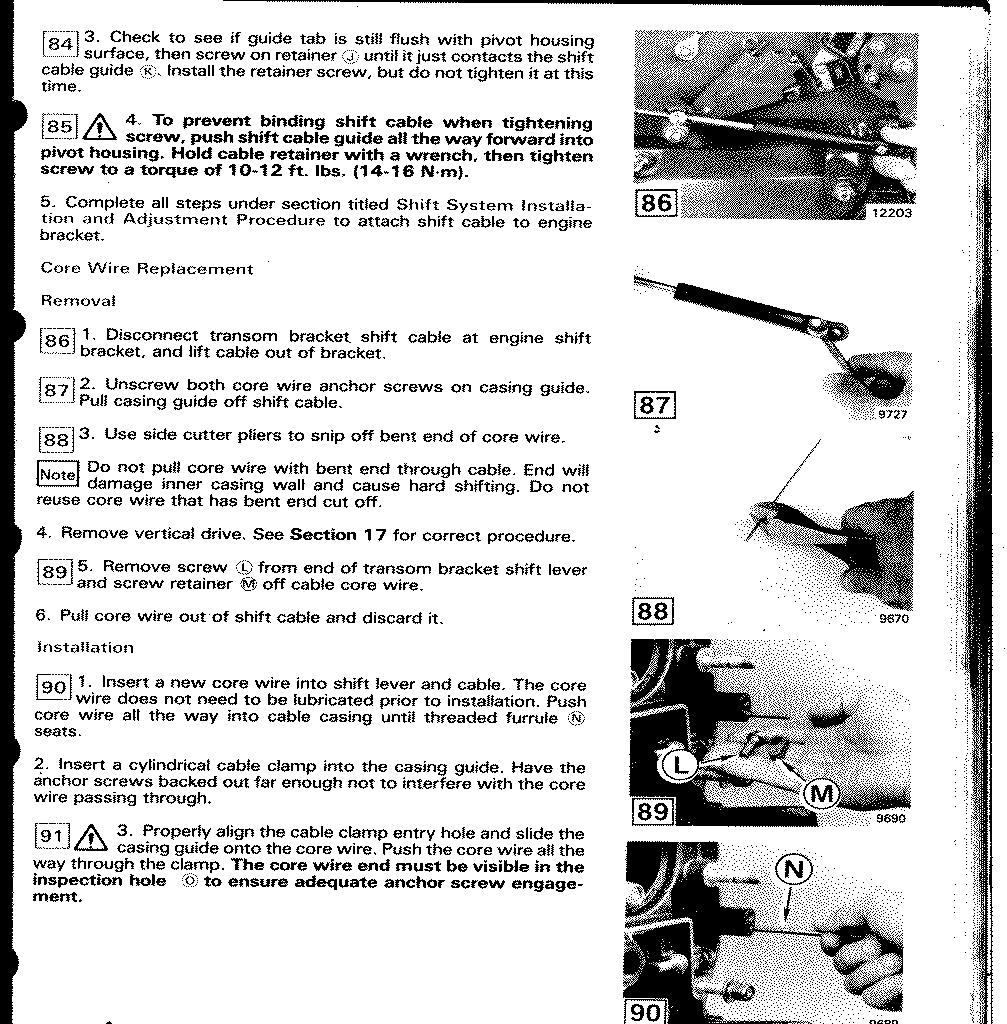
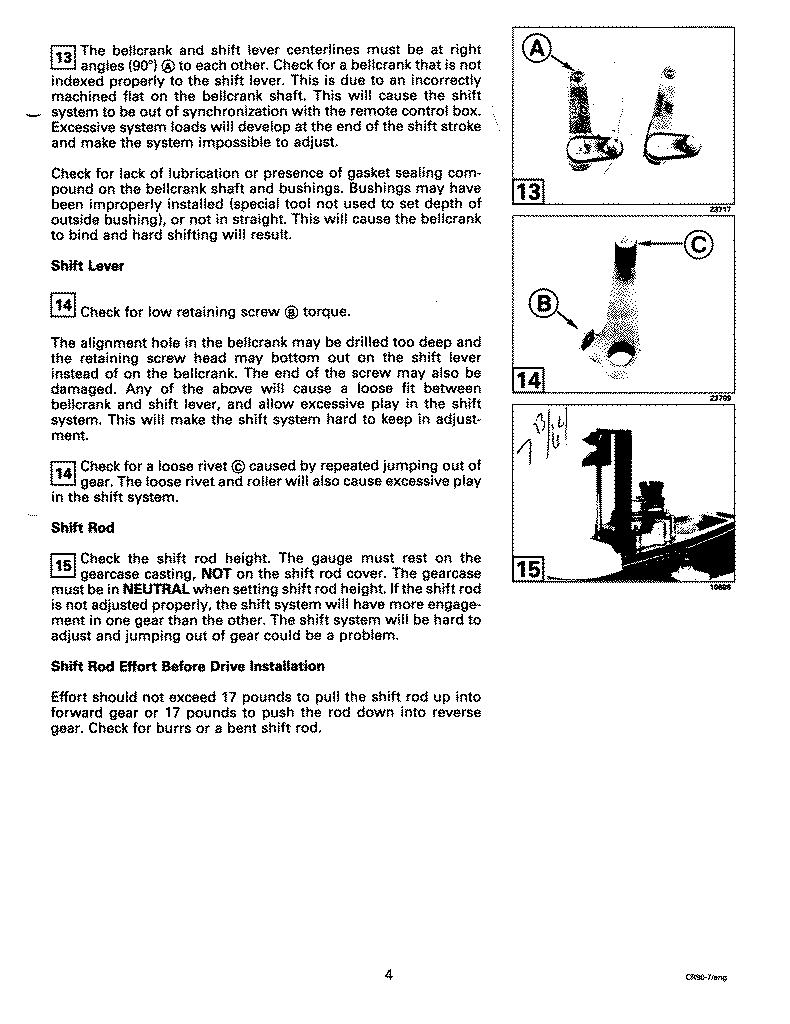
Dave Brown (marina owner and frequent contributor to rec.boats) once said that a properly adjusted Cobra will "shift with a finger." I urge the reader to demand as much from your own sterndrive. If your sterndrive requires more than one finger to shift, get it fixed soon, because your gearset depends upon it. If you're serious about working on your sterndrive, I urge you buy all of the appropriate documentation, especially the "shop manual." I strongly recommend you get the original documentation from the people that built your equipment. I'm not impressed by the aftermarket manuals (Clymer, Seloc, &etc). The manuals should be available from your local dealer, or you can call the manufacturer directly and pay with a credit card. The price will be similar; locally, you'll pay sales tax, and if you order from the manufacturer, you'll pay shipping. Even if your shop manual is out-of-date in some respects (as mine is), it is a wealth of information, and very useful when diagnosing an obscure problem. I'm not listing part numbers for the documentation here because OMC may have different manuals that apply to different years of drives, and I'm too lazy to confirm or disprove this with OMC. However, here are the names of the documents I recommend you get: OMC Cobra Owner-Operator's Manual OMC Cobra Service Manual OMC Cobra Parts Catalog The third item may surprise you; it's a booklet of exploded parts diagrams for an entire sterndrive, with part numbers. This makes it very convenient to order parts from a dealer; you can order by part number, avoiding the usual colorful "thingy that connects the whatsit to the thingamgig" discussions. Below is a link to my by-hand transcription of an OMC document that explains how to adjust the shift linkage on the Clutch-Dog Cobra. I believe this procedure supercedes the procedure outlined in the OMC Cobra Service Manual. My copy of the OMC document is dated "10/17/96", and I believe it to be the latest and final word OMC will ever utter on this topic. Fortunately, it is reasonably clear and easy to follow, and I am very satisifed with my results. I hope this information is as helpful to others. When you read this document, be aware that it assumes you have a servicable Transom Bracket Shift Cable installed and adjusted correctly. If you are replacing your Transom Shift Cable, you'll need to adjust it with the ponderously-named Transom Bracket Shift Cable Adjustment procedure from the OMC Cobra Service Manual (page 11-16 in my copy). I have the two applicable pages 11-16 (290k) and 11-17 (288k) here. This procedure requires only common wrenches, a straightedge, and a ruler; note that subsequent Service Bulletins from OMC require you to use special Cobra-specific tools to make this adjustment.
Here is the legendary how-to-adjust-your-Cobra-shift-linkage document (what your dealer never told you, or didn't know):
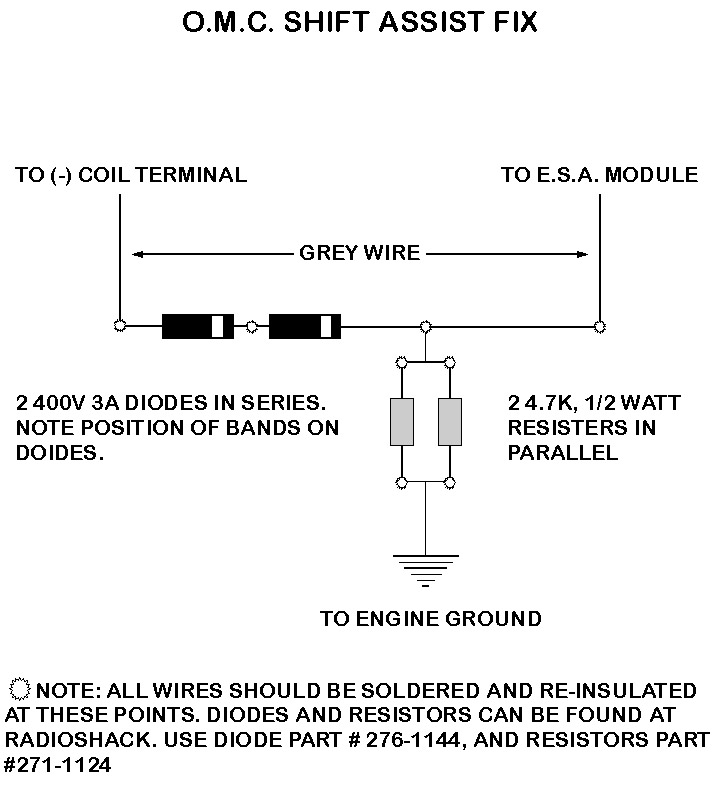
Many Cobras were built with non-electronic ignitions, using conventional points. These ignitions work fine, but the points are subject to wear, so the boat needs re-timing or even new points every season. You can end this cycle of maintenance by installing an electronic igntion retrofit; this is a gadget that replaces the points in your distributor. You install a plastic ring with magnets over the distributor cam, and the gadget senses the magnets as the distributor rotates. The beauty of the system is there are no points to wear and go out of adjustment, and I suppose it's a little more tolerant of moisture. OMC installed such "point-less" ignitions in the later Cobras (I've seen a '92 Cobra with factory electronic ignition). One option is to purchase this and mate it with your boat; in fact, OMC had a set of "kits" that included an electronic ignition gadget plus a new Electronic Shift Assist (ESA), all for the price of the ESA alone. I don't know if these are still available now that OMC is gone. Another, cheaper option is to install the Pertronix Ignitor(tm). (See http://www.pertronix.com.) This is problematic, as the OMC ESA expects to see its sense line dragged down to zero volts every time the points "close," and the Pertronix gadget doesn't do that. Your engine will run fine, but the ESA won't see the pulses it expects, and it won't work, so shifting is stiff. I telephoned Pertronix tech support (the phone number used to be on their website) and inquired. They said the OMC ESA was a known problem, and they mailed me a sheet with instructions for a simple circuit that would interface their gadget to the OMC ESA. Specifically, the circuit has two identical resistors, and two identical diodes, for a total of four parts. I visited my local Radio Shack, bought the parts, plus a small plastic box, and built the circuit. I installed it with my Pertronix Ignitor(tm), and my ESA works fine with it. The diagram that Pertronix sent me is here (100k). I grabbed this off their website some time back, and it subsequently disappeared. However, it had reappeared when I checked in early 2003 (look for "Ignitor," then "Support").
This Web Page
My intent in creating this web page is to spread what I've learned about the Cobra to other Cobra owners, that others may profit from what I've learned. I'm doing this as a Public Service; I'm not selling anything, or making any money with this information. I'm not trying to criticize anyone or force any changes in any corporate policies; I'm fighting ignorance. I did not create this web page to deprive OMC of documentation sales, or to save a few bucks for Cobra owners too cheap to buy the manuals, or to deprive OMC dealers of service business. If you own a Cobra, and you want to work on it yourself, you already know why you need the shop manuals. I realize, however, there are many people that are considering the purcase of a boat with a Cobra drive, or have been putting off the purchase of some manuals, or were just curious,& etc. Sadly, there are still many OMC dealers and independent technicians blissfully unaware of this information, and occasionally a Cobra gearset is destroyed due to such ignorance. Such incidents are expensive for Cobra owners, and they help propagate the "bad gears" story. For example, here is a letter (297k) from the March 1998 issue of Trailer Boats Magazine documenting such a case. If you spot an error, or have any suggestion for improving these pages, please send me a note. I'm reluctant to put my exact email address here, due to spamming concerns, but I'll spell it out: "stuart at hastings period org."
Legal Disclaimer
This information is provided as a Public Service; nobody is making any money from this. This website and its author are not affiliated in any way with Outboard Marine Corporation (OMC). OMC disavows any responsibility for this website, and the information herein. Neither OMC nor Stuart Hastings warrantee this information, and we accept no responsibility for any consequences if you attempt to apply any of the information stored here. OMC has looked at this website. When I created this website, I sent OMC an email describing this location and content. An OMC representative responded with this letter, graciously explaining OMC's position. I have already addressed the issues raised in the letter; you're reading the disclaimer. Please understand, dear reader, that I have reproduced OMC technical documents here, documents that OMC could claim copyright protection for. OMC has graciously agreed to tolerate this practice. Now that OMC is gone, I suppose Bombardier owns these documents; either way, I can't guarantee they'll stay available here forever. Given the fickle and ever-changing nature of the Web, this site will not exist forever. If you own, or expect to own, a Cobra sterndrive, I humbly suggest you make personal copies of any/all informtion contained here that seems useful to you. Created 19feb1999 Added Pertronix stuff, OMC bankruptcy, 03feb2003 Updated 23jun1999


