


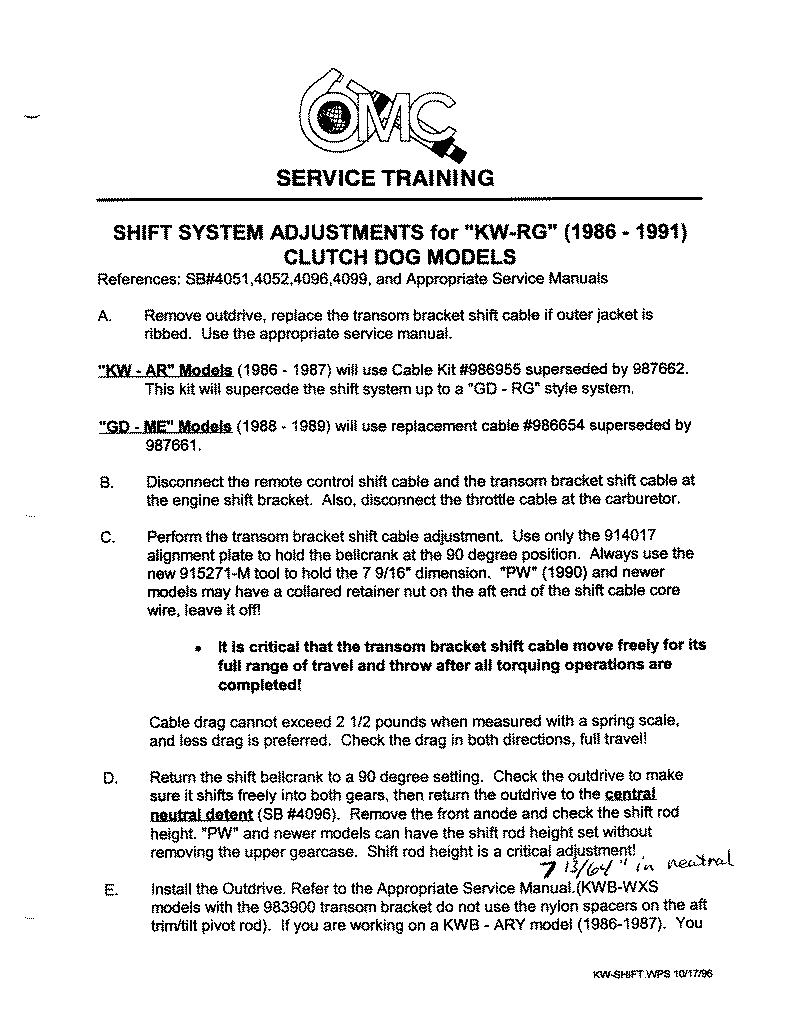
HOW TO MAINTAIN YOUR GELCOAT FINISH
BOAT NUT MAGAZINE.com /BOATS.com /POWER BOAT & MOTORYACHT.com
YOU DECIDE
--------------------------------------------------------------------------------------------------------------------------
Maintaining Gelcoat Finish
In the thirty seven years of repairing, restoring, fabricating and maintaining gel coat surfaces I have read and viewed a mountain of how to information related to gel coat maintenance. This information came by way of manufacturer service schools (attending and instructing), operating the largest fiberglass repair shop in Canada ( Nautica Marine Repair, Port Moody BC), completing prototype work for power boat manufacturers (Maxum Boats, Chris Craft Boats), supplier technical literature/ video and practical experimentation (around the world). A portfolio filled with more than one thousand completed gel coat projects. The fact remains that maintaining a gel coat finish comes down to three basic rules.
1- A willingness of the boat owner to put in the time and/or the money to maintain his/her boat.
2- Using the right products to complete the tasks at hand
3- A clear understanding of how gelcoat as a material reacts to different procedures
Gelcoat is the finish that production boat builders use because it a predictable product that is a bonded layer of tinted polyester material, making up the finished surface we see when the hull or deck are removed from the mold.. Gelcoat is a material that can be released from a mold with a repetitive, reliable result. A gelcoat surface is repairable and forgiving. There are well defined procedures to maintain, and repair, these procedures are all well documented. There are other reasons but for sake of argument these are the reasons that are easy to understand. Virtually every new boat has some type of cosmetic work done to the hull and or the deck while in production. These repairs should not or do not effect the life time finish of your boat. So the thought that gel coat maintenance or repair is doomed to fail is just not true. As a matter of fact a well maintained gelcoat finish can last the lifetime of a boat.
FROM BOATS .COM
If you’re a boat nut ( I love the Boat Nut Reference) perusing the internet for boat maintenance tips—and since you're here on boats.com, we’re guessing that you are—you’ve probably come across our videos on getting tough stains out of gel coat, and how to restore faded gel coat. Even if you've already absorbed that information, there are a number of small yet important things you can add to your list of regular boat maintenance chores to help you attain the ultimate gleam in your hull—which will also make your gel coat last longer. Here are 10 tips to keep your pride and joy in prime condition.
You will read or view information that will inform boat owners that gel coat finishes are unsustainable or require a PHD in polymers to maintain. Entire articles dedicated to painting over the gelcoat finish, touting the idea that a painted hull will somehow reduce the maintenance aspect of boat ownership. With no discussion in regard to how much it will change a repair bill if you slide down the dock and damage the top coat finish. I get the paint proposal, however the cost involved in a great top coat finish will buy you a hell of a lot of gelcoat maintenance. There are ways to determine when a boats gelcoat finish is just to far gone to restore or repair and top coat is only option. That being said there are definitely some boats were the quality of the material and or the products used as mold release definitely affect the life and look of the finish. In these cases the amount of time and material you will spend to try to maintain the factory finish is a waste. The initial gel coat restoration that you do to determine if the factory finish is obtainable or sustainable is not a waste of time. Should the gelcoat be beyond saving the surface is now clean and a top coat estimate will be more accurate. This is due to the fact that the company you hire to top coat over the gelcoat will se any areas that will require repair before primer.
FROM POWER AND MOTORYACHT .COM
Fiberglass is a pretty good boatbuilding material, but gelcoat is its weakness. Although gelcoat feels slick as polished stainless, its surface actually has more nooks and crannies than a Thomas’ Original English Muffin—and it attracts dirt and stains as well as those tasty breakfast treats absorb butter, too. Ask anyone who has transited the Intracoastal Waterway: Tannin in the water from rotting vegetation leaves a tea-brown mustache, pretty much in the shape of the bow wave at 6 or 7 knots. A rite of ICW passage is cleaning off the stain once you arrive at your destination, an awkward chore with the boat in the water.
Even if your boat’s clean-shaven, you still have to deal with stains from bird droppings, water streaks, exhaust, general airborne pollution, spilled wine, and, my personal favorite, ink from a half-eaten squid left on deck by a seagull. (I assume it was a seagull, anyway.) How do you handle all of these, without developing rubbing-compound shoulder? Choose the right products, and in many cases you’ll need less elbow (or shoulder) grease than you think.Gelcoat care involves three stages: Cleaning, protecting, and polishing. Keep up with cleaning and protecting, and you shouldn’t need to do much polishing. A fourth stage, restoration, is necessary only as a last resort, and best left to experts. Let’s hope it doesn’t come to that. Cleaning is easiest, and there are plenty of modern concoctions to help you out
GELCOAT QUIRKS YOU NEED TO KNOW
POST CURE
Fiberglass boats with a gelcoat finish have a few quirky characteristics that anyone who has owned the same boat for years will recognize. There is the post cure curve which is were the materials will continue to cure over years in the hot sun long after the boat was built. This is why you get a hot side of the boat with more print through pattern, if you have the boat facing the same way year in/ year out. This print pattern is far more apparent with colored gel coat hulls. Even a great name in production power boats like Sea Ray will experience this issue. Print thru is when you look at the gelcoat finish and you see the laminated pattern that is under the gelcoat surface. Post cure is also responsible for surface issue such as lines in the gelcoat finish when you remove pin strips. You may also notice that the first name that is applied to the transom is usually visible after a name change even years later. Post cure plays a role in the reason why hull blisters do not suddenly appear in a boat over ten years old, (The materials that the boat are constructed with have stabilized and hardened up to a point were chemical breakdown of the resin becomes almost impossible). there are always exceptions to this rule. The blister topic is another bone of contention with me, we will save that for another article. Believe me it is not just a hull problem.
FOGGING / WATER SPOTS
Fogging or water spotting, is only visible in gelcoat that has color. This is were high moisture content has crept into the gelcoat material. Gelcoat is not a solid surface, it is full of pores and any areas were sanding and polishing or just heavy polishing has gone on without the experience of heat closing the surface flaws, there will appear foggy or cloudy areas. If this foggy or cloudy look appears in a new hull after a short time, this surface area was probably sanded and polished or simply polished during production, well before the boat even got to the dealer. Water spots are most noticeable under air conditioning through hulls, exhaust ports and drains. Theses are areas were water is present in one way or another most of the time. A great representation of how water effects a color is Bayliner models that were built with the dark grey hull (Cierra and Trophy). This color was in the area from the lower hull side to the keel. The grey colored gelcoat at the water line on one of these boats that is moored with out bottom paint. The surface will get a white color change in the grey gelcoat at and below the water line. When the boat is hauled out and the surface gets a chance to dry the white shade in the grey will start to darken back up.
TRANSLUCENCE
The last quirk is translucence this is were either the color of the gel coat is not a solid (there is not enough pigment in the color of the gelcoat to create a solid color) or when one color overlaps another when the two colors are sprayed in the mold. In this case you can see ghosting when the color behind is not uniform in thickness or evenness over the area. You will notice this mainly in gelcoat that is red, blue or green. Translucent gel is the most susceptible to buff through. This is when the wrong type of compound is used to prepare the surface for wax and large areas of the color either get darker or lighter in areas on the boat.
SPECIAL NOTATION FOR METAL FLAKE GELCOAT
Metal flake gelcoat finishes are created in three levels the photo clear gelcoat top we touch, the flake under that and the base color under the flake. The mistake that is made with flake gelcoat is that aggressive compounds are used and burn through is common. If burn through occurs there is no way to restore the factory finish. Once the flake is exposed the compound removes the color from the flake and it becomes a silver area on the boat. Flake requires a delicate touch nothing more aggressive than a 2000 compound and at least two coats of heat set wax, do not mess around with any one step products. You have no room for gelcoat surface damage on a flake boat. I have done a lot of flake gelcoat repairs over the years and they are not easy to match or finish . Flake is an art and most boats that get any damage are painted. Be sure if you buy a used flake boat that you know whether the finish you are seeing and maintaining is gelcoat or paint. it is hard to tell a great paint repair job from a great gelcoat finish. Many boats that have been repaired may have both.
There have been huge advances in gelcoat over the years its harder and more UV resistant now than ever before, however the principals to maintaining a great finish remain the same. Some boat builders are better than others at making allowances for gel finish aging. An example of this is with Sea Ray their blue color gel coat is actually more purple in color, so as the UV breaks the color down the color becomes more blue. This same affects take place with white colors, off white will become whiter and a bright white will become more yellow or grey in color depending on the tint mixture.
Understanding this information is key to a successful maintenance program, and boaters consideration when it comes to swapping out strip packages and graphics. You will even notice that first name on the back of the boat is usually visible after it has been changed out, even years later. This is UV damage and post cure working together in tandem.
So how do you keep your boat looking its best?
So how do you keep your boat looking its best?
--------------------------------------------------------------------------------------------------------------------------
DETERMINE THE CONDITION OF GELCOAT
I think we can break boats into three levels of condition ROUGH, HALF WAY and NEW
Rough Condition
Rough this boat has received no maintenance and when you wash the boat a white wash comes of the hull and deck. No matter what the color of the gelcoat.There is no shine left at all! When a boat is in this condition you use all the weapons you can to clean and prepare the gelcoat surface for restoration. Do not worry about harming the gelcoat finish there is no finish left ! The gelcoat may not completely recover depending on the make of the boat or the gelcoat color. Yes the brand does make a difference in the gelcoat finish, not all boats are created equally. However this is not to deter you, you will not know what you have until you try.
FROM POWER AD MOTORYACHT.COM
When attacking any stain, remember the doctor’s credo: First, do no harm. The shelves of every chandlery hold a slew of gelcoat cleaners, but try boat soap and water first. Starting with mild cleaner and working your way up to the heavy artillery keeps you from damaging the gelcoat unnecessarily. “Soap, water, and elbow grease is the best way to take out most stains,” explains Sandy Derthick of Ashland Inc. (www.ashland.com), manufacturer of Maxguard and Enguard gelcoats. “Avoid using harsh chemicals like acetone, acid, or bleach-based cleaners to wash gelcoats, as these types of chemicals can weaken the gelcoat matrix.”
My boat-cleaning friend Margarita Xistris (www.nauticaldetails.com) agrees, up to a point. “Wash your boat weekly with boat soap, and remove stains right away,” she says. If soap won’t remove a stain, try lemon juice; it often works, and is very safe environmentally. Less environmental, but effective, is oxalic acid. “Apply it in the sun, and keep it warm,” she says. For rust stains, make a paste and let it sit. Mean Green Degreaser (www.meangreendegreaser.com) is good for removing black soot and pollutants, especially from non-skid. “Marinate the area. Don’t dilute the cleaner much; let it sit for 10 minutes, then hit it again if necessary,” adds Xistris. “It’s better to use less abrasion, and rely on chemical action to clean the stain.”
Before selecting any cleaning product, read the label to find out what’s in it, what kinds of stains it’s designed to remove, and how to use it. Pay attention to any warnings on the label, too. Acidic cleaners and stain removers are effective, but many require protective measures. MaryKate On & Off Hull & Bottom Cleaner (www.crcindustries.com), for example, contains phosphoric, hydrochloric, and oxalic acids. The safety data sheet says, “wear protective gloves/protective clothing/eye protection/face protection. Avoid release to the environment.” I’d try something milder first.
1ST STEP: Pressure wash the hull and deck, use a small fan tip and keep the wand moving, try to wash toward the stern always in the same direction. Open all the deck hatches and lockers at this time, get the inside of the lids, drain channels and locker walls. Get ride of all the heavy crap and clear all the drains spend time focusing on the anchor locker.You are doing this to knock off all the chalking and years of crud. In most cases the white dust is mold release that has given up the UV fight. All boats are born with some mold release on the gelcoat surface. This mold release is removed were sanding and polishing or just aggressive polishing has been completed by a detailer, repair technician or factory. So when I reference fogging in color when the surface is repaired at the factory or after the factory the removal of the mold release surface plays a key role in the failure of the gelcoat finish. This mold release is a wax and when the hull is curing in the mold there is a lot of heat generated so this wax surface is very hard and should be considered part of the gel coat surface your trying to reproduce and maintain.. Keep this in mind as heat setting is the key to maintaining and reproducing a new boat gelcoat finish
2ND STEP: Remove the stains that are on the gelcoat surface. These stains are usually from spiders and birds. There may also be rust stains and grease and oil marks. Under hatches and in deck access lockers you will want to remove mold and mildew.
It is a great idea to spray the whole deck area down with bleach yes bleach. The deck must be wet and you must remove any gear such as lines, ropes, and canvas from the boat. Use a spray bottle and spray the gelcoat surface down. The bleach will remove environmental surface debris, this is a must if you are anywhere under a flight path of airplanes. Use bleach to remove bird and spider stains, this may take repeating the process several times until the stains are gone. This same process will clean the mold and mildew out of lockers, hatch lids and drain channels. Even good detailers will miss this step.
The next chemical you will need is muriatic acid available from swimming pool supply stores or paint supply stores. Muriatic Acid will not damage vinyl or plastic. This is the product required to remove rust stains from the gelcoat finish. Rust can appear at the base of any stainless hardware on the boat. Stainless is no longer stainless when you cut the air off from the surface and allow water to creep in. Rust may also come from engine work tools or other metal items left in damp locations. You apply the muriatic acid by brush from a jar, be sure you read the instructions on the product it is an acid and can be harm full to breath or ingest. The stain areas with rust must be dry before you start , apply the acid on the rust stain area with a small paint brush and watch for the area to turn yellow when this happens rinse with water right away. repeat until the stain is gone.
For grease and oil marks try WD40 even on the seats, if this dos not work get out a Mr Clean scrub pad.
3RD STEP: Wash the boat completely with a mild soap and rinse the hell out of the boat. Spend time at the rub rail and hatches you can get a pile of sand and foreign debris out of these areas. Make sure you have cleaned the whole boat top to bottom. The next steps depend on a clean surface the cleaner the better the gelcoat finish will be. Allow your gelcoat to completely dry, you will need to inspect all of the gelcoat surfaces next!
FROM BOATS.COM
1. Start the spring by hitting the hull with an oxidation remover and a buffer (after an initial wash-down, of course). We agree it's a pain in the keister, but if you wax without cleaning first you’ll only seal in the imperfections and dullness that took root over the winter.FROM POWER AND MOTOR YACHT.COM
No matter how conscientious you are at cleaning and sealing your gelcoat, eventually the day will come when it looks dull and chalky, which means it’s time to get out the buffer and compound. Polishing with rubbing compound, or, in dire cases, wet-sanding, will usually restore the gelcoat’s color and shine—but every compounding removes gelcoat (wet-sanding strips even more), so it’s better to protect than to restore. Eventually, your gelcoat can get so thin that you’ll be able to see the glass fabric underneath it. (To predict how your gelcoat will look after restoration, wipe it with a wet sponge. The water briefly fills the chalky areas and brings back the color. If it looks good wet, your gelcoat will probably respond to polishing; if not, skip this section and go straight to the sidebar on this page: “Paint? Get Out Your Checkbook”)
There’s a right way and a wrong way to compound, by the way, and it starts with the compound itself. Don’t use auto compound on a boat; it’s designed for softer paint, so it’s less abrasive and it will take a lot of rubbing to do the job. Compound formulated for gelcoat is more abrasive and cuts faster—never use it on your car, or you’ll be heading for the spray booth. And most rubbing compound contains petroleum distillates. (Wear a mask, so you don’t inhale any particles.) The oil is what restores the color, though.
If you’re not comfortable using a buffer, hire the yard to compound your hull, if not the whole boat. (The deck is easier, and you can do it in smaller bites.) Honestly, I’d rather work more and earn the money to pay for someone else to compound my boat than do it myself. It’s not particularly satisfying work, and it takes more skill than you think to do a good job. Wet-sanding? Call the experts.
4RTH STEP: Its time to get that finish back. What supplies and equipment will you need?
The materials or products that you use are more than half the battle in your gelcoat maintenance program. I have a simple list of products that will give you the best results every time no matter where you are geographically, salt water/ fresh water your boat is kept in, or the brand of boat you own. The list I am providing you are the best products that I have ever used or seen to restore or maintain gelcoat surfaces in the industry. You will not be disappointed with the products as long as you understand how to make them work for you.
PRODUCT LIST TO COMPLETE A GELCOAT MAINTENANCE PROGRAM ( MATERIALS)
AQUA BUFF COMPOUNDS 1000 & 2000
http://www.aquabuff.com/application-guides/
Why Aqua Buff? Aqua Buff is the best compound for gelcoat maintenance and restoration that I have ever used, it is predictable and easy to manage. Aqua Buff supplies 1000 and 2000 compounds. Use the 1000 compound for the first buff (to restore the color and remove any fogging) it is effective at removing any old applied waxes and what is left of the existing mold release wax on gelcoat surfaces. Used in combination with the 2000 compound (this is a necessary step) the gel coat surface will be reflective and visually look finished. This compound is the most forgiving material you will ever use on a gelcoat surface. Aqua Buff allows you the necessary work time to heat the gelcoat surface to the temperatures required to close the surface flaws. Aqua Buff compounds give you immediate visual feed back. All necessary when you are working to restore a gelcoat surface to a factory new boat finish. This product will work on any plastic surface. You can use the 2000 compound right over graphics, the chances of burning or polishing through the surface is reduced to a point where the chances of buff through is virtually eliminated.
Why Aqua Buff? Aqua Buff is the best compound for gelcoat maintenance and restoration that I have ever used, it is predictable and easy to manage. Aqua Buff supplies 1000 and 2000 compounds. Use the 1000 compound for the first buff (to restore the color and remove any fogging) it is effective at removing any old applied waxes and what is left of the existing mold release wax on gelcoat surfaces. Used in combination with the 2000 compound (this is a necessary step) the gel coat surface will be reflective and visually look finished. This compound is the most forgiving material you will ever use on a gelcoat surface. Aqua Buff allows you the necessary work time to heat the gelcoat surface to the temperatures required to close the surface flaws. Aqua Buff compounds give you immediate visual feed back. All necessary when you are working to restore a gelcoat surface to a factory new boat finish. This product will work on any plastic surface. You can use the 2000 compound right over graphics, the chances of burning or polishing through the surface is reduced to a point where the chances of buff through is virtually eliminated.
3M FINESS IT
http://solutions.3m.com/wps/portal/3M/en_US/3MIndustrial/Abrasives/Products/~/3M-Finesse-it-Polish-Final-Finish?N=7581719+3293242753&rt=rud
Why Finesse It? Finesse It is a sealer that will bring the color to an absolute factory finish. With the right technique and heat from the buffer pad this product gives the extra finish step that a compound cannot provide. Finesse It is available in black and white, only use the black on dark colors. Aqua Buff leaves virtually no swirl marks when worked into the gelcoat surface, however if there are any swirls Finesse It will eliminate them.
BOAT AND AIRCRAFT WAX
Why Boat & Aircraft Wax? This is simply an inexpensive product that can be heat set and provide a wax finish as close to a mold release new boat finish as I have ever been able to produced. You will fall over when you find out the retail price point! Boat and Aircraft Wax is considered a cleaner wax which allows you to get any Aqua Buff compound or Finesse It sealant that the polisher will no reach. Yes it looks that good even by hand. It is a wax that allows you to carry on using it as a great gel coat surface maintenance product.
I can not explain the science of why the combination of these products work but be assured it sure does in any environment any where in the world, every time. It has taken years to get the right combination of products together to produce a new boat finish that can be reproduced over and over.
FROM BOATS.COM
2. Now set that buffer aside, and make your base coat of wax a thick paste wax. Yes, this stuff is tougher to apply than liquid wax, and no, it doesn’t provide as much shine as a spray-on carnauba. Your elbows will ache and unless your boat's a dinghy this job will take hours. But that thick, pasty stuff is more protective and lasts far longer. The truly dedicated among us will rub, rub, rub from stem to stern—and then start all over again, giving the boat a full-length double-coating of love.
3. With the base coat applied it's time to get the gleam going, by giving the boat a third coat of wax with a liquid carnauba-based product. But remember, though this stuff looks great it doesn’t last for long. After a couple of weeks in the sun and rain, that gleam will be gone. So every other Saturday plan to re-apply it. That way the shine will keep shining and the base coat of wax will stay protected.
4. After every trip in saltwater, douse every inch of fiberglass with freshwater regardless of how dirty it may or may not be. Then, douse it again. Otherwise, when the saltwater dries it leaves crystals behind. These crystals can magnify the sun's rays, and UV light is the number-one enemy of wax—so leaving salt behind will rapidly speed up the wax’s break-down.
FROM POWER AND MOTOR YACHT.COM
Once the stain’s gone and the gelcoat’s clean, you have to rewax. Some folks still swear by carnauba wax, while others have switched to longer-lasting polymer sealers. Which is better? Depends on who you ask. Derthick at Ashland says, “If the gelcoat is in good condition, it’s best to just use a conventional wax to protect the surface.” Xistris, on the other hand, says polymer sealant takes more time to apply, but lasts longer and is better for the gelcoat. “Polymer sealants are like suntan lotion for your boat,” she says.
Everyone knows how to wax gelcoat, but most of us don’t do it often enough. More is better, within reason. Polymer sealants aren’t so straightforward, says Garry Dean, a professional detailer from Tampa, Florida, who has developed Detail Juice, a line of eco-friendly products for maintaining the finishes of cars, motorcycles, and boats (www.detailjuice.com). His Bionic Banana Shield is a “synthetic polymer hybrid wax” that prevents dirt and oxidation from getting into the gelcoat pores. Even under the Florida sun, one application should last at least six months, says Dean. Won’t two layers be better? Maybe not.
Dean says that if you protect a surface with a solvent-based polymer, then apply a second layer over the first to get more protection, the second layer dissolves and removes most of the first one. Thus, you’ve done two applications, used twice as much product, spent twice the time, but you end up with just one layer of polymer. The trick, he says, is to recoat a solvent-based sealant with a water-based one. Using his own products as examples, Dean recommends sealing gelcoat with solvent-based Bionic Banana Shield. Then, every month or so, apply a layer of water-based Juice Boost polymer; it won’t dissolve the Bionic Banana Shield, but will add another layer of protection on top of it. In six months, start over. (This process should work with any combination of solvent- and water-based sealants—but I’d test on a small area first, just to make sure they’re compatible.)
BOAT NUT MAGAZINE NOTE: You will notice the varying opinions on the use of polymers. The truth is a lot of boaters buy these products or one step solutions to restore and maintain gelcoat (color) issues. Unknowingly they screw up the gelcoat surface, the damaged gel coat surface is immediately apparent while prepping the boat for a buff and wax. After removing all the stains and washing the gelcoat surface, swirl marks from a rag become visually apparent on the surface. This gelcoat damage requires more than a little work to repair. A buff and polish now carries with it a gelcoat surface repair bill. Boaters are sold on the idea that all they have to do is apply the secret sauce and the gelcoat will look new, NOT FOR LONG!
FROM BOATS.COM
10. Never apply a polymer or acrylic coating (like Rejex or Poli Glow) over of a waxed hull. This stuff can make old gel coat look new again, for sure. But if any wax gets trapped under the barrier these coatings create it will turn yellow over time, so be sure they’re initially applied to clean, bare glass. What about after application? You can wax over most of these coatings (read the manufacturer's recommendations to be sure this is true of the one you're using, since a few require polishing with a specific product,) and it will help their beauty shine through.
EQUIPMENT TO COMPLETE A GELCOAT MAINTENANCE PROGRAM
YOU WILL NEED: A variable speed sander/polisher complete with and arbor extension. The arbor extension will allow you to use a two side polishing pad (use a 3m white two sided polishing pad). You will also need a pad spur to clean the compound from and prep the polishing pad for use. You require a variable speed polisher, as 90% of the time you will be using the tool at the absolute lowest speed possible. You will also need the recommended polishing pad for the Finesse It (this is a foam pad) to reduce and eliminate swirls from a rotating surface. The other tools you will need will be plenty of clean white cotton rags and a soft hand held scrub brush for the non skid areas.
--------------------------------------------------------------------------------------------------------------------------
CONDITION
HALFWAY GELCOAT FINISH
A half way gelcoat finish has been some what neglected yet retains a nice shine. You will notice more on the gelcoat finish of boats that for sale or that the owner has recently started to loose interest in his/her gelcoat maintenance. This gelcoat will not require a complete restoration, but may have areas that are starting to show signs of gelcoat finish break down. This boat will require an assessment of condition some areas may need to be restored. Half way gelcoat finishes will require you to cherry pick from the above list of steps to restore that factory new gelcoat shine.
The gelcoat finish on this type of boat will probably require a variety of maintenance levels of work from rough to new. If the boat is only a year or so old always check to see if there is a transferable warranty if there is be sure you know what it covers. If there is a transferable warranty be careful to try and follow as close to New Boat Condition rules as possible
--------------------------------------------------------------------------------------------------------------------------
CONDITION
NEW BOAT
When it comes to a new boat I recommend the first thing you do is contact the customer service department of the boat builder that you have purchased and get the complete recommended gelcoat maintenance details from them. Get a written document that outlines what materials and procedures they advise are accepted and will not void a warranty limitation. Stick to these perimeters and do not let any detailer sell you on any other services or products. It is tough enough to get a claim on a gelcoat finish issue through the system, by using products that are not recommended by the manufacturer you can find yourself having a warranty claim kicked.
Document the fact that you are following all the recommended maintenance procedures and products for all your new boat service and maintenance. You have paid a premium for that new boat and the warranties that are associated with that purchase. If you do have an issue with the gelcoat finish on your new boat report and document the area(s) right away never wait until the end of a season or the next time of service. Most claims are accepted based on the report date, not on the date the work to repair starts.
I have seen more and more new boats trying to gain an edge in the marketing by offering exotic colors and finishes on hulls in the last few years, some are clearly using these colors and materials on the hull to hide the amount of factory repair work on the gelcoat that would be necessary when chopping all those popular (huge) hull side windows in a new boat hull. After all boat builders rarely spend money they don't have to on facilities and new materials like top coat. These finishes are not gelcoat they are top coat finishes never assume that you know what your new boat is made of. Top coat products may require unique products and procedures to maintain the finish.
------------------------------------------------------------------------------------------------------------------------
FROM BOATS.COM
8. Throughout the season, if you spot some staining and need to use a dedicated hull cleaner or soap with strong de-greasers, immediately re-wax the gel coat. Many of those strong cleaners or strippers contain acid, to erase rust streaks and other tough stains. But that acid will also melt your protective coating of wax right off of the fiberglass. If you don’t replace it, oxidation will quickly set in.
GELCOAT MAINTENANCE
Number 8 from Boats.com is very true, maintaining a gelcoat finish requires not just a regular front to back boat going over but spot maintenance. This brings us full circle to the Determining Gelcoat Condition section of this article if you recall I mentioned that gelcoat will deteriorate and show flaws when the mold release wax had been tampered with. You must maintain that wax surface over your shiny gelcoat surface. If the color gelcoat starts to fog up or show water spots again get out the gelcoat maintenance products and maintain those specific areas. Gelcoat finish has environmental enemies all the time, however a constant buff and wax and wax program can keep your boat looking like new for years and years. Get a maintenance schedule going right away it will pay dividends, particularly when you are ready to your boat. A boat with shiny like new gelcoat will always be the first to sell.
Never assess the over all condition of your gelcoat finish by the components that make up the boat. Components are the pieces of separately finished pieces that make up your boat. An example of components are the radar arch, hardtop, dash, vents etc. Some of these components are made out of materials other than gelcoat, some are manufactured by vendors and not by the boat builder. Parts manufactured separate from the hull or the deck can and will age differently than those large gelcoat areas that make up the hull and deck. Components often require their own maintenance assessment and maintenance program
I can not think of a better example than a dash component. If the dash is not molded in one piece with the deck then the gelcoat surface will quite often die in the sun behind the windshield faster than the rest of the surfaces in the cockpit area. Dashes are tricky they have limited access and all that stuff in and on them. It is not uncommon to have to lift a windshield if the forward section of the dash has no gelcoat finish left at all. You must take a look at the accessibility and the gelcoat color to make a determination of how you restore this area. There are a few tricks to make this area better without having to tear the boat apart, however if you do aggressively go after this area of gelcoat finish, and plan to keep the boat for a while. Consider this is an area for top coat finishes, this makes all the sense in the world. No one wants to go at that size of job more than once in the lifetime of ownership.
On a New Boat always cover those hard to maintain areas up do not leave the sun to damage the gelcoat finish.
--------------------------------------------------------------------------------------------------------------------------
NO WAY BACK
FROM POWER AND MOTORYACHT.COM
When your gelcoat fades beyond recovery, paint—actually linear polyurethane—is your best friend. Yes, you can re-gelcoat, but why? LP is harder, smoother, more fade- and stain-resistant, and easier to maintain than gelcoat, explains Matt Anzardo, North American marketing manager at AkzoNobel, the parent company of Awlgrip and Interlux. The two materials are completely different, he says: Gelcoat cures via a chain-reaction initiated by a catalyst (usually MEKP, the clear liquid that comes with polyester resin you buy at the chandlery). “There’s not a set mix ratio for catalyst,” Anzardo says, “so there’s usually some unreacted material.” And what’s more, aggressive cleaners and compounds open the natural pores in gelcoat and make it more susceptible to staining.Awlgrip, like other linear polyurethanes, is cured, not catalyzed, from components carefully mixed in a precise ratio that cross-link to form the linear polyurethane coating. Anzardo says that this results in a tough, abrasion- and UV-resistant material with a smooth, non-porous surface that’s color-stable and relatively stain resistant. When applied over an equally tough epoxy primer (the primer seals the pores in the existing gelcoat, and provides a tenacious bonding surface for the topcoat), the result is a finish that’s hard to beat, and one that demands minimal maintenance: just regular cleaning and occasional polymer sealing. (The Awlgrip system includes a proprietary cleaner, Awlwash, and polymer sealant, Awlcare.)
So the gelcoat finish on the boat has died or requires so much work to restore that top coating the hull or deck is the only real sensible option on the table. Okay shop the higher end yards close to you and remember you get what you pay for (there is always taking a risk spraying top coat outside a controlled environment). As a matter of fact in more and more places you cannot spray top coat in the open environment at all. It has been at least ten years since I have been involved in top coat materials and procedures (in the paint game that's a lifetime!) New water based products and procedures exist today so I will leave the top coat conversation for a paint expert to advise you on. But I do know this paint on a boat should be a last resort unless you are dealing with a boat that has been painted from day one, or has been so screwed up that paint is the solution. A boat can be have a new gelcoat finish applied to it do not let anyone tell you it cannot, however the labor to complete this work and the skill level to finish the surface are getting very difficult to source today.
We have other options today to create a new look and colors on a boat and they include wraps, I know its not top coat or gel coat but anything we put over that old gelcoat surface is susceptible to damage. Never mind it will get damaged and a wrap is just that it can be replaced and changed over time. If you want have heard to be current and hip, get a wrap!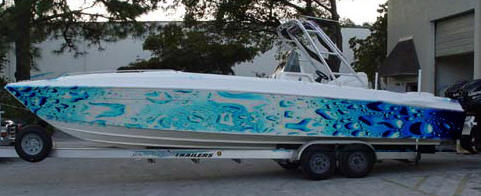
--------------------------------------------------------------------------------------------------------------------------
REMEMBER THE THREE RULES
1- A willingness of the boat owner to put in the time or the money to maintain his/her boat.2- Using the right products to complete the tasks at hand
3- A clear understanding of how gelcoat as a material reacts to different procedures
Buy the right products take the time to learn how to use them, do not be sold snake oil that will fix all your gelcoat finish issues and show your boat some love and it will love you back! Gelcoat is still the best finish for a boat and it can last the life time if you just educate yourself on what it is how it reacts, do not be intimidated by articles that tell you to go straight to the paint shop. Lastly do not start putting products onto your gelcoat surface until you understand how they work and why they work.
--------------------------------------------------------------------------------------------------------------------------
IF YOU WANT TO LEARN HOW TO MAINTAIN YOUR GELCOAT
Order a free video from BOAT NUT MAGAZINE! You will get step by step detailed information on technique and how to use the products we listed, Gelcoat maintenance is a hands on job and to understand all the steps you have to see it and try it. Boat Nut Magazine explains how to determine the condition of the gelcoat finish carrying right through to the finished boat. This video also includes non skid protection and restoration as well as after restoration maintenance.
administrator@boatnutmagazine.com tag: gelcoat maintenance
You will receive the video along with a tech support number you can call if you run into issues or need assistance with a question.
--------------------------------------------------------------------------------------------------------------------------
To guarantee access to all of Boat Nut Magazine articles, pictures and featured services visit the official Boat Nut Magazine ©™ website. Be sure to reply to the Boat Nut Association registration on our site for the latest Boat Nut weekly and monthly news letters and opportunities.
Copyright 2015 © Boat Nut Media, Toronto, Ontario. All rights reserved. No part of this information/publications may be stored in a retrieval system, transmitted, or reproduced in any way, including but not limited to photocopy, magnetic, or other record, without prior agreement and written permission of the publisher, Boat Nuts Media ©™ No liability is assumed with respect to the information provided


