HOW TO WINTERIZE MY BOAT?
This is a difficult topic to address in this format, the reason for this is that every boat is different and the systems along with the way they are rigged can be very different. Watching a video or getting information on a web site does not mean that the boat has been properly protected. So I will go over each main system on the boat that can potentially freeze and discuss the problems you could run into. What you need is a list and a strategy that is specific to your boat.
BOAT SPECIFIC(will include) MAKE, MODEL ,YEAR, MOTOR (serial number) DRIVE (information), LIST of SYSTEMS
INBOARD & INBOARD OUTBOARD
There are two different types of cooling systems 1
Closed cooling and 2
Raw water cooling.
What does this mean?
Closed cooling refers to a motor that has a heat exchanger and antifreeze running through the block. This type of cooling takes very little raw water to run the system, you need to protect the raw water side and be aware of the condition of the coolant in the closed system side.
Two different systems to cool the motor.
1-
Closed cooling requires you to check the condition of the antifreeze in the heat exchanger, and not just a visual check but a check of the freeze point or temperature which the antifreeze will no longer be effective. There is a tool for this and if you fail to check this the motor can and will still freeze.
2- The raw water side of the system is where the lake water is pumped through the heat exchanger and cools the anti freeze. This is the side that must be drained and have antifreeze pumped through it until it comes out the exhaust. You will notice that I said you must drain the system first. This goes for all the water systems on the boat if you just pump antifreeze through the system how do you know you have the level of protection you expect, you don't, the water in the system will mix with your antifreeze and lower the temp with which it will freeze or possibly leave pockets of water in areas of the block or the accessories mounted to the block. These areas will freeze!
3- You will have to locate the drain on the heat exchanger to allow the fresh water to drain. While you are draining the fresh water from the heat exchanger it is a good time to remove and check the condition of the pencil anode. This anode protects the heat exchanger from corrosion.
4- On the older heat exchangers you can remove one of the end caps to allow the fresh water to drain. If you remove the end cap it is important to replace the end cap and the gasket in the right direction. Do not overtighten the end cap when you replace it. Be sure you inspect the end cap for leaks in the spring when you start the engine.
Raw water cooling is where motor cooling is done by pumping lake water alone, flowing through the block and all attached accessories. The same strategy applies you must drain the block, manifolds, coolers and any other raw water components of water first. If you have a Mercruiser with the central water sump drain be sure you remove the drain plug. Once you have drained all the fresh water and replaced the drain plugs, go ahead and pump antifreeze through the block until it comes out the exhaust.
Here are the things you need to watch for
- When draining the block and the manifolds are you getting flow out of each drain? You should. If you are not getting a flow of water out of the drain there are two possibilities of a problem. 1- You have a build up of sand in the area where the drain is, and this sand will freeze and split the block or the manifold 2- You have a build up of corrosion in the port you are trying to drain. You can test these possibilities by finding a short piece of wire or a wire tie with you. Poke it in the drain and see what comes out. The debris that comes out will tell you what is going on, once cleared of debris you should start to see the area drain down.
- Do you have mufflers in your boat? The mufflers also hold water and have a drain screw at the bottom to let the water out before you add antifreeze to the motor.
- Be sure you have pumped enough anti freeze through the system, do not be stingy or assume that the exhaust tells you when the system is full there could be long runs to coolers or a hot water heater. When the anti freeze is showing at the exhaust be sure to rev the motor up two or three times and back to idle to verify that you have all the systems full.
- You should have a nice constant flow of antifreeze out the exhaust if it is week or taking forever to flow then you have a bad water pump. Just because you had flow of water through the exhaust while your boat was in the lake doesn't mean the pump is strong enough to pump the antifreeze on land.
- Your boat may also rely on raw water to lubricate the stuffing box were the shaft goes through the hull you must see antifreeze flowing out here as well
- Water pick up lines from the lake to the raw water pump must also be protected this may include basket strainers, be sure you drain the strainers and protect them as well. All basket strainers have a drain on or near the bottom, this is also a good time to use your shop vac and clean them out of debris. As long as the thru hull is open the hose from the thru hull to the basket will gravity drain.
- Fuel filters, if you have had a problem with water in the gas this year change the fuel filters or drain the water separator bowl. Fuel filters and bowls will freeze and crack.
Information from Discover Boating
You should run the engine(s) to warm it up and change the oil while it is warm. This tends to allow impurities to be drained away with the oil. You should also change the oil filter(s). Flush the engine(s) with fresh water. You should circulate antifreeze through the manifold by using a pickup hose from the waterpump to a bucket of antifreeze. Start the engine and allow the antifreeze to circulate until water starts to exit the exhaust. This process will vary slightly depending on whether you have a "Raw Water" cooling system or an "Enclosed Fresh Water" cooling system. While you're in the engine room you should also change the fluid in your transmission. Remove spark plugs and use "fogging oil" to spray into each cylinder. Wipe down the engine with a shop towel sprayed with a little fogging oil or WD-40.
Reply from Boat Nut
If you are planning a fluid change it is better to do this before you haul the boat or put your boat on a trailer. This will assure that you can run the boat engine long enough to obtain a temperature that will allow you to remove the fluids. Cold oil is like dealing with molasses and is hard to remove. Never assume that you can get enough water to the boat on land to run it long enough to get the engine warm enough to flow. A big block engine can suck a garden hose flat in a matter of seconds and create an overheat situation, damaging the water pump and much more. You must also have the correct muffs to run your boat or the water pump will draw air when you are on water or antifreeze. If you have the means grab a sample of the antifreeze after you feel that you are protected and use a Anti freeze tester to see the freeze point. Giving the block a spray with WD 40 is always a good idea.
You should thoroughly inspect the stern drive and remove any plant life or barnacles from the lower unit. Drain the gear case and check for excessive moisture in the oil. This could indicate leaking seals and should be repaired. Clean the lower unit with soap and water. If your stern drive has a rubber boot, check it for cracks or pinholes. Grease all fittings and check fluid levels in hydraulic steering or lift pumps. Check with your owner's manual for additional recommendations by the manufacturer.
Alpha Service Information from Boat Nut Magazine
Bravo Drive and Volvo Duo Prop
If you have an OMC drive it is important that you know to drain the shift cavity as this area holds water and can freeze
All of the above will also apply to your generator if you have one on board.
There is question as to whether you leave the antifreeze in the blocks and systems or to drain the system after you add the antifreeze. Some people say the antifreeze protects the inside of the water passages from corroding over the winter, but because we have had a few crazy winters with rapid temp fluctuations I drain the systems after I run the antifreeze through the systems, this is because I am in an area where we use minus 50 antifreeze but could see colder temperatures. This also means that in the spring I am not starting the boat in the water and polluting the lake with coolant.
In the case of an
Inboard Out board Drive it is always a good idea to pull and inspect the drive. The biggest reason for this is the bellows will in all probability have some water in them. In the spring you will see many issues with bellows cracks and this is because the water in the bellows has frozen and expanded. Now the boat is taking on water and you have a problem. If you have a OMC you must loosen the drive and drain the shift cavity this area holds water and will freeze.
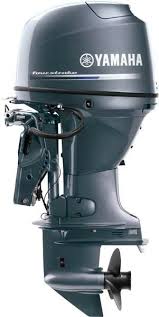
OUTBOARD
Information from Discover Boating -Outboard Motor
Flush engine with fresh water using flush muffs or similar device attached to the raw water pickup. Let all water drain from the engine. Wash engine down with soap and water and rinse thoroughly. Disconnect fuel hose and run engine until it stops. It is important to follow a step by step process to make sure that all fuel is drained from the carburetor to prevent build-up of deposits from evaporated fuel. Use fogging oil in the cylinders to lubricate the cylinder walls and pistons. Apply water resistant grease to propeller shaft and threads. Change the gear oil in the lower unit. Lightly lubricate the exterior of the engine or polish with a good wax.
Boat Nut Response
All new four stroke motors must be winterized as there are areas such as thermostat housings and other areas which do not self drain when the motor is tilted in the vertical potion. If you wish to protect the engine from fuel issues in the spring you can run the motor on a light mix of two stroke mix or you can purchase man made fuel to run the motor on which last more than a year.
No matter what you are winterizing Inboard Out board or Outboard always pull the props clean the shaft check for fishing line at the back of the prop around the shaft or thrust washer. Re grease the shaft with prop shaft grease and reinstall the prop, do not over apply the grease or the thrust washer will not push all the way back on the shaft. Treat the lower unit on an outboard the same as an Inboard Outboard.
Link
BATTERIES
If the batteries are not at a full charge or have been serviced by adding distilled water they can freeze, it is best to store the batteries in a dry warm location and to give them a trickle charge every once in a while to keep them fresh and ready to go in the spring
AIR CONDITIONING
Your Air Conditioning relies on lake water pumped through a heat exchanger of sorts. This is why we need to drain and protect this system as well. Because the water pick up point is the lowest point this is the best way to drain the AC. If you have a basket strainer then use this as your drain point and take the time to clean the strainer out. Gravity will allow the water to feed back down and drain almost all of the water out of the AC unit, and you can use the basket strainer as the feed point to pump antifreeze back through the AC until it comes out of the thru hull on the side of the boat. So what can go wrong?
- AC systems from the factory have a magnetic drive pump. This means the impellor can run free when the system is not powered, however they are expensive and many pumps have been replaced with traditional impellor pumps. If you have a nonmagnetic pump you will not be able to gravity drain the system as the impellor will not free wheel backwards. This will mean disconnecting the hose at the outlet side of the pump and reconnecting after you drain the system.
- It is not unusual for the impellor to become slimy and not pick up the antifreeze and pump it through the system, you may need to force pump antifreeze through the system.
- If it is a split system where you have more than one AC unit you need to be sure that both units are protected equally this may mean blocking a thru hull until antifreeze shows at both the thru hull drains on your boat. Check the antifreeze by catching some and inspecting some of it just to be sure it is not watered down.
- The same rules apply here, you can drain away the antifreeze when you are done if you choose to. One note the antifreeze is very slippery and can affect the spring start up ability of the AC pump to prime itself, you may need to pull the magnetic impellor and clean the pieces to prevent the impellor from simply not turning.
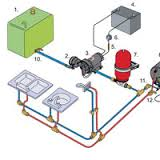
SUMP PUMP, BILGE PUMPS, ACCESSORY PUMPS
Information from Discover Boating- Bilge
Make sure the bilges are clean and dry. Use soap, hot water and a stiff brush to clean up any oil spills. Once the bilges are clean, spray with a moisture displacing lubricant and add a little antifreeze to prevent any water from freezing.
Response from Boat Nut Magazine
With new boats and different types of boats there are many pumps and systems that will require your attention. In the case of Fishing boats and Wake Board boats there are a variety of pumps that cannot be over looked these include ballast pumps and tanks, live wells and bait wells. For cruisers and smaller boats there are bilge pumps, shower sump pumps and wash down pumps. Each one of these systems must be drained and protected with antifreeze. This is where boat specific information is required as you may not know where to access or how to access these pumps. These systems can be expensive to repair and can cause a boat to sink if they are not properly protected.
Leaving water in the bilge can cause thru hull blocks to split and create leaks at any hardware that goes through the boats hull. Always be sure the areas below the floor are dry and clean if you have any concerns take any extra anti freeze you have and pour it directly into the bilge after you clean and dry these areas. If you read the blog on Shrink Wrap you will have picked up on the tip to use a dehumidifier this will draw the moisture out from any where below the floors and get the water and moisture off the boat so that any damage by freezing water in areas you cannot see are reduced.
FRESH WATER SYSTEM
Information from Discover Boating - Water System
Completely drain the fresh water tank and hot water heater. Isolate the hot water heater by disconnecting the in and out lines and connect them together. Pump a non-toxic antifreeze into the system and turn on all the faucets including the shower and any wash-down areas until you see the antifreeze coming out. Also put non-toxic antifreeze in the water heater.
Reply from Boat Nut Magazine
The fresh water system is the hot and cold water that you have on your boat, this maybe as simple as a tank, pump and one sink. It can also be complex with hot and cold manifolds complete with a dockside systems, The following is a list of what could be included.
- Hot Water Tank. You do not want to fill your hot water heater with antifreeze, you need to by pass the tank by tying the hot and cold lines from the tank together to create a closed loop and drain the water heater down of water using the drain provided on the tank.
- Ice Maker. The Ice Maker uses water from the cold side on the boat to make ice and must be drained and protected as any other water accessory on the boat. There are different types of ice makers but they all require a small cold water line to work. You do not need to pump antifreeze all the way thru the icemaker when you disconnect the small water line to the unit it will drain . You just want antifreeze to the unit itself.
- Head. If you have a head which relies on potable water to flush, such as a vacuflush system then you need to be sure that the water to the head is pumped out and that antifreeze is pumped to the head. in the case of a vacuflush head if you push up on the flush foot valve you can pump the water out with the fresh water pump on and while pumping antifreeze do the same action and you will see the antifreeze flow into the bowl. Traditional flush heads and electric flush heads pick up water from the lake to flush, but beware this is not always the case. You must know where the head is getting water from to protect it properly. This goes for each head on the boat. I have seen cases where heads have been changed and in doing so have changed the water supply as well. Of course you must flush a gallon or so directly down the head to protect the lines and accessories between the head and the holding tank. Be sure you have pumped out your holding tank before touching the head system, once pumped if you have an odor in the boat add some cleaner to the holding tank and let it work over the winter.
Pump out the holding tank at an approved facility. While pumping, add fresh water to the bowl and flush several times. Use Vanish crystals or whatever your owner's manual recommends that will not harm your system and let sit for a few minutes. Again add fresh water and pump out again. Add antifreeze and pump through hoses, holding tank, y-valve, macerator and discharge hose. Again, check your owners manual to make sure that an alcohol-based antifreeze won't damage your system.
- Hot and Cold water systems on older boats are straight forward. The tank feeds a pump and the pump feeds the system. However new boats have distribution manifolds and in many cases more than one, each manifold has a drain and must be drained before you add antifreeze as these distribution points will not fill with antifreeze to prevent freezing. There will be hot water manifolds and cold water manifolds. This again is boat specific stuff and you must know where they are located to be sure you do not have a leak in the spring.
- Washer/Dryer. The washer/dryer units in larger boats are also tied to the cold water lines and you must understand the manufacturers instructions on how to correctly protect the unit from freezing.
- Dock Side Water hook up is a separate cold line which tees in on the pressure side of the water pump and has no connection to the water holding tank on board the boat, and for this reason it is a dead end from the pump and must be drained out and protected.
When you start to protect the fresh water system you must first pump the water holding tank and the system out of water.
DO NOT PUT THE ANTIFREEZE IN THE WATER HOLDING TANK!!
- Open the drain valve on the hot water heater
- Open all the taps on the boat hot and cold, this includes the transom shower and allow the pump to run until all water is out of tank and taps are spitting water.
- Disconnect the dockside fitting and let the pump push any water out of line
- Hold up on the flush valve on your vacuflush head until you have no water
- Disconnect the water line at the icemaker
- By pass the hot water heater
Once all the water is gone disconnect the water line feeding the fresh water pump and attach the line you intend to feed the antifreeze thru. Once you are ready to pump antifreeze, close all the taps and get ready for antifreeze flow at the open lines such as dockside water and icemaker. These lines will fill quick. Turn on the pump and watch to be sure the system has picked up the antifreeze, once the dockside line and ice maker lines are full turn off the pump, reconnect these lines and get ready to do each tap in the boat individually (don't forget the showers) start with the furthest tap from the pump and work your way thru the boat until all the lines are running with antifreeze.
It is always a good idea to pour some antifreeze down any deck drains!
WINTERIZE USING COMPRESSED AIR
The other option is no anti freeze and using compressed air this works very well. Create a line which connects your compressor to the dockside water hook up. in this case you do not need to bypass the water heater. You leave all taps open and simply push air thru the system until all the water vapor is gone this way the next year you simply fill the system and go. The trick here is not to over pressurize the water system with too much air. I have met people who use air to blow the water out of virtually all there systems and use little to no antifreeze at all. This takes less time and effort but does require the experience of knowing what to look for. Otherwise you will not know all the water is pushed out of the systems.
FUEL SYSTEM
Information from Discover Boating
Fill your fuel tank(s) to avoid a build up of condensation over the winter months. Add a fuel stabilizer by following the instructions on the product. Change the fuel filter(s) and water separator(s).
Response from Boat Nut Magazine
There is a great deal of disagreement on filling fuel tanks or leaving them with some fuel. Here is why if you have been filling with fuel that contains ethanol, which most of us are now, the ethanol will actually create a water in fuel condition when left to settle unburnt. So some say the more fuel you leave in the tank the more contamination you are introducing. Others are still on the side of filling the tanks up. Most additives we use to stabilize fuel only last three months or so. I believe less fuel is better as fuel life is so short that even with stabilizer you can top the tanks in the spring change the filters and run the bad or old fuel off in a mix.
The Boat
Information from Discover Boating
Once you have taken care of the system you should remove any valuables, electronics, lines, PFDs, fire extinguishers, flares, fenders, etc. Over the winter these items can be cleaned, checked and replaced as necessary. Open all drawers and lockers and clean thoroughly. Turn cushions up on edge so that air is able to circulate around them or, better yet, bring them home to a climate controlled area. Open and clean the refrigerator and freezer. To keep your boat dry and mildew-free you might want to install a dehumidifier or use some of the commercially available odor and moisture absorber products such as "No Damp," "Damp Away" or "Sportsman's Mate."
Response from Boat Nut Magazine
We agree with Discover Boating! You must however take care of the canvas, never leave the canvas on under the plastic cover. The corners of the canvas get worn down premature and mold and mildew set into the material. Once this mold is in the canvas it keeps coming back. Always remove and store the canvas in a dry location, this gives you the opportunity to inspect for areas that need repair and zippers that need repair. The curtains or windows should be dry clean and rolled for storage. Never fold or crush the windows as they will crack along these folds. Remember in the off season it is the ideal time to have repairs, replacement or modifications made to your canvas covers. While the boat is in storage it is important to treat the exterior seats with the same care as the interior seats lift them up and allow the air to move around them. Open all lockers and hatches for the same reasons prevent excessive mold. In the spring when the temperatures start to climb all the moisture trapped in the boat attempts to evaporate this will cause mold any where the moisture cannot reach the outer environment. Remember NO BOAT BUILDERS RECOMMEND PLASTIC AS A STORAGE SOLUTION!
OUT OF WATER
Information from Discover Boating
Pressure wash hull, clean barnacles off props and shafts, rudders, struts and trim tabs. Clean all thru-hulls and strainers. Open seacocks to allow any water to drain. Check the hull for blisters and if you find any that should be attended to you might want to open them to drain over the winter. While you're at it, why not give the hull a good wax job? It is probably best to take the batteries out of the boat and take them home and either put them on a trickle charger or charge them every 30-60 days.
Response from Boat Nut Magazine
The method of pressure washing works great if you have bottom paint on the hull, however without bottom paint it can be a different situation. Pressure washing works at its best if you get the hull cleaned immediately after haul out (Right Away). If you have no bottom paint then it maybe necessary to used a acid cleaning. To complete an acid clean you must be aware of how to protect the boat the environment, yourself and the trailer. Boat Nut Magazine will prepare an article on Acid Cleaning for boaters who want the bottom to look like new for the next season. If you find blisters on the hull have a professional inspect the areas, there are several reasons for blisters and opening them up without any knowledge of what you are assessing can be detrimental to determining the cause. If you leave the blisters until the spring to have assessed then you are defeating the purpose in having the blisters looked at many types of bottom blisters will dry up over the winter and appear to have gone away. There not they will be back next season and quite often worse and larger in size. Maintaining gelcoat finishes with wax or compounds only works when there is correct temperatures to cold and the materials will not be effective. Pick the days you compound and wax carefully.
IN WATER STORAGE
Information from Discover Boating
Close all seacocks and check rudder shafts and stuffing boxes for leaks, tighten or repack as necessary. Check your battery to make sure it is fully charged, clean terminals, add water if necessary and make sure your charging system is working. Check bilge pumps to ensure they are working and that float switches properly activate the pumps and that they are not hindered by debris. Make sure either to check your boat periodically or have the marina check it and report to you. If in an area where the water you are docked or moored in actually freezes, you should have a de-icing device or bubbling system around your boat.
Response from Boat Nut Magazine
Boat Nut Magazine will follow this subject up with an article dedicated to this topic soon!
This information is not a how to guide nor is this information intended to make you a pro at winterizing. It is to educate you that there are situations that can appear that will effect the ability of antifreeze to be effective in preventing freezing ( Anti freeze can freeze it is just designed not to expand, unlike water which can grow to nine times its liquid size in volume). This information will also demonstrate that there is more than one way to winterize, and without being boat specific there is no way to be sure that you are protected. No one can show or tell you with any certainty without knowing the details of your boat that you have winterized your boat with any guaranty. In some cases a combination of techniques may be best for your boat, as some systems maybe hard to locate. It is also important to note that not all motors are the same (even the same model may have several types of drain systems) there may be no drains where you expect and others where your not looking. Simply running antifreeze through your boats systems does not in any way mean that your boat is protected you must have knowledge of your boats systems to be sure you are doing the right techniques. If you have invested in a brand new boat or do not feel confident hire a pro, its not cheap but you will know that if there is a problem that you have not voided a warranty or insurance plan.
Once you have a plan in place and have a clear understanding of the types of pumps, sizes of hoses and lines you need to work with. You can design and create adaptors and hose fittings for each system so you can hook up your antifreeze container or air lines to make the process of winterizing quicker and easier to complete. You should only struggle the first year with your boat after that you will find the whole process a lot less time consuming and be able to accurately purchase the necessary supplies without waste. Come up with a system that works for you everyone has an opinion or advise some will be ok lots will not apply to your boat!
To guarantee access to all of Boat Nut Magazine articles, pictures and featured services visit the official Boat Nut Magazine ©™ website. Be sure to reply to the Boat Nut Association registration on our site for the latest Boat Nut weekly and monthly news letters and opportunities.
Copyright 2015 © Boat Nut Media, Toronto, Ontario. All rights reserved. No part of this information/publications may be stored in a retrieval system, transmitted, or reproduced in any way, including but not limited to photocopy, magnetic, or other record, without prior agreement and written permission of the publisher, Boat Nuts Media ©™ No liability is assumed with respect to the information provided.