Posts
Posts


http://boatnutmagazine.com/
BOAT RESTORATION Project #1 1998 BAYLINER 280
Boat Nut Media thought it would interesting to follow several spring start up boats this year, we have tried to select a cross section of different boats and budgets. Saving the dream! Boat Nut Media has selected a 2001- 410 Silverton Yacht (Sport Bridge),1998-280 Bayliner (Cruiser), 2001- 260 Sea Ray (Small Cruiser) and a 2010- Center Console fishing boat (Fully Rigged with Kicker, Radar, Down Riggers, all the toys)
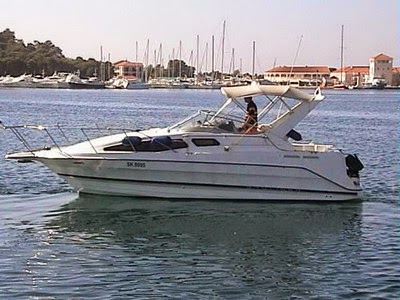
2015 Spring Project Boat 1998 Bayliner 28 Cierra
List of spring work to be completed:
1- Restore the exterior of the alpha drive
2- Replace the universal joints
3- Alpha Drive spring service - Gear Oil, Water Pump, Prop Repair, etc.
4- Gel coat repairs to hull on Port and Starboard sides and the back edge of swim platform
5- Replace hull graphics
6- Polish and wax the whole boat
7- Repaint the wiper arm components
8- Replace the haws pipe at anchor locker
9- Replace the horn
10- Replace the VHF radio
11- Repair the wood grain dash all the printing is gone
12- Replace the fridge
13- Clean up the interior like new (remove mildew stains)
14- Clean up and restore exterior upholstery
15- Spring start up on 5.7 liter motor. Fluids, paint the works.
16- Replace the dockside water fitting
17- Replace the Bimini and install tonneau cover
18- Full systems check and repair any failures
19- New bottom paint
20- New prop
20- New prop
After all work is completed there will be a sea trial and delivery to a new marina. The reason for all this work is the boat has only had 1 hour of operation time in the last 3 years. Boat Nut Media will video the boat at the start of the project, and take you through the project to completion. Work will begin late this week, we will upload videos every two days. If you have a similar projects on your boat you will see the products and procedures that are used to make this boat look like new again.
Bringing this boat back to its former pride and glory will be a lot of work. This is one of those boats that begs the question, what do you do and were do I start? Do you let it go cheap or spend the time and money and bring the boat back to a clean reliable boat. There are a lot of these types of project boats out there and not all of them are worth repairing. Why do boats end up in this condition? Well for whatever reason the owner has not had time, has lost interest in the boat, or cannot afford the boat. How do you determine which boats to save? Boats like this one reach a tipping point, and this one is right on the cusp. Another year of no use and no interest would have pushed it over the edge. This is when the cost to repair starts to exceed the value.
Here is an example of a 2010 Bayliner 260 after one season abandoned at the dock


This boat was chained to the dock with a smashed out port cabin side window all of last summer. The boat literally was frozen when Boat Nut was asked to get it to the ramp! This boat will be for sale this year would you want to be the next owner? There are always tell tail signs of a boat that was abandon or let go. For information on how to detect this type of boat check out Telemarinetech Services from Boat Nut Media.
If you get to this point you should have sold the boat the first year that you were not using it. If you do not have the budget, the time or the want to repair your boat sell it ASAP take the loss and walk away. Even one year of no use or hours really hurts a boat. This 28 Bayliner will take weeks of time and a large budget to bring it back to where it should be, the fortunate part about this story is the boat has been put away every year correctly. Boats that have been left by owners who have lost all interest rarely seek the correct seasonal services. So luckily in this case the important parts of this boat are still in good shape, the motor, the structure etc. So with the right planning this boat will be one to be proud of again. This boat is going to receive this work not for a profit but for the love of the boat.
Fixing and flipping can be a risky proposition and you can be with the boat for some time. There is no sure thing. I have seen sure fire flip boats be for sale for three years you must be prepared for this or cut your losses.
At the end the boat will either be loved again or it will be sold. No matter what the out come this boat is going to enter the second stage of its life.
If you are a do it yourself boater this 28 Bayliner would have been a great candidate for a fixer upper, and that cannot be said for too many loss of interest boats out there. Do not be fooled by the story, the boat has had no use in the last couple of years so this boat will be in better shape than a boat that has been used regularly. That is bull, the boat that has been used and maintained will ninety percent of the time the better boat. If you are considering buying a fixer upper this project will be one to follow. You will certainly get a feel for what it takes to restore a mid size cruise.
Bringing this boat back to its former pride and glory will be a lot of work. This is one of those boats that begs the question, what do you do and were do I start? Do you let it go cheap or spend the time and money and bring the boat back to a clean reliable boat. There are a lot of these types of project boats out there and not all of them are worth repairing. Why do boats end up in this condition? Well for whatever reason the owner has not had time, has lost interest in the boat, or cannot afford the boat. How do you determine which boats to save? Boats like this one reach a tipping point, and this one is right on the cusp. Another year of no use and no interest would have pushed it over the edge. This is when the cost to repair starts to exceed the value.
Here is an example of a 2010 Bayliner 260 after one season abandoned at the dock


This boat was chained to the dock with a smashed out port cabin side window all of last summer. The boat literally was frozen when Boat Nut was asked to get it to the ramp! This boat will be for sale this year would you want to be the next owner? There are always tell tail signs of a boat that was abandon or let go. For information on how to detect this type of boat check out Telemarinetech Services from Boat Nut Media.
If you get to this point you should have sold the boat the first year that you were not using it. If you do not have the budget, the time or the want to repair your boat sell it ASAP take the loss and walk away. Even one year of no use or hours really hurts a boat. This 28 Bayliner will take weeks of time and a large budget to bring it back to where it should be, the fortunate part about this story is the boat has been put away every year correctly. Boats that have been left by owners who have lost all interest rarely seek the correct seasonal services. So luckily in this case the important parts of this boat are still in good shape, the motor, the structure etc. So with the right planning this boat will be one to be proud of again. This boat is going to receive this work not for a profit but for the love of the boat.
Fixing and flipping can be a risky proposition and you can be with the boat for some time. There is no sure thing. I have seen sure fire flip boats be for sale for three years you must be prepared for this or cut your losses.
At the end the boat will either be loved again or it will be sold. No matter what the out come this boat is going to enter the second stage of its life.
If you are a do it yourself boater this 28 Bayliner would have been a great candidate for a fixer upper, and that cannot be said for too many loss of interest boats out there. Do not be fooled by the story, the boat has had no use in the last couple of years so this boat will be in better shape than a boat that has been used regularly. That is bull, the boat that has been used and maintained will ninety percent of the time the better boat. If you are considering buying a fixer upper this project will be one to follow. You will certainly get a feel for what it takes to restore a mid size cruise.
Boat Nut Media will include the costs of labor and parts for each step, giving you an idea of how much of a budget is necessary, and how to manage this type of project.
Telemarinetech information is available on our next blog and at boatnutmedia@gmail.com
To guarantee access to all of Boat Nut Magazine articles, pictures and featured services visit the official Boat Nut Magazine ©™ website. Be sure to reply to the Boat Nut Association registration on our site for the latest Boat Nut weekly and monthly news letters and opportunities.
Copyright 2015 © Boat Nut Media, Toronto, Ontario. All rights reserved. No part of this information/publications may be stored in a retrieval system, transmitted, or reproduced in any way, including but not limited to photocopy, magnetic, or other record, without prior agreement and written permission of the publisher, Boat Nuts Media ©™ No liability is assumed with respect to the information provided.